background image

4

GB

CY

NI

IE

Content

Introduction ................................. 4
Intended Use ................................ 4
General Description ...................... 5

Scope of delivery .............................. 5
Overview ......................................... 5

Technical Data .............................. 5
Notes on Safety ........................... 6

Symbols ........................................... 6
General safety instructions 
for power tools ................................. 6
Additional safety instructions .............. 9
Residual risks .................................... 9

Assembling instructions .............. 10

Attaching/removing sanding sheet .... 10

Mounting sanding fi nger

 .................. 10

Connecting/removing/emptying 
the dust collection box ..................... 11
How to connect/remove 
external dust extraction .................... 11

Operation .................................. 11

Switching on/off ............................. 11

Practical tips .............................. 12

Sanding ......................................... 12
Selection of sanding sheet ................ 12
Choosing the right sanding plate ...... 12

Cleaning/Maintenance ............... 13

Cleaning ........................................ 13

Cleaning/replacing the fi lter 

insert of the dust collection box  ........ 13

Storage ...................................... 13
Waste Disposal/
Environmental Protection ........... 13
Spare Parts/Accessories ............. 14
Trouble Shooting ........................ 15
Guarantee ................................. 16
Repair Service ............................ 17
Service-Center ............................ 17
Importer .................................... 17

Introduction

Congratulations on the purchase of your 
new device. With it, you have chosen a 
high quality product. During production, 
this equipment has been checked for qual-

ity and subjected to a fi nal inspection. The 

functionality of your equipment is therefore 
guaranteed. 

  The operating instructions constitute 

part of this product. They contain 

important information on safety, use 
and disposal.


Before using the product, familiarise 
yourself with all of the operating 
and safety instructions. Use the 
product only as described and for 

the applications specifi ed. Keep this 

manual safely and in the event that 
the product is passed on, hand over 
all documents to the third party.

Intended Use

This device is designed for dry sanding of 

wood, metal, plastic, fi llers and painted 

surfaces.

The device is not suitable for commercial 

use.
Any other use that is not explicitly ap-
proved in these instructions may result in 
damage to the equipment and represent a 
serious danger to the user.

The equipment is designed for use by 

adults. Adolescents over the age of 16 
may use the device only under supervision.

The manufacturer is not liable for damages 

caused by unspecifi ed use or incorrect 

operation.

Translation of the original EC 
declaration of conformity ............ 55
Exploded Drawing ...................... 57

Summary of Contents for 317125-1904

Page 1: ...Detail Sander PMS 160 A1 Multischleifer Originalbetriebsanleitung Detail Sander Translation of the original instructions Πολυλειαντήρας Μετάφραση των αυθεντικών οδηγιών λειτουργίας IAN 317125_1904 ...

Page 2: ...ε τις εικόνες και εξοικειωθείτε με όλες τις λειτουργίες της συσκευής Klappen Sie vor dem Lesen die Seite mit den Abbildungen aus und machen Sie sich anschließend mit allen Funktionen des Gerätes vertraut GB IE NI CY Translation of the original instructions Page 4 GR CY Μετάφραση των αυθεντικών οδηγιών λειτουργίας Σελίδα 18 DE AT CH Originalbetriebsanleitung Seite 36 ...

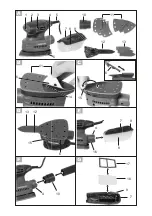
Page 3: ...1 2 4 3 5 7 8 9 7 17 18 8 7 9 9 6 16 4 4 6 10 13 14 15 15 12 12 6 10 13 11 11 6 ...

Page 4: ... During production this equipment has been checked for qual ity and subjected to a final inspection The functionality of your equipment is therefore guaranteed The operating instructions constitute part of this product They contain important information on safety use and disposal Before using the product familiarise yourself with all of the operating and safety instructions Use the product only as ...

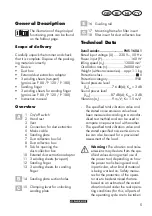
Page 5: ...ox Technical Data Detail sander PMS 160 A1 Rated input voltage U 230 V 50 Hz Power input P 160 W Idling speed n0 13000 min 1 Oscillation rate n 26000 min 1 Weight without accessories appr 1 1 kg Protection class II Protection category IPX0 Sound pressure level LpA 76 dB A KpA 3 dB Sound power level LWA 87 dB A KWA 3 dB Vibration ah 9 m s2 K 1 5 m s2 The specified total vibration value and the state...

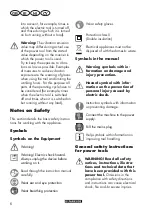
Page 6: ... Symbols Symbols on the Equipment Warning Warning Electric shock hazard Always unplug the device before working on it Read through the instruction manual carefully Wear ear and eye protection Wear breathing protection Wear safety gloves Protection class II Double insulation Electrical appliances must not be disposed of with the domestic waste Symbols in the manual Warning symbols with in formation...

Page 7: ...he cord for carrying pulling or unplugging the power tool Keep cord away from heat oil sharp edges or moving parts Damaged or entangled cords increase the risk of electric shock e When operating a power tool outdoors use an extension cord suitable for outdoor use Use of a cord suitable for outdoor use reduces the risk of electric shock f If operating a power tool in a damp location is unavoidable ...

Page 8: ...e wall socket and or remove the re chargeable battery before you change the device s settings change accessory parts or put away the power tool Such pre ventive safety measures reduce the risk of starting the power tool accidentaIly d Store idle power tools out of the reach of children and do not allow persons unfamiliar with the power tool or these instruc tions to operate the power tool Power to...

Page 9: ...er paper sack or in the filter sack or extraction system filter can self ignite under unfavourable conditions such as flying sparks caused by grinding metals Particular hazards are caused if the sanding dust is mixed with paint polyurethane residues or other chemi cal substances or if the sanded object is hot after long working periods Please check the operating manual of your vacuum cleaner whether ...

Page 10: ...ight grain size Attaching sanding sheet 1 Press both parts of the sanding sheet 11 evenly onto the sand ing plate 6 Please ensure that the sanding sheets lie flush and the holes are placed directly above the extraction openings 14 of the sanding plate 6 Removing sanding sheet 2 Pull the sanding sheet 11 from the sanding plate 6 Only perform sanding once both sanding sheets are mounted Mounting sand...

Page 11: ...rnal dust extraction 1 Push the external dust extraction adaptor 10 as far as it will go on the dust extraction connector 4 A suitable vacuum cleaner must be used e g a workshop vacuum cleaner Normal household vacu um cleaners are not intended for vacuuming sanding material This information can be found in the operating instructions of the exter nal device 2 Connect the extraction hose from a vacu...

Page 12: ...ys lead the mains cable towards the back and away from the device Clean the sanding plate before you at tach a sanding sheet Only work with sanding sheets in per fect condition to achieve good sanding results Work with low and even pressure on the hand rest 2 and even forward pressure This protects the appliance and the sanding sheet Grind rough corners and edges with the top or side edge of the s...

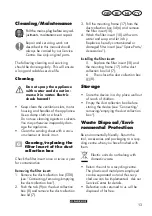
Page 13: ...llection box 2 Push the tab 9 on the dust collection box 8 and remove the dust collection box lid 7 3 Pull the mounting frame 17 from the dust collection box lid 6 and remove the filter insert 18 4 Wash the filter insert 18 with warm water and soap and let it dry Replace a heavily contaminated or damaged filter insert see Spare Parts Accessories Installing the filter insert 5 Replace the filter insert ...

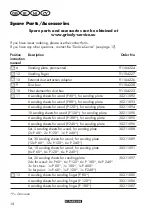
Page 14: ... 120 for sanding plate 30211094 10 sanding sheets for wood P 120 for sanding plate 30211090 6 sanding sheets for wood P 180 for sanding plate 30211095 6 sanding sheets for wood P 240 for sanding plate 30211096 Set 5 sanding sheets for wood for sanding plate 30211088 2x P 60 2x P 120 1x P 240 Set 30 sanding sheets for wood for sanding plate 30211089 12x P 60 12x P 120 6x P 240 Set 18 sanding sheets...

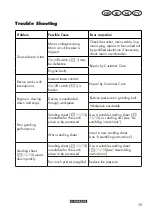
Page 15: ...tomer Care On off switch 1 is broken Engine is slowing down and stops Device is overloaded through workpiece Reduce pressure on grinding tool Workpiece unsuitable Poor grinding performance Sanding sheet 11 13 unsuitable for the work piece to be processed Use a suitable sanding sheet 11 13 or sanding disc see As sembling instructions Worn sanding sheet Insert a new sanding sheet see Assembling inst...

Page 16: ... carefully pro duced in accordance with strict quality guidelines and conscientiously checked prior to delivery The guarantee applies for all material and manufacturing defects This guarantee does not extend to cover product parts that are subject to normal wear and may there fore be considered as wearing parts e g tools sanding sheets or to cover damage to breakable parts e g switches This guaran...

Page 17: ...equate packaging and postage Attention Please send your equipment to our service branch in clean condition and with an indication of the defect Equipment sent carriage forward or by bulky goods express or other special freight will not be accepted We will dispose of your defective devices free of charge when you send them to us Service Center GB Service Great Britain Tel 800 404 7657 0 10 Min E Ma...

Page 18: ...αυτής της συσκευής ελέγ χθηκε κατά τη διάρκεια της παρα γωγής αλλά και σε τελικό έλεγχο Με τον τρόπο αυτό εξασφαλίστηκε η λειτουργικότητα της συσκευής σας Δεν αποκλείεται σε μεμονωμένες πε ριπτώσεις να βρίσκονται στη συσκευή ή στους σωλήνες κατάλοιπα νερού ή λιπαντικών Το γεγονός αυτό δεν απο τελεί ελάττωμα ή βλάβη της συσκευής και δεν είναι καθόλου ανησυχητικό Οι οδηγίες χρήσης αποτελούν αναπόσπα...

Page 19: ...ροστασίας II Είδoς προστασίας IPX0 Στάθμη ηχητικής πίεσης LpA 76 dB A KpA 3 dB Η συσκευή προορίζεται για οικιακή χρήση Δεν είναι φτιαγμένη για συνε χή επαγγελματική χρήση Η συσκευή απευθύνεται σε ενήλι κες Ανήλικοι κάτω των 16 ετών δεν επιτρέπεται να χρησιμοποιούν τη συσκευή χωρίς επίβλεψη Ο κατα σκευαστής δεν αναλαμβάνει καμία ευθύνη για φθορές που οφείλονται σε μη ορθή ή λάθος χρήση Γενική περιγ...

Page 20: ...ής θορύβου μετρήθηκαν σύμφωνα με μια τυποποιημένη διαδικασία ελέγχου και μπορούν να χρησιμοποιηθούν για τη σύ γκριση ενός ηλεκτρικού εργαλείου με ένα άλλο Η αναγραφόμενη συνολική τιμή δονήσε ων και η αναγραφόμενη τιμή εκπομπής θορύβου μπορούν να χρησιμοποιηθούν επίσης για προσωρινή εκτίμηση του φορ τίου Προειδοποίηση Οι τιμές δο νήσεων και εκπομπής θορύβου ενδέχεται να διαφέρουν από τις καθορισμέν...

Page 21: ...λον στο οποίο βρίσκονται εύφλεκτα υγρά αέρια ή σκόνες Τα ηλεκτρικά εργαλεία παράγουν σπινθήρες που μπορούν να αναφλέξουν τη σκόνη και τους ατμούς γ Να κρατάτε μακριά τα παιδιά κατά τη διάρκεια χρήσης του ηλεκτρικού εραλείουαλυσοπρίονου Εάν δεν είστε καλά συγκεντρωμένοι δεν απο κλείεται να χάσετε τον έλεγχο επί της συσκευής 2 ΗΛΕΚΤΡΙΚΗ ΑΣΦΑΛΕΙΑ α Το βύσμα του ηλεκτρικού εργαλείου πρέπει να ταιριάζε...

Page 22: ...ούς τραυματισμούς τικά ή μπερδεμένα καλώδια αυξάνουν τον κίνδυνο ηλεκτροπληξίας ε Εάν εργάζεστε με το ηλεκτρικό εργα λείο στο ύπαιθρο να χρησιμοποιείτε μόνο μπαλαντέζες που είναι κατάλ ληλες για το ύπαιθρο Η χρήση μίας μπαλαντέζας κατάλληλης για το ύπαι θρο μειώνει τον κίνδυνο ηλεκτροπληξίας ζ Εάν δεν μπορείτε να αποφύγετε τη λειτουργία του ηλεκτρικού εργαλεί ου σε υγρό περιβάλλον να χρησι μοποιεί...

Page 23: ...όλα τα κινού μενα τμήματα ή εάν έχουν σπάσει εξαρτήματα ή ορισμένα τμήματα έχουν ζημιές που εμποδίζουν την άψογη λειτουργία του ηλεκτρικού εργαλείου Δώστε να επισκευα στούν τα ελαττωματικά εξαρτήματα πριν χρησιμοποιήσετε τη συσκευή Πολλά ατυχήματα οφείλονται σε ηλε κτρικά εργαλεία που δεν έχουν συντη ρηθεί σωστά ζ Τα κοπτικά εξαρτήματα να διατηρού νται πάντα ακονισμένα και καθαρά Τα προσεγμένα κοπ...

Page 24: ...ερίπτωση που δεν χρησιμοποιεί ται προστασία για την αναπνοή b Τέμνοντα τραύματα c Bλάβες της ακοής εάν δεν χρησι Προειδοποίηση Κατά τη λεί ανση μπορεί να προκύψουν επιβλαβείς για την υγεία σκόνες π χ υλικά με αμία ντο μέταλλα ή ορισμένα είδη ξύλου οι οποίες μπορεί να αποτελούν κίνδυνο για τον χειριστή ή όσους βρίσκονται κοντά Φροντίζετε για καλό αερισμό του χώρου εργα σίας Φοράτε πάντα γυαλιά προσ...

Page 25: ...ηση Απομάκρυνση φύλλου λείανσης Καθαρίστε την πλάκα λείανσης προτού τοποθετήσετε ένα φύλ λο λείανσης Χρησιμοποιείτε μόνο φύλλα λείανσης αντίστοιχου μεγέθους Φύλλα λείανσης που εξέχουν από την πλάκα λείανσης μπο ρεί να προκαλέσουν τραυματι σμούς καθώς και μπλοκάρισμα ή σκίσιμο των φύλλων λείαν σης Η πλάκα λείανσης 6 είναι εξοπλι σμένη με μια επιφάνεια σκρατς για την γρήγορη τοποθέτηση του φύλλου λε...

Page 26: ...ά το κουτί σκό νης ώστε να εξασφαλίζετε βέλ τιστη απόδοση αναρρόφησης Συναρμολόγηση γλωττίδας λείανσης Μπορείτε να αντικαταστήσετε την προσυναρμολογημένη πλάκα λεί ανσης 6 με την γλωττίδα λείανσης 12 που περιέχεται στον παραδοτέο εξοπλισμό Αποσυναρμολόγηση πλάκας λείανσης 1 Ανοίξτε τον μοχλό σύσφιξης 15 και γυρίστε τον μέχρι τέρμα στην κατεύθυνση του φύλλου λείανσης 2 Απομακρύνετε το μπροστινό τμή...

Page 27: ...άπτορα για εξωτερική δι άταξη αναρρόφησης σκόνης 10 2 Αφαιρέστε τον αντάπτορα για εξωτερική διάταξη αναρ ρόφησης σκόνης 10 Μπορείτε να συνδέσετε τον εύ καμπτο σωλήνα αναρρόφησης μιας διάταξης αναρρόφησης σκόνης εφόσον απαιτείται απευθείας και χωρίς αντάπτορα στη συσκευή Χρήση Ενεργοποίηση και Απενερ γοποίηση Ελέγξτε η ένταση στο σημείο σύνδεσης με το δίκτυο να είναι ίδια με αυτή που αναφέρεται στο...

Page 28: ...αλά αποτελέσματα λεί ανσης Να εργάζεστε με ελάχιστη και ομοιόμορφη δύναμη πίεσης στο στήριγμα χεριού 2 και ομοι όμορφη ταχύτητα Έτσι προστα τεύετε τη συσκευή και το φύλλο λείανσης Λειαίνετε γωνίες και ακμές με τη μύτη ή την πλαϊνή ακμή του φύλ λου λείανσης Εάν η μπροστινή μύτη του τρι γωνικού φύλλου λείανσης έχει φθαρεί μπορείτε να αφαιρέσετε το φύλλο λείανσης και να το επανα τοποθετήσετε περιστρέ...

Page 29: ...ή ένα πανί Verwenden Sie keine Reinigungs bzw Lösungsmittel Sie könnten das Gerät damit irreparabel beschädigen Καθαρίζετε το φύλλο λείανσης με μια αναρροφητική σκούπα ή χτυ πάτε το Καθαρισμός Αλλαγή ενθέμα τος φίλτρου στο κουτί σκό νης Ελέγχετε το ένθεμα φίλτρου μια έως δύο φορές ανά έτος για ρύπους Απομάκρυνση ενθέματος φίλ τρου 1 Αφαιρέστε το κουτί σκόνης 8 δείτε Σύνδεση Απο μάκρυνση Άδειασμα κ...

Page 30: ...ος Παραδώστε συσκευή αξεσουάρ και συσκευασία για ανακύκλωση που σέβεται το περιβάλλον Μην πετάτε τις ηλεκτρικές συ σκευές στα σκουπίδια Παραδώστε τη συσκευή σε έναν τόπο ανακύκλωσης Τα χρησιμοποιημένα πλαστικά και μεταλλικά τμήματα μπορούν να διαχωριστούν πλήρως και να προωθηθούν για ανακύκλωση Για περισσότερες πληροφορίες απευ θυνθείτε στο κέντρο σέρβις της εταιρίας μας Τη απόρριψη των ελαττωματι...

Page 31: ...λα λείανσης για ξύλο Ρ 120 για την πλάκα λείανσης 30211094 10 Φύλλα λείανσης για ξύλο Ρ 120 για την πλάκα λείανσης 30211090 6 Φύλλα λείανσης για ξύλο Ρ 180 για την πλάκα λείανσης 30211095 6 Φύλλα λείανσης για ξύλο Ρ 240 για την πλάκα λείανσης 30211096 Σετ 5 φύλλων λείανσης για ξύλο για την πλάκα λείανσης 30211088 2x P 60 2x P 120 1x P 240 Σετ 30 φύλλων λείανσης για ξύλο για την πλάκα λείανσης 3021...

Page 32: ...ί από το κέντρο σέρβις Ο διακόπτης ενεργο απενεργοποίησης A1 είναι ελαττωματικός Ο κινητήρας γίνε ται πιο αργός και ακινητοποιείται Η συσκευή υπερφορ τώνεται από το τεμάχιο επεξεργασίας Μειώστε την πίεση στο τεμάχιο λείανσης Ακατάλληλο τεμάχιο επεξεργα σίας Κακή απόδοση λείανσης Το φύλλο λείανσης είναι ακατάλληλο για το τεμά χιο προς επεξεργασία Χρησιμοποιήστε κατάλληλο φύλλο λείανσης βλέπε Συ ναρ...

Page 33: ...γύ ησης Διάρκεια εγγύησης και νόμιμες αξι ώσεις για ελαττώματα Η διάρκεια της εγγύησης δεν επεκτεί νεται από την παροχή εγγύησης Αυτό ισχύει και για αντικαταστημένα και επι σκευασμένα εξαρτήματα Ενδεχόμενα ελαττώματα που διαπιστώνονται κατά την αγορά πρέπει να δηλωθούν αμέ σως μετά το ξεπακετάρισμα Για όλες τις επισκευές που καθίστανται απαραί τητες μετά τη λήξη της εγγύησης επι βαρύνεστε με τις σ...

Page 34: ...ρουσιάστηκε στη διεύθυνση του σέρβις μας που σας κοινοποιήθηκε Προς αποφυγή προβλημάτων παραλαβής και πρό σθετων δαπανών παρακαλούμε να χρησιμοποιήσετε μόνο τη διεύθυνση που σας κοινοποιήθηκε Σιγουρευ τείτε πως η αποστολή δεν έγινε χωρίς πληρωμή των ταχυδρομικών τελών σαν ογκώδες αντικείμενο σαν εξπρές ή με άλλο ειδικό τρόπο Στείλτε τη συσκευή μαζί με όλα τα αξεσουάρ που σας παραδόθηκαν κατά την α...

Page 35: ...l 8009 4409 E Mail grizzly lidl com cy IAN 317125_1904 εισαγωγέας Παρακαλούμε να λάβετε υπόψη σας πως η ακόλουθη διεύθυνση δεν είναι η διεύθυνση για σέρβις Επικοινωνή στε πρώτα με το πιο πάνω αναφερό μενο κέντρο εξυπηρέτησης πελατών Grizzly Tools GmbH Co KG Stockstädter Straße 20 63762 Großostheim Γερμανία www grizzly service eu ...

Page 36: ...einer Endkontrolle unterzogen Die Funktionsfähigkeit Ihres Gerätes ist somit sichergestellt Die Betriebsanleitung ist Bestandteil dieses Gerätes Sie enthält wichtige Hinweise für Sicherheit Gebrauch und Entsorgung Machen Sie sich vor der Benutzung des Gerätes mit allen Bedien und Sicherheitshin weisen vertraut Benutzen Sie das Gerät nur wie beschrieben und für die angegebenen Einsatzbereiche Bewah...

Page 37: ...rt und der angegebene Geräusch emissionswert können auch zu einer vorläufigen Einschätzung der Belastung verwendet werden Warnung Die Schwingungs und Geräuschemissionen können wäh rend der tatsächlichen Benutzung des Elektrowerkzeugs von den Allgemeine Beschreibung Die Abbildung der wichtigs ten Funktionsteile finden Sie auf der Ausklappseite Lieferumfang Packen Sie das Gerät aus und kontrollieren S...

Page 38: ...d Weise in der das Elektrowerkzeug verwendet wird insbesondere welche Art von Werkstück bearbeitet wird Es ist notwendig Sicherheitsmaßnahmen zum Schutz des Bedieners festzule gen die auf einer Abschätzung der Schwingungsbelastung während der tatsächlichen Benutzungsbe dingungen beruhen hierbei sind alle Anteile des Betriebszyklus zu berücksichtigen beispielsweise Zei ten in denen das Elektrowerkz...

Page 39: ...der unbeleuchtete Arbeitsbereiche können zu Unfällen führen b Arbeiten Sie mit dem Elektrowerkzeug nicht in explosionsgefährdeter Umgebung in der sich brennbare Flüssigkeiten Gase oder Stäube befin den Elektrowerkzeuge erzeu gen Funken die den Staub oder die Dämpfe entzünden können c Halten Sie Kinder und an dere Personen während der Benutzung des Elek trowerkzeuges fern Bei Ablenkung können Sie di...

Page 40: ...en Sie eine unbe absichtigte Inbetriebnah me Vergewissern Sie sich dass das Elektrowerkzeug ausgeschaltet ist bevor schen Schlag wenn Ihr Körper geerdet ist c Halten Sie Elektrowerk zeuge von Regen oder Nässe fern Das Eindringen von Wasser in ein Elektrowerk zeug erhöht das Risiko eines elektrischen Schlages d Zweckentfremden Sie die Anschlussleitung nicht um das Elektrowerkzeug zu tragen aufzuhän...

Page 41: ...Kleidung fern von sich bewegenden Teilen Lockere Kleidung Schmuck oder lange Haare können von sich bewegenden Teilen erfasst wer den g Wenn Staubabsaug und auffangeinrichtungen montiert werden können sind diese anzuschließen und richtig zu verwenden Verwendung einer Staubabsau gung kann Gefährdungen durch Staub verringern h Wiegen Sie sich nicht in falscher Sicherheit und set zen Sie sich nicht üb...

Page 42: ...chen erlauben keine sichere Bedienung und Kontrolle des Elektrowerkzeugs in unvorherge sehenen Situationen gefährlich und muss repariert werden c Ziehen Sie den Stecker aus der Steckdose und oder entfernen Sie einen abnehmbaren Akku be vor Sie Geräteeinstellun gen vornehmen Einsatz werkzeugteile wechseln oder das Elektrowerkzeug weglegen Diese Vorsichts maßnahme verhindert den unbeabsichtigten Sta...

Page 43: ...chtun gen oder Schraubstock festge haltenes Werkstück ist sicherer gehalten als mit Ihrer Hand Verwenden Sie das Elek trowerkzeug nur für den Trockenschliff Schaben Sie keine angefeuchteten Materialien Das Eindringen von Wasser in ein Elektrogerät erhöht das Risiko eines elektri schen Schlages Vermeiden Sie eine Über hitzung des Schleifgutes und des Schleifers Es be steht Brandgefahr Das Werkstück...

Page 44: ...etzstecker Gefahr durch elektrischen Schlag und das Schleifgut nach langem Arbeiten heiß ist Beachten Sie auch die Betriebs anleitung Ihres Staubsaugers ob dieser für das Aufsaugen von Schleifspänen geeignet ist Schließen Sie das Gerät an eine Steckdose mit Fehlerstrom Schutzeinrichtung RCD Residual Current Device mit einem Be messungsfehlerstrom von nicht mehr als 30 mA an Wenn die Anschlussleitu...

Page 45: ...wenn beide Schleifblätter montiert sind Schleifzunge montieren Sie können die vormontierte Schleifplatte 6 gegen die im Lieferumfang enthaltene Schleifzunge 12 austauschen Schleifplatte demontieren 1 Öffnen Sie den Spannhebel 15 und drehen Sie ihn bis zum An schlag in Richtung Schleifblatt 2 Nehmen Sie den vorderen Teil der Schleifplatte 6 ab Schleifzunge einsetzen 3 Führen Sie die Schleifzunge 12...

Page 46: ...eßen Sie den Saugschlauch eines Staubsaugers nicht im Liefer umfang enthalten an den Adapter zur externen Staubabsaugung 10 an Achten Sie darauf dass die Staubabsaugung für den zu bear beitenden Werkstoff geeignet ist Externe Staubabsaugung ab nehmen 1 Ziehen Sie den Saugschlauch vom Adapter zur externen Staubabsaugung 10 ab 2 Ziehen Sie den Adapter zur externen Staubabsaugung 10 ab Sie können den...

Page 47: ...uflage 2 und gleichmäßigem Vorschub So schonen Sie Gerät und Schleifblatt Schleifen Sie Ecken und Kanten mit der Spitze oder seitlichen Kante des Schleif blattes Ist die vordere Spitze des dreieckigen Schleifblattes abgenutzt kann das Schleifblatt abgenommen und gedreht wieder aufgesetzt werden Schleifen Sie mit dem selben Schleif blatt nicht unterschiedliche Materialien z B Metall und danach Holz ...

Page 48: ...el 7 ab 3 Ziehen Sie den Halterahmen 17 am Staubboxdeckel 7 ab und nehmen Sie die Filtereinlage 18 heraus 4 Waschen Sie die Filtereinlage 18 mit lauwarmem Wasser und Seife aus und lassen Sie sie trocknen Tauschen Sie eine stark verschmutzte oder beschädigte Filtereinlage aus sie he Ersatzteile Zubehör Filtereinlage einsetzen 5 Setzen Sie die Filtereinlage 18 und den Halterahmen 17 in den Staub box...

Page 49: ...blätter für Holz P 120 für Schleifplatte 30211094 10 Schleifblätter für Holz P 120 für Schleifplatte 30211090 6 Schleifblätter für Holz P 180 für Schleifplatte 30211095 6 Schleifblätter für Holz P 240 für Schleifplatte 30211096 Set 5 Schleifblätter für Holz für Schleifplatte 30211088 2x P 60 2x P 120 1x P 240 Set 30 Schleifblätter für Holz für Schleifplatte 30211089 12x P 60 12x P 120 6x P 240 Set...

Page 50: ...vice Center Ein Ausschalter 1 defekt Motor wird lang samer und bleibt stehen Gerät wird durch Werk stück überlastet Druck auf Schleifwerkzeug verringern Werkstück ungeeignet Schlechte Schleifleistung Schleifblatt 11 13 für das zu bearbeitende Werk stück ungeeignet Geeignetes Schleifblatt 11 13 einsetzen siehe Montage Schleifblatt abgenutzt Neues Schleifblatt einsetzen siehe Montage Schleifblatt 11 ...

Page 51: ...en gemeldet werden Nach Ablauf der Garantiezeit anfallende Reparaturen sind kostenpflichtig Garantieumfang Das Gerät wurde nach strengen Qualitäts richtlinien sorgfältig produziert und vor Anlieferung gewissenhaft geprüft Die Garantieleistung gilt für Material oder Fabrikationsfehler Diese Garantie erstreckt sich nicht auf Produktteile die normaler Abnutzung ausgesetzt sind und daher als Verschleiß...

Page 52: ... rantie unterliegen gegen Berechnung von unserer Service Niederlassung durchführen lassen Sie erstellt Ihnen gerne einen Kos tenvoranschlag Wir können nur Geräte bearbeiten die ausreichend verpackt und frankiert einge sandt wurden Achtung Bitte senden Sie Ihr Gerät gerei nigt und mit Hinweis auf den Defekt an unsere Service Niederlassung Nicht angenommen werden unfrei per Sperrgut Express oder mit...

Page 53: ...53 ...

Page 54: ...N 62841 1 2015 EN 62841 2 4 2014 EN 55014 1 2017 EN 55014 2 2015 EN 61000 3 2 2014 EN 61000 3 3 2013 EN 62321 1 2013 Die alleinige Verantwortung für die Ausstellung dieser Konformitätserklärung trägt der Hersteller Grizzly Tools GmbH Co KG Stockstädter Straße 20 63762 Großostheim Germany 30 10 2019 Der oben beschriebene Gegenstand der Erklärung erfüllt die Vorschriften der Richtlinie 2011 65 EU de...

Page 55: ...ve been applied EN 62841 1 2015 EN 62841 2 4 2014 EN 55014 1 2017 EN 55014 2 2015 EN 61000 3 2 2014 EN 61000 3 3 2013 EN 62321 1 2013 This declaration of conformity is issued under the sole responsibility of the manufacturer Grizzly Tools GmbH Co KG Stockstädter Straße 20 D 63762 Großostheim Germany 30 10 2019 The object of the declaration described above satisfies the provisions of Directive 2011 ...

Page 56: ...21 1 2013 Η αποκλειστική ευθύνη για την έκδοση της παρούσας δήλωσης συμμόρφωσης ανήκει στον κατασκευαστή Christian Frank υπεύθυνος τεκμηρίωσης Grizzly Tools GmbH Co KG Stockstädter Straße 20 D 63762 Großostheim Germany 30 10 2019 Το ανωτέρω περιγραφόμενο αντικείμενο της δήλωσης πληροί τις προδιαγραφές της Οδηγίας 2011 65 ΕΕ του Ευρωπαϊκού Κοινοβουλίου και του Συμβουλίου της 8ης Ιουνίου 2011 για το...

Page 57: ...57 Explosionszeichnung Exploded Drawing Επί μέρoυς σχεδιαγράμματα informativ informative ενημερωτικό PMS 160 A1 ...

Page 58: ...ZZLY TOOLS GMBH CO KG Stockstädter Straße 20 DE 63762 Großostheim GERMANY Last Information Update Έκδοση των πληροφοριών Stand der Informationen 09 2019 Ident No 72037243092019 GB IE NI CY IAN 317125_1904 ...

Reviews: