background image

40

FR

BE

•  Pulvérisez ou frottez les lames de 

broyage à l’aide d’une huile biodégra-
dable.

•  Nettoyez les poignées sales à l’aide 

d’un chiffon humide.

•  Contrôlez avant chaque utilisation si 

l’appareil présente des vices évidents 
tels que des pièces détachées, usées 

ou endommagées. Vérifiez si tous les 

écrous, les boulons et les vis sont bien 
serrés. 

•  Contrôlez si les protections et les dispo-

sitifs de protection sont endommagés 
et s’ils sont correctement mis en place. 
Remplacez-les le cas échéant.

Remplacer les lames de 
broyage

L’appareil comprend quatre lames de 
broyage qui se remplacent par paire sans 
problème.

  Remplacez toujours les 

deux paires de lames 

en même temps afin 

d’éviter l’endommage-

ment de l’appareil dû à 

un déséquilibre.

  Éteignez l’appareil, débran-

chez la fiche électrique et 

attendez que les lames de 

broyage (7) s’arrêtent com-

plètement.

E

  1.   Retirez la goupille du boulon 

(15) et retirez la partie exté-
rieure de la lame de broyage (7) 
de l’arbre d’entraînement (16).


2.  Dévissez l’écrou autobloquant de 

la vis à six pans (17) (clé de 13) 
et retirez la partie intérieure de 

la lame de broyage (7) de l’arbre 
d’entraînement (16).


3.  Nettoyez l’arbre d’entraînement 

avec de l’huile biodégradable.

 4. 

Glissez les nouvelles lames de 
broyage (7) sur l’arbre d’entraîne-
ment (16) de sorte que les perfora-
tions du porte-lames correspondent 
aux trous sur l’arbre d’entraînement 
(16).

  Vérifiez si le sens de rotation des lames 

de broyage est correct. Le bord en 
biais des lames de broyage (7) doit 
être orienté dans le sens de rotation des 
lames de broyage (7) vers le sol.


Le sens de rotation est indiqué par une 

flèche sur le carter de l’appareil.


5.  nsérez la vis à six pans (17) dans 

la perforation le plus près de la 
transmission (8) et vissez un nou-
vel écrou autobloquant.


6.  Poussez le boulon (15) dans la 

perforation extérieure et sécuri-
sez-le avec la goupille.


Installez la goupille du boulon 
(

15) de sorte qu‘elle se fer-

me dans le sens contraire du 
sens de rotation des lames de 
broyage 


Transport

L‘appareil dispose d‘une position de trans-
port et de trois positions de travail

1.  D‘une main, tenez fermement l‘appareil 

par le longeron central (3)

2.  Pour modifier la position, détachez le 

verrouillage du châssis en tirant sur 
l‘anneau (18).

Summary of Contents for 324395 1907

Page 1: ...ructions d origine Tuincultivator Vertaling van de originele gebruiksaanwijzing Zahradn kultiv tor P eklad origin ln ho provozn ho n vodu Gartenkultivator Tiller Bineuse lectrique PGK 1400 A1 Kultywat...

Page 2: ...van het apparaat Przed przeczytaniem prosz roz o y stron z ilustracjami a nast pnie prosz zapozna si z wszystkimi funkcjami urz dzenia P ed ten m si otev ete stranu s obr zky a potom se seznamte se v...

Page 3: ...A D E B 8 9 10 11 7 4 4 5 6 3 3 11 11 10 2 1 1 2 C 2 12 13 14 11 11 11 11 15 17 16 7 7 18 19 20 3 15...

Page 4: ...am Ger t f hren und eine ernsthafte Gefahr f r den Benutzer darstellen Der Benutzer ist f r Unf lle oder Sch den an anderen Men schen oder deren Eigentum verantwortlich Das Ger t ist zum Gebrauch durc...

Page 5: ...Arbeitsposition Funktionsbeschreibung Der handgef hrte Gartenkultivator ist mit einem wartungsfreien Elektromotor und einem Getriebe mit lbadschmierung aus gestattet Als Schneideinrichtung besitzt das...

Page 6: ...d solche in denen es zwar einge schaltet ist aber ohne Belastung l uft Sicherheitshinweise Dieser Abschnitt behandelt die grundle genden Sicherheitsvorschriften bei der Arbeit mit dem Gartenkultivator...

Page 7: ...tigen F higkeiten oder mangels Erfahrung und oder mangels Wissen benutzt zu werden es sei denn sie werden durch eine f r ihre Sicherheit zu st ndige Person beaufsichtigt oder erhalten von ihr Anweisun...

Page 8: ...um sofortigen Verlust des Garantieanspruches Arbeiten mit dem Ger t Halten Sie F e und H nde beim Arbeiten insbesondere bei der Inbetriebnahme von den Hackmessern fern Es besteht Verletzungsgefahr Bea...

Page 9: ...n Unter grund wie Fliesen oder Treppen Entfernen Sie regelm ig Pflan zen und Wurzelreste im Bereich der Antriebswelle Sie vermei den damit eine berlastung und Besch digung des Ger tes Achten Sie auf b...

Page 10: ...r Bedienungsperson Wird die Netzanschlussleitung w hrend des Gebrauchs besch digt tren nen Sie sie sofort vom Netz Ber hren Sie auf keinen Fall die Netzanschlussleitung solange der Netzstecker nicht g...

Page 11: ...vor die Maschine bedient wird Montageanleitung Ziehen Sie vor allen Arbeiten an dem Ger t den Netzste cker Achten Sie bei der Montage darauf dass die Netzan schlussleitung 2 nicht einge klemmt wird un...

Page 12: ...des Ge r tes drehen sich die Hackmesser 7 noch f r einige Sekunden nach Ber hren Sie die rotie renden Hackmesser 7 nicht Es besteht Verlet zungsgefahr Arbeitshinweise Halten Sie das Ger t w hrend der...

Page 13: ...L sungsmittel Entfernen Sie anhaftende Boden und Schmutzreste an Hackmessern 7 Antriebswelle 16 Ger teoberfl che und L ftungsschlitzen mit einer B r ste oder mit einem trockenen Lappen Spr hen oder r...

Page 14: ...e die Siche rungsklammer des Bolzens 15 so dass sie gegen die Laufrichtung der Hackmesser schlie t Transport Das Ger t besitzt eine Transport Position und drei Arbeitspositionen 1 Halten Sie das Ger t...

Page 15: ...werden Fragen Sie hierzu unser Service Center Zur Entsorgung der Verpackung ge ben Sie den Karton zum Papierm ll Kunststoffteile f hren Sie dem Dualen System zu Ersatzteile Zubeh r Ersatzteile und Zub...

Page 16: ...pa cken gemeldet werden Nach Ablauf der Garantiezeit anfallende Reparaturen sind kostenpflichtig Garantieumfang Das Ger t wurde nach strengen Qualit ts richtlinien sorgf ltig produziert und vor Anlief...

Page 17: ...tie unterliegen gegen Berechnung von unserer Service Niederlassung durchf hren lassen Sie erstellt Ihnen gerne einen Kostenvoranschlag Wir k nnen nur Ger te bearbeiten die ausreichend verpackt und fra...

Page 18: ...ard for the operator The operator or user of the tool is respon sible for any damage or injury caused to other persons or property This tool is intended for use by adults Children and persons unfamili...

Page 19: ...14 Start handle 15 Bolt with securing clip 16 Drive shaft 17 Nut self securing hexagonal bolt 18 Chassis lock 19 Transport position 20 Working position Technical data Tiller PGK 1400 A1 Motor power i...

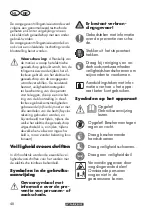
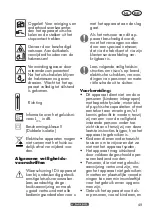
Page 20: ...rying out maintenance and cleaning work on the tool to avoid injury from cuts Help symbols with informa tion on improving tool han dling Symbols on the implement Caution Read the user manual Caution P...

Page 21: ...ally children or pets are close by Remember the user is responsi ble for accidents involving other people or their property Familiarise yourself with han dling the tool and pay attention to all possib...

Page 22: ...the tool Always hold the tool securely in both hands while working with it Make sure that the grips are dry and clean Be careful while mov ing backwards danger of trip ping over Take particular care w...

Page 23: ...service centre to carry out any work not listed in the user manual Keep the tool in a dry place out of children s reach Be careful in handling the tool Keep the tines sharp and clean to improve its w...

Page 24: ...persons with medical implants consult their doctor and the manufacturer of their medical implant before operating the machine Assembly instructions Always disconnect the tool from the mains before con...

Page 25: ...will continue to turn for a few seconds after the tool has been switched off Do not touch the ro tating tines 7 injury hazard Operating instructions Always keep a firm grip on the tool with booth hand...

Page 26: ...h as loose worn or damaged parts before using it Check that all nuts bolts and screws are tight Check the covers and guards for damage and correct fit Change them if necessary E Changing the tines The...

Page 27: ...r the tool in plastic bags as moisture may form Loosen the quick release lever 11 and fold the handlebars together as illustrated Make sure that the cable does not become jammed Do not use the tool wi...

Page 28: ...xpiry of the guarantee period are chargeable Guarantee Cover The equipment has been carefully pro duced in accordance with strict quality guidelines and conscientiously checked prior to delivery The g...

Page 29: ...ied out by our ser vice branch which will be happy to issue a cost estimate for you We can handle only equipment that has been sent with adequate packaging and postage Attention Please send your equip...

Page 30: ...i sateur L op rateur ou l utilisateur est responsable des accidents ou des dommages caus s d autres personnes ou aux biens de ces derni res L appareil est destin tre utilis par des adultes L utilisati...

Page 31: ...es Apercu A 1 Poign e 2 C ble d alimentation 3 Longeron central 4 Longeron inf rieur 5 Ch ssis 6 Roue 7 Lame de broyage 8 Transmission 9 Carter moteur 10 Serre c bles 11 Vis tendeur rapide rondelle C...

Page 32: ...r es pendant lesquelles il est certes allu m mais ne subit aucune charge Consignes de s curit Ce chapitre traite des consignes de s curit l mentaires respecter imp rativement lors de l utilisation de...

Page 33: ...et appa reil Si le c ble d alimentation de cet appareil est endommag il doit tre remplac par un c ble d alimentation sp cial qui est disponible chez le fabricant ou aupr s de son service apr s vente V...

Page 34: ...position de fonctionne ment afin d viter toute blessure par coupure Effectuez un contr le vue avant chaque utilisation de l ap pareil N utilisez pas l appareil si les dispositifs de s curit par ex le...

Page 35: ...faites demi tour avec la machine ou si quelqu un s ap proche de vous Si le soc du sarcleur est blo qu par un corps h t rog ne teignez l appareil et retirez la prise de courant Retirez le corps h t rog...

Page 36: ...essayez pas de r parer l ap pareil vous m me moins que vous ne disposiez des qualifica tions requises Confiez tous les travaux qui ne sont pas d taill s dans notre mode d emploi notre centre de servi...

Page 37: ...a Coupures b Dommages affectant l ou e si aucune protection d ou e appro pri e n est port e c Ennuis de sant engendr s par les vibrations affectant les bras et les mains si l appareil est utili s pen...

Page 38: ...ez ce qu il ne soit pas en contact avec d autres objets et tenez le fer mement deux mains C 1 Branchez la rallonge la fiche lectrique de l appareil 2 Pour le syst me anti traction for mez une boucle a...

Page 39: ...refroidi Nettoyage entretien Confiez les travaux qui ne sont pas d taill s dans notre mode d emploi notre centre de services Utilisez unique ment des pi ces originales teignez l appareil avant tous le...

Page 40: ...la vis six pans 17 cl de 13 et retirez la partie int rieure de la lame de broyage 7 de l arbre d entra nement 16 3 Nettoyez l arbre d entra nement avec de l huile biod gradable 4 Glissez les nouvelle...

Page 41: ...ion de l appareil des acces soires et de l emballage Les appareils ne peuvent pas tre jet s dans la poubelle d chets m nagers Le produit est recyclable est soumis une responsabilit largie du fa brican...

Page 42: ...ssance du vendeur et que ce dernier a accept Article L217 16 du Code de la consommation Lorsque l acheteur demande au vendeur pendant le cours de la garantie commer ciale qui lui a t consentie lors de...

Page 43: ...esquels une mise en garde est mise doivent abso lument tre vit s Le produit est con u uniquement pour un usage priv et non pour un usage industriel En cas d emploi impropre et incorrect de recours la...

Page 44: ...sent s durant cette p riode de trois ans et que la nature du manque et la mani re dont celui ci est apparu soient explicit s par crit dans un bref courrier Si le d faut est couvert par notre garantie...

Page 45: ...e marchandises encombrantes envoi express ou autre taxe sp ciale Veuil lez renvoyer l appareil y compris tous les accessoires livr s lors de l achat et prenez toute mesure pour avoir un emballage de t...

Page 46: ...aat leiden en een ernstig risico voor de gebruiker vormen De gebruiker is verantwoordelijk voor onge vallen of schade die aan andere personen of aan hun eigendom toegebracht wordt Het apparaat is best...

Page 47: ...n onderstaande beschrijving Overzicht A 1 Grijpstang 2 Netsnoer 3 Centrale stang 4 Onderste stang 5 Onderstel 6 Wiel 7 Hakmes 8 Aandrijving 9 Motorbehuizing 10 Kabelklem 11 Schroef snelspanner dichtin...

Page 48: ...met tijden tijdens de welke het elektrische gereedschap uitgeschakeld is en tijden tijdens dewelke het weliswaar ingescha keld is maar zonder belasting func tioneert Veiligheidsvoorschriften In dit ho...

Page 49: ...rdt moet het vervangen worden door een speciaal netsnoer dat via de fabrikant of via zijn klantenserviceafdeling ver krijgbaar is Lees volgende veiligheidsin structies om risico s op brand elektrische...

Page 50: ...bruik het apparaat niet als veiligheidsinrichtingen bijv inschakelblokkering of veilig heidsafdekking delen van de snij inrichting of bouten ontbre ken versleten of beschadigd zijn Controleer in het b...

Page 51: ...elt u het apparaat uit en trekt u de netstekker uit Verwijder het vreemde voorwerp bijvoor beeld wortel voordat u het ap paraat terug in gebruik neemt Werk niet met een bescha digd onvolledig of zonde...

Page 52: ...enter uitvoeren Bewaar het apparaat op een droge plaats en buiten het bereik van kinderen Onderhoud het apparaat zorg vuldig Houd de messen scherp en proper zodat u beter en veili ger kunt werken Leef...

Page 53: ...uikt wordt of niet zoals re glementair voorgeschreven be heerd en onderhouden wordt Waarschuwing Dit elektrische gereedschap produceert tij dens de werking een elektro magnetisch veld Dit veld kan in...

Page 54: ...anden C 1 Sluit de verlengkabel aan op het netsnoer van het apparaat 2 Voor de snoerontlasting vormt u met het uiteinde van de verleng kabel een lus en hangt deze in de snoerontlasting 12 3 Sluit het...

Page 55: ...en reinigingswerkzaamheden het apparaat uit trek de stekker uit het stopcontact en wacht tot de hakmessen tot stilstand gekomen zijn Voer de volgende onderhouds en reini gingswerkzaamheden regelmatig...

Page 56: ...nt van het hakmes 7 moet in looprichting van het hakmes 7 naar de grond gericht zijn De looprichting van het hakmes is met een pijl op de behuizing van het apparaat gemarkeerd 5 Steek de zeskantschroe...

Page 57: ...shoudelijk afval verwijderd worden Breng het afgedankte apparaat naar een recyclagecentrum De gebruikte kunststof en metaalonderdelen kunnen afzonderlijk ingezameld en gerecycleerd worden Raad pleeg o...

Page 58: ...iddellijk na het uitpakken gemeld worden Na het verstrijken van de garantieperiode tot stand komende reparaties worden tegen verplichte betaling van de kosten uitge voerd Omvang van de garantie Het ap...

Page 59: ...soires in te zenden en voor een voldoende veilige transport verpakking te zorgen Reparatieservice U kunt reparaties die niet onder de ga rantie vallen tegen berekening door ons servicefiliaal laten do...

Page 60: ...acznie okre lony jako dozwolony w niniejszej instrukcji obs ugi mo e spowodowa uszkodzenie urz dze nia i stanowi powa ne zagro enie dla u ytkownika Osoba obs uguj ca urz dzenie lub jego u ytkownik odp...

Page 61: ...gnia uruchamiaj ca 15 Bolec z pa kiem zabezpieczaj cym 16 Wa nap dowy 17 Nakr tka samokontruj ca ruba z bem sze ciok tnym 18 Blokada stela a podwozie 19 Pozycja transportowa 20 Pozycja robocza Opis dz...

Page 62: ...ie elektryczne jest wy czone b d jest w czone ale pracuje bez ob ci enia Zasady bezpiecze stwa Ten rozdzia zawiera podstawowe prze pisy bezpiecze stwa obowi zuj ce przy pracy z kultywatorem ogrodowym...

Page 63: ...zyta nast puj ce wskaz wki w celu unikni cia szk d osobowych i rzeczowych Czynno ci przygotowawcze To urz dzenie nie jest prze znaczone do u ywania przez osoby o ograniczonych zdolno ciach fizycznych...

Page 64: ...zpieni b d je eli elementy te s zu yte albo uszkodzone W szczeg lno ci sprawd czy nie s uszkodzone przew d siecio wy oraz d wignia w cznika W celu wyeliminowania obja w w niewywa enia uszkodzo ne narz...

Page 65: ...gody producenta urz dzeniem Nigdy nie pra cuj urz dzeniem z uszkodzo nymi lub brakuj cymi elemen tami zabezpieczaj cymi Nie przeci aj urz dzenia Pracuj tylko w podanym zakre sie mocy Nie u ywaj maszyn...

Page 66: ...narz dzia by y zawsze ostre i czyste umo liwi Ci to wydaj niejsz i bezpieczniejsz prac Przestrzegaj przepis w konser wacji Bezpiecze stwo elektryczne Uwaga Urz dzenia wolno u ywa tylko z nieuszkodzo...

Page 67: ...nie elektryczne wytwarza w czasie pracy pole elektro magnetyczne Pole to mo e w okre lonych warunkach wp ywa na aktywne lub pasywne implantaty me dyczne Aby zmniejszy niebezpiecze stwo doznania powa n...

Page 68: ...przed si ci gu uformuj z jego ko ca p tl i zawie j w zaczepie odci a j cym 12 3 Przy cz urz dzenie do sieci elek trycznej 4 Aby w czy urz dzenie wci nij przy cisk odblokowuj cy 13 w uchwycie a nast p...

Page 69: ...egularnie wykonuj wymienione poni ej czynno ci konserwacyjne Zapewni to d ug niezawodn prac urz dzenia Og lne prace z zakresu oczyszczania i konserwacji Nie spryskuj urz dze nia wod szczeg lnie wod po...

Page 70: ...no a pokrywa y si z otworami na wa ku nap dowym 16 Zwr uwag na prawid owy kieru nek obrotu no y piel cych ci ta kraw d no y rozdrabniaj cych 7 musi by skierowana zgodnie z kie runkiem pracy no y 7 w...

Page 71: ...a kowanie do zgodnej z przepisami o ochro nie rodowiska naturalnego utylizacji Urz dze elektrycznych nie nale y wyrzuca razem z odpadami do mowymi Oddaj urz dzenie w punkcie utylizacji odpad w U yte w...

Page 72: ...bezzw ocznie po rozpakowaniu Naprawy przypadaj ce po up ywie okresu gwarancji s odp atne Zakres gwarancji Urz dzenie wyprodukowano z zacho waniem staranno ci zgodnie z surowymi normami jako ciowymi i...

Page 73: ...ie i zadbanie o wystarczaj co bezpieczne opakowanie Serwis naprawczy Naprawy kt re nie s obj te gwarancj mo na zleci odp atnie w naszym oddziale serwisowym Serwis sporz dzi Pa stwu kosztorys naprawy P...

Page 74: ...n nebezpe pro u ivatele Obsluhovatel anebo u ivatel je zodpov d n za nehody anebo kody u jin ch lid anebo na jejich majetku Tento n stroj je ur en pro pou it skrze dosp l osoby D ti jako i osoby kter...

Page 75: ...r kem 16 hnac h del 17 matice samozaji ovac estihrann roub 18 blokov n podvozek 19 p epravn poloha 20 pracovn poloha Technick data Zahradn kultiv tor PGK 1400 A1 P kon motoru P 1400 W Jmenovit vstupn...

Page 76: ...u z str ku Noste p i ist c ch a dr bo v ch prac ch ochrann ru kavice abyste se vyvarovali ezn m poran n m Informa n zna ky s informa cemi pro lep zach zen s n strojem Symboly na n stroji Pozor P e st...

Page 77: ...m kolen m D tem nebo jin m osob m kter neznaj n vod k obsluze bezpodm ne n zabra te v po u v n p stroje Na z klad p slu n ch ustanoven m e b t stanoven minim ln v k obslu n ho person lu Nikdy nepo vej...

Page 78: ...ho sv tla anebo p i dobr m osv tlen Do pr ce se dejte rozumn Ne pracujte s t mto n strojem jste li unaveni anebo nesoust ed ni anebo po po it alkoholu ane bo tabletek Dejte si v dy v as pracovn p est...

Page 79: ...troj kdy odstra ujete kousky p dy a sti rostlin kdy se tento n stroj nepou v p i v ech dr b sk ch a isti c ch prac ch kdy je p ipojovac veden po kozen anebo zamotan kdy tento n stroj p i pr ci na raz...

Page 80: ...a to abys te vyt hli z str ku ze z suvky Chra te kabel p ed horkem olejem a ostr mi hranami Zapojte p stroj do z suvky s proudov m chr ni em Residu al Current Device s reak n m proudem nep esahuj c 30...

Page 81: ...la A 1 3 a upevn te je rychloup na em A 11 P ed spu t n m je nutn uv st podvozek A 5 do pracov n polohy Viz kapitola P en en Dbejte p ed zapnut m na to aby se tento n stroj nedot kal dn ch p edm t a d...

Page 82: ...prave n k provozu i t n dr ba Pr ce kter nejsou popsan v tomto n vodu nechte vykonat na im servisn m centrem Pou ijte pouze origin ln d ly Vypn te tento n stroj p ed v emi dr bov mi a ist c mi pr cemi...

Page 83: ...estihrannou hlavou 17 OK 13 a st hn te vnit n st prosek vac ho no e 7 z hnac ho h dele 16 3 O ist te hnac h del biologic k m olejem 4 Nov prosek vac no e 7 nasu te na hnac h del 16 tak aby se otvory...

Page 84: ...o n stroj jeho p slu enstv a obal k recyklaci s ohledem na ivon prost ed Elektrick n stroje nepat do dom c ho odpadu Odevzdejte tento n stroj na m st pro re cyklaci odpad Pou it plastov a kovov d ly l...

Page 85: ...m rnic a p ed dod n m byl sv domit zkontrolov n Z ru n oprava se vztahuje na materi lov nebo v robn vady Tato z ruka se net k d l v robku kter jsou vystaveny norm l n mu opot eben a lze je pova ovat z...

Page 86: ...na em servisu oproti z tov n R di v m p iprav me p edb n odhad n klad M eme zpracov vat jen ty p stroje kter byly dostate n zabalen a odesl ny vy placen Pozor Pros m p stroj za lete na emu auto rizov...

Page 87: ...a m e vies ku kod m na n stroji a m e predstavova v ne ne bezpe enstvo pre pou vate a Obsluhovate alebo pou vate je zodpo vedn za nehody alebo kody u in ch ud alebo na ich majetku Tento n stroj je ur...

Page 88: ...dr adlo 5 Posuvn skelet 6 Koleso 7 N seka ky 8 Prevodovka 9 Kryt motora 10 Svorka na k ble 11 Skrutka r chloup na podlo ka C 12 Od ah enie od ahu 13 Uvo ovacie tla idlo 14 tartovacia p ka 15 Kol k s...

Page 89: ...o z kladn ch bez pe nostn ch predpisoch pri pr ci s t mto n strojom Symboly v n vode V stra n zna ky s dajmi pre zabr nenie kod m na zdrav ale bo vecn m kod m Existuje nebezpe enstvo pop lenia sa Pr k...

Page 90: ...r tane det s obmedzen mi fyzick mi senzorick mi alebo du evn mi schopnos ami alebo s nedostatkom sk senost a alebo s nedostatkom vedomost iba v tomto pr pade ke bude na ich bezpe nos dohliada kompeten...

Page 91: ...r sa dod vaj a odpor aj v robcom Pou itie cudz ch dielov vedie k okam itej strate n roku na garanciu Pr ca s n strojom Udr ujte nohy a ruky pri pr ci vzdialene od no ov moty ky obzvl pri uveden do pre...

Page 92: ...i na a k Rocky a k alebo podobn Podlahy Preru enie pr ce Pozor Po ka dom vypnutiu n stroja sa no e moty ky e te po nieko ko sek nd ot aj Po kajte ne sa no e moty ky zastavia Existuje nebezpe enstvo po...

Page 93: ...predl ovacieho k bla mus by chr nen pred striekaj cou vodou mus by zhotoven z gumy alebo mus by potiah nut gumou Pou vajte iba pre dl ovacie k ble ktor s ur en pre vonkaj ie pou itie a ktor s pr slu...

Page 94: ...mi k blov mi svorkami 10 Nasa te svorku na k ble 10 na hornom konci strednej ty e dr adla 3 Zatla te svorku na k ble 10 na stredn ty dr adla 3 a nasu te svorku na k ble 10 na okr hlu as strednej ty e...

Page 95: ...ajte alebo ne ahajte tento n stroj s be iacim motorom Naddvihnite tento n stroj pri transporte nad tuh mi povrchmi ako s dla dice alebo schody Ve te tento n stroj r chlos ou ch dze po pokia mo no rovn...

Page 96: ...en a korektn ho usadenia Pr padne ich vyme te V mena no ov Tento n stroj je vybaven tvormi no mi ktor mo no bezprobl movo po p roch vymeni Vyme te v dy oba p ry no ov s asne aby sa zabr nilo kod m skr...

Page 97: ...bly sa pritom nesm pri tipn Tento n stroj sa nesmie pou va so sklopen m nosn kom rukov t Existuje nebezpe enstvo poranenia Odstr nenie ochrana ivotn ho prostredia Prive te tento n stroj jeho pr slu e...

Page 98: ...m bol svedomite kontrolovan Z ruka sa t ka materi lov ch alebo v robn ch ch b T to z ruka sa nevz ahuje na diely produktu ktor s vystaven norm lnemu opotrebeniu a preto sa m u pova ova za opotrebovan...

Page 99: ...Radi v m poskytneme predbe n kalkul ciu n kladov M eme spracova len pr stroje ktor boli doru en dostato ne zabalen a so zapla ten m po tovn m Pozor Pr stroj za lite do na ej servisnej po bo ky vy ist...

Page 100: ...100...
Page 101: ...ird entsprechend der Ger uschemissionsrichtlinie 2000 14 EG best tigt Schallleistungspegel Garantiert 93 dB A Gemessen 89 01 dB A Angewendetes Konformit tsbewertungsverfahren entsprechend Anh VI 2000...

Page 102: ...ment la directive sur les missions de bruit 2000 14 EC nous confirmons Niveau de puissance sonore garanti 93 dB A mesur 89 01 dB A Proc d utilis pour l valuation de la conformit en fonction de l anne...

Page 103: ...potwierdzono zgodnie z dyrektyw w sprawie emisji ha asu 2000 14 EC poziom mocy akustycznej gwarantowany 93 dB A zmierzony 89 01 dB A Zastosowana procedura oceny zgodno ci odpowiada za cznikowi VI 2000...

Page 104: ...13 Okrem toho sa v s lade so smernicou o emisi ch hluku 2000 14 EC potvrdzuje Hladina akustick ho v konu zaru en 93 dB A nameran 89 01 dB A Pou it postup hodnotenia zhody v s lade s dodatkom VI 2000 1...

Page 105: ...confirm the following in accordance with the 2000 14 EC emissions guideline Sound power level guaranteed 93 dB A measured 89 01 dB A Compliance evaluation process carried out in accordance with Appen...

Page 106: ...de geluidsemissierichtlijn 2000 14 EC bevestigd Akoestisch niveau gegarandeerd 93 dB A gemeten 89 01 dB A Toegepaste conformiteitbeoordelingsprocedure in overeenstemming met Annex VI 2000 14 EC Aangem...

Page 107: ...13 EN 62321 1 2013 Nav c se v souhlase se sm rnic pro emisi hluku 2000 14 EC potvrzuje rove akustick ho v konu zaru en 93 dB A m en 89 01 dB A Pou it postup konformitn ho ohodnocen dle dodatku VI 2000...

Page 108: ...osionszeichnung Vue clat e Rysunek samorozwijaj cy N kresy expl zi Exploded Drawing Explosietekening V kres sestaven informativ informatif pouczaj cy informat vny informative informatief informa n PGK...

Page 109: ...2_TvR Explosionszeichnung Vue clat e Rysunek samorozwijaj cy N kresy expl zi Exploded Drawing Explosietekening V kres sestaven PGK 1400 A1 informativ informatif pouczaj cy informat vny informative inf...

Page 110: ...ter Stra e 20 DE 63762 Gro ostheim GERMANY Stand der Informationen Last Information Update Version des informations Stand van de informatie Stan informacji Stav informac Stav inform ci 08 2019 Ident N...

Reviews: