background image

10  GB/IE

Before first use / Preparing the tool for use 

General safety advice for electrical power tools / Before first use


Do not drill any material containing 
asbestos. 

Asbestos is a known carcinogen.


Hold the electrical power tool firmly. 

High reaction torques may occur momentarily 
during tightening or loosening of screws.


If the inserted tool jams, switch off the 
electrical power tool immediately. 

Be 

prepared for high reaction torques as they may 
cause kickback. The inserted tool may jam if 
the electrical power tool is overloaded or is 
held at an angle to the workpiece.


Before you carry out any tasks on the 
device, transport or store it, make sure 
that the direction of rotation switch is 
in the middle position (lock).

 To prevent 

the device from starting up unintentionally.


Children or persons who lack the knowledge or 
experience to use the device or whose physical, 
sensory or intellectual capacities are limited 
must never be allowed to use the device without 
supervision or instruction by a person responsi-
ble for their safety. Children must never be  
allowed to play with the device.

Q


 Attention - Service lines!


Take steps to ensure that 

you do not hit upon any service lines 
(electricity, gas, water) when working 
with electrical appliances.

 Check, if need be 

with a service line detector, before you start to cut 
or bore into a surface.

Q


 Original  ancillaries  /   

accessories


Use only the ancillaries and accessories 
that are detailed in the operating  
instructions. 

The use of ancillaries and ac-

cessories other than those recommended in the 
operating instructions could lead to an in-
creased risk of personal injury for you. 

Q


Before first use

Q


 Removing / charging / inserting 

rechargeable battery pack

Note: 

The battery is supplied partially charged. 

Charge the rechargeable battery in the charging 
station for at least one hour before first use. By doing 
this the battery will operate at its highest capacity. 
You can charge the Li-Ion battery at any time with-
out risk of shortening battery life. Interrupting the 
charging process does not damage the battery. 

1.   In order to remove the rechargeable battery pack 

8

, press the release buttons 

9

 and take the 

rechargeable battery pack 

8

 out of the device.

2.   Insert the rechargeable battery pack 

8

 into the 

quick-charger 

15

.

3.   Insert the mains plug into the mains socket.  

The indicator LED 

13

 illuminates red.

4.   The green charge indicator LED 

14

 shows you 

that the charging process is complete and the 
battery pack 

8

 is ready for use.

5.   Insert the rechargeable battery pack 

8

 into 

the device.

Q


Checking the battery status

   To check the battery status, press the button for 

the rechargeable battery LED 

2

 (refer to main 

diagram). The status or the remaining power 
will be displayed in the rechargeable battery 
LED 

3

 as follows: 

RED / ORAnGE / GREEn = maximum charge /  
performance 
RED / ORAnGE = medium charge / performance 
RED = low charge – recharge battery

Q


 Changing  tools

Your cordless drill / screwdriver has a fully automat-
ic spindle lock 


.

Once the motor has come to a halt, the drive shaft 
is automatically locked, so that the chuck 

12

 can 

be opened simply by turning it 

.

Summary of Contents for PABS 10.8 A2

Page 1: ...d Safety Notes Translation of original operation manual SLADDL S BORRSKRUVDRAGARE Bruksanvisning och s kerhetsanvisningar vers ttning av bruksanvisning i original AKKUPORAKONE K ytt ja turvaohjeet Alk...

Page 2: ...e yourself with all functions of the device K nn ennen lukemista kuvallinen sivu esiin ja tutustu seuraavaksi laitteen kaikkiin toimintoihin Vik ut bildsidan och ha den till hands n r du l ser igenom...

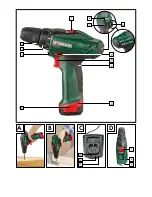
Page 3: ...A B C D 1 1 9 12 10 6 7 8 5 3 2 4 2 13 14 15 4 11...

Page 4: ......

Page 5: ...elating to cordless drill drivers Page 9 Attention Service lines Page 10 Original ancillaries accessories Page 10 Before first use Removing charging inserting rechargeable battery pack Page 10 Checkin...

Page 6: ...l use Q Equipment Components 1 Gear selector switch 2 Button for rechargeable battery LED 3 Rechargeable battery LED status indication 4 Bit garage 5 Direction of rotation switch lock 6 ON OFF switch...

Page 7: ...underestimate the vibration load if the electrical power tool is used regularly in particular circumstances Note If you wish to make an accurate assessment of the vibration loads experienced during a...

Page 8: ...ment of carelessness when using the device can lead to serious injury b Wear personal protective equipment and always wear safety glasses The wearing of personal protective equipment such as dust mask...

Page 9: ...electrical power tool a Charge a rechargeable battery unit using only the charger recommended by the manufacturer Chargers are often designed for a particular type of rechargeable battery unit There...

Page 10: ...se of ancillaries and ac cessories other than those recommended in the operating instructions could lead to an in creased risk of personal injury for you Q Before first use Q Removing charging inserti...

Page 11: ...on of rotation unlocking the device Unlock the device and change the direction of rota tion by pressing the rotational direction switch 5 to the right or to the left Q Switching On Off Switching on To...

Page 12: ...e Use a cloth to clean the housing Never use petrol solvents or cleaning agents that might attack plastic Q Service Have your device repaired at the service centre or by qualified specialist personnel...

Page 13: ...batteries and appliances over the existing collection facilities Your local communal or municipal authorities can provide information on how to dispose of the worn out appliance Q Conformity Declarati...

Page 14: ...14...

Page 15: ...turvaohjeet Sivu 19 Huomio johdot Sivu 20 Alkuper iset tarvikkeet lis laitteet Sivu 20 Ennen k ytt nottoa Akkupaketin poisto lataus paikoilleenasetus Sivu 20 Akun lataustilan tarkistus Sivu 20 Ty kalu...

Page 16: ...LED tilan ytt 4 Poranter slipas 5 Suunnanvaihtokytkin lukitus 6 P LLE POIS kytkin 7 Pehme k densija 8 Akkupaketti 9 Akun vapautuspainike 10 Valaistus 11 Esivalinta v nt momentti porausporras 12 Pikap...

Page 17: ...nn llisesti k ytet n t ll tavalla Huomio Liikekuormituksen arvioimiseksi tietyn ty ajan kest ess on huomioitava my s ajat jolloin laite on sammutettuna tai ajat jolloin laite on k yn niss mutta ei ty...

Page 18: ...u on kytketty pois p lt ennen kuin liit t sen pistorasiaan nostat sen tai kannat sit Tapaturmat ovat mahdollisia jos sormesi on laitetta kantaessasi virtakytki mell tai laite on kytketty p lle d Poist...

Page 19: ...nny lis ksi l k rin puoleen Vuotava akkunes te voi rsytt ihoa tai aiheuttaa palovammoja VAROITUS R J HDYSVAARA l lataa ei ladattavia paristoja koskaan uudestaan Akkuk ytt isen porakoneen turvaohjeet T...

Page 20: ...i 8 laitteeseen Q Akun lataustilan tarkistus Paina akun lataustilan tarkistamiseksi painiketta Akku LED 2 katso my s suuri kuva Lataustila ja j ljell oleva lataus n ytet n Akku LED 3 n yt ss seuraavas...

Page 21: ...itty niiden mitat ja muoto Jos olet ep varma kokeile aina ensin ett pala sopii ruuvin kantaan tiiviisti ilman v lyst Tarkasta ennen k ytt ett ruuvaus tai porauskappale on asetettu asianmukaisesti paik...

Page 22: ...stusvir heit ei kuitenkaan kuljetusvaurioita kuluvia osia tai herk sti vaurioituvien osien esim kytkinten tai akkujen vaurioita Tuote on tarkoitettu ainoastaan yksityiseen ei kaupalliseen k ytt n V r...

Page 23: ...neettista yhteensopivuutta koskevat direktiivit 2004 108 EC Sovelletut harmonisoidut normit EN 60745 1 A11 2010 EN 60745 2 1 2010 EN 60745 2 2 2010 EN 62233 2008 EN 55014 1 A1 2009 EN 55014 2 A2 2008...

Page 24: ...24...

Page 25: ...Sidan 29 S kerhetsanvisningar fr laddbara skruvdragare Sidan 29 Akta ledningar Sidan 30 Originaltillbeh r Extrautrustning Sidan 30 F re f rsta anv ndning Ta bort ladda montera batteri Sidan 30 Kontro...

Page 26: ...ndning Den h r apparaten r inte avsedd f r yrkesm ssigt bruk Q Utrustning 1 V xelomkopplare 2 Knapp batterilampa 3 Batterilampa niv indikering 4 Bitf rvaring 5 Rotationsriktningsomkopplare sp rr 6 TI...

Page 27: ...missbed mas om elverktyget regelbundet anv nds p s dant s tt Obs F r att kunna best mma sv ngningsbelast ningen b r ven tiden under en best md arbetstid ber knas under vilket verktyget r avst ngt elle...

Page 28: ...hj lm eller h rselskydd beroende p elverktygets typ och anv ndning reducerar risker f r skador c Undvik att verktyget startar av misstag Kontrollera att elverktyget r avst ngt innan str mf rs rjningen...

Page 29: ...er i kontakt med gem mynt nycklar spik skruvar eller an dra mindre metallf rem l Batterikon takterna kan skadas Kortslutning i batte rikontakterna kan medf ra br nnskador eller eldsv da d Batterisyra...

Page 30: ...t 8 i snabbladdaren 15 3 Anslut n tkontakten till ett v gguttag Kontrol lampan 13 lyser r d 4 Lampan i den gr na laddningsstatusindikering en 14 visar att laddningen r avslutad och att batteriet 8 r r...

Page 31: ...och andra material Skruvbits r m rkta med m tt och form Om du nd r os ker p om en bit passar kan du prova genom att kontrollera s att den inte har n got spelrum i skruvhuvudet Kontrollera att skruv r...

Page 32: ...ningsdelar eller skador p mt liga delar som t ex brytare och batterier Produkten r endast avsedd f r privat bruk och f r inte anv ndas yrkesm ssigt Vid missbruk och felaktig behandling anv ndande av v...

Page 33: ...42 EC L gsp nningsdirektiv 2006 95 EC Elektromagnetisk kompatibilitet 2004 108 EC anv nda harmoniserade normer EN 60745 1 A11 2010 EN 60745 2 1 2010 EN 60745 2 2 2010 EN 62233 2008 EN 55014 1 A1 2009...

Page 34: ...34...

Page 35: ...for batteridreven boremaskine og skruetr kker Side 39 OBS Ledninger Side 40 Originalt tilbeh r originale ekstraenheder Side 40 F r ibrugtagningen Aftagning opladning is tning af batteripakke Side 40 A...

Page 36: ...rindstilling 2 Akku LED knap 3 Akku LED tilstandsvisning 4 Bitgarage 5 Retningsomstiller sp rring 6 T ND SLUK knappen 7 Softgreb 8 Batteripakke 9 Taste til frig relse af batteri 10 Lampe 11 Forvalg fo...

Page 37: ...rdi der er angivet i disse anvisninger Svingningsbelastningen kan undervur deres hvis det elektriske redskab j vnligt bliver anvendt p en s dan m de Obs For at opn en n jagtig vurdering af sving ning...

Page 38: ...ad De foretage Dem og g til v rks med det elektriske v rkt j med fornuften i behold Undlad at bruge apparatet hvis De er tr t eller under indflydelse af euforiserende stoffer alkohol eller medikamente...

Page 39: ...t for denne s rlige type apparat Her skal der ogs tages hensyn til arbejdsbetingelserne og den opgave der skal udf res Anvendelse af elektriske redskaber til andre form l end de angivne kan f re til f...

Page 40: ...rug kun tilbeh r og ekstraenheder der er angivet i betjeningsvejledningen Brugen af andre v rkt jer eller andet tilbeh r end det der anbefales i betjeningsvejledningen kan betyde at der er get fare fo...

Page 41: ...kker omdrejningsskifteren 5 til h jre hhv til venstre igennem Q S dan t nder slukker du enheden Igangs tning Tryk p T ND SLUK knappen 6 for at t n de enheden og bliv ved med at trykke p den Lampen 10...

Page 42: ...af apparatet Til reng ring af huset skal der bruges et stykke stof Brug aldrig benzin opl sningsmidler eller reng ringsmidler der angriber syntetisk materiale Q Service Deres apparater b r De kun lade...

Page 43: ...bortskaf felse af den kasserede enhed Q Overensstemmelseserkl ring producent Vi Komperna GmbH ansvarlig for dokumenter Semi Uguzlu Burgstr 21 D 44867 Bochum Tysk land erkl rer hermed at dette produkt...

Page 44: ...44...

Page 45: ...kuwerkzeugs Seite 49 Sicherheitshinweise f r Akku Bohrschrauber Seite 50 Achtung Leitungen Seite 50 Originalzubeh r zusatzger te Seite 50 Vor der Inbetriebnahme Akku Pack entnehmen laden einsetzen Sei...

Page 46: ...mmt der Hersteller keine Haftung Ausstattung 1 Gangwahlschalter 2 Taste Akku LED 3 Akku LED Zustandsanzeige 4 Bitgarage 5 Drehrichtungsumschalter Sperre 6 EIN AUS Schalter 7 Softgriff 8 Akku Pack 9 Ta...

Page 47: ...nweisungen angegebenen Wert liegen Die Schwingungsbelastung k nnte untersch tzt werden wenn das Elektrowerkzeug regelm ig in solcher Weise verwendet wird Hinweis F r eine genaue Absch tzung der Schwin...

Page 48: ...schalter Der Einsatz eines Fehlerstromschutzschalters vermindert das Risiko eines elektrischen Schlages 3 Sicherheit von Personen a Seien Sie stets aufmerksam achten Sie darauf was Sie tun und gehen S...

Page 49: ...ist Lassen Sie besch digte Teile vor dem Einsatz des Ger tes reparieren Viele Unf lle haben ihre Ursache in schlecht gewarteten Elektrowerkzeugen f Halten Sie Schneidwerkzeuge scharf und sauber Sorgf...

Page 50: ...r geistigen F higkeiten oder mangels Erfahrung und oder mangels Wissen benutzt zu werden es sei denn sie werden durch eine f r ihre Sicherheit zust ndige Person beaufsichtigt oder erhielten von ihr An...

Page 51: ...rwahl Drehmoment Bohrstufe Sie k nnen ber die Vorwahl Drehmoment Bohr stufe 11 die Drehkraft einstellen Ist die eingestellte Drehkraft erreicht trennt die Kupplung den Antrieb W hlen Sie eine niedrige...

Page 52: ...stigen Sie wenn m glich das Werkst ck in einer Spannvorrichtung Markieren Sie die Stelle an der gebohrt werden soll mit einem K rner oder einem Nagel und w h len Sie zum Anbohren eine niedrige Drehzah...

Page 53: ...ngert Dies gilt auch f r ersetzte und reparierte Teile Eventuell schon beim Kauf vorhandene Sch den und M ngel m ssen sofort nach dem Auspacken gemeldet werden sp testens aber zwei Tage nach Kaufdatu...

Page 54: ...C angewandte harmonisierte Normen EN 60745 1 A11 2010 EN 60745 2 1 2010 EN 60745 2 2 2010 EN 62233 2008 EN 55014 1 A1 2009 EN 55014 2 A2 2008 EN 60335 2 29 2004 A2 10 EN 60335 1 2002 A11 A1 04 A12 A2...

Page 55: ...ompernaSS GmbH Burgstra e 21 D 44867 Bochum by ORFGEN Marketing Last Information Update Tietojen tila Informationsstatus Tilstand af information Stand der Informationen 08 2011 Ident No PABS10 8A20820...

Reviews: