background image

31

GB

Failure to follow the above instruction may 

cause people or animals to suffer eye 

injuries and/or to lose their sight� Even a 

weak LED light beam is capable of causing 

eye damage�


z

Assembly

Please note:

 remove all packaging material 

from the product� Protect easily damaged 

surfaces before setting up the product�

Please note:

 fully unwind the mains power 

cable� Route the mains power cable in such 

a way that nobody can tread on it or trip 

over it�


z

Setting up the tripod stand


„

Loosen the hand screw (tripod base) 

8

 by 

turning it anticlockwise� 

RISK OF TRAPPING/PINCHING! 

To 

avoid injuries when unfolding the legs, take 

care not to put your hands between the 

tripod base and the legs�


„

Take hold of the tripod base 

6

 at the point 

where the legs are attached, level with the 

hand screw (tripod base) 

8

, and press it 

downwards so that the legs fold out� Once 

the tripod base 

6

 is pushed down as far 

as it will go and the legs are fully extended, 

re-tighten the hand screw (tripod base) 

8


by turning it clockwise (see Fig� A)�


z

Setting the height of the 

tripod stand


„

Loosen the hand screw (telescopic pole) 

9


by turning it anticlockwise (see Fig A)� 


„

Set the tripod stand 

5

 to the desired 

height by pulling up or pushing down the 

telescopic pole 

4

 (see Fig� A)� 


„

Firmly tighten the hand screw (telescopic 

pole) 

9

 by turning it clockwise to fix the 

tripod stand 

5

 at the desired height (see 

Fig� A)�  


z

Mounting the work 

floodlight on the tripod 

stand

RISK OF ELECTRIC SHOCK!


Unplug the mains plug from the 

power outlet socket before mounting 

the floodlight on the tripod stand.


„

Open the mounting clamp 

11

 at the top of 

the telescopic pole 

4

 so that the locking 

handle is facing towards you (see Fig� D)� 


„

Loosen the hand screw (folding bracket) 

13


so that you can fold the floodlight and the 

inner bracket to the rear out of the way� 

Then locate the floodlight 

2

 centrally on 

the open mounting clamp 

11

 with the aid 

of the handle 

1

 (see Fig� D)�

Please note:

 make sure that the back of the 

floodlight is facing the locking handle. 

Otherwise it is not possible to close the 

mounting clamp�

Please note:

 take care to ensure the mains 

power cable is not trapped�


„

Fold down the two rear clips of the 

mounting clamp over the outer folding 

bracket of the floodlight, which is now 

seated in the mounting clamp (see Fig� D)� 

Next, fold down the front clip of the 

mounting clamp over the two rear clips 

previously folded down, so that they 

interlock (see Fig� D)�


„

Press down the locking handle of the 

mounting clamp 

11

 to fix the mounting 

bracket in place (see Fig� D)�


„

Now position the floodlight and inner 

folding bracket centrally over the mounting 

clamp and fix them in position by 

tightening the hand screw 

13

 (see Fig� D)�


z

Operation without tripod 

stand

RISK OF ELECTRIC SHOCK!


Unplug the mains plug from the 

power outlet socket before 

attempting to alter the position of the 

Summary of Contents for PAS 1500 LM A1

Page 1: ...WITH TRIPOD Operating and safety information FR BE PROJECTEUR DE CHANTIER LED AVEC TR PIED Instructions d utilisation et consignes de s curit NL BE LED WERKSCHIJNWERPER MET STATIEF Gebruiks en veiligh...

Page 2: ...Sie vor dem Lesen die Seite mit den Abbildungen aus und machen Sie sich anschlie end mit allen Funktionen des Artikels vertraut GB Before you start reading please fold out the illustrations page and...

Page 3: ...A B C D 1 2 3 4 5 6 9 11 10 13 14 12 7 8 11 2 11 13 4 10 12 13 min 10 cm...

Page 4: ...v 25 Ein Ausschalten 25 Reinigung 25 Entsorgung 25 Garantie 26 Service 27 FR BE NL BE Introduction 6 Explication des symboles 6 Utilisation conforme 7 Contenu de l emballage 7 Description des composan...

Page 5: ...les enfants Attention Risque de br lure sur les surfaces br lantes AVERTISSEMENT Risque d lectrocution b a Recyclez l emballage et l appareil dans le respect de l environnement Ne convient pas pour l...

Page 6: ...usage professionnel L appareil n est pas adapt pour l clairage ambiant domestique z zContenu de l emballage 1 x projecteur de travail 1 x tr pied barre t lescopique et l ment trois pieds 1 x notice d...

Page 7: ...ble d alimentation est d t rior l appareil doit alors tre mis au rebut Ne vous servez jamais du c ble d alimentation comme poign e pour porter l appareil Positionnez le c ble d alimentation de telle...

Page 8: ...pieds du tr pied afin d viter toute blessure lors du d pliage des pieds Saisissez l l ment trois pieds 6 l endroit o les pieds sont raccord s hauteur de la vis molet e l ment trois pieds 8 et poussez...

Page 9: ...rabattable 12 de 10 cm au moins voir fig C Fixez la position en serrant bien la vis molet e trier rabattable 13 sur le tr pied Placez le projecteur dans la position souhait e z zMise en marche arr t B...

Page 10: ...r ou un nouveau produit La r paration ou l change du produit n entra ne pas de nouvelle p riode de garantie P riode de garantie et droits l gaux r sultant de la constatation d un vice La prestation de...

Page 11: ...nditions pr vues aux articles L217 4 L217 13 du Code de la consommation et aux articles 1641 1648 et 2232 du Code Civil Article L217 4 du Code de la consommation Le vendeur livre un bien conforme au c...

Page 12: ...du produit sont disponibles pendant la dur e de la garantie du produit z zService apr s vente FR Service France Tel 00800 80040044 E Mail administration mynetsend de BE Service Belgique Tel 00800 800...

Page 13: ...lspanning Waarschuwingen en veiligheidsvoorschriften opvolgen Levensgevaar en risico op ongevallen voor kleuters en kinderen Voorzichtig Gevaar voor verbranding door hete oppervlakken Waarschuwing Gev...

Page 14: ...estaan en vormen een mogelijke oorzaak van beschadigingen De fabrikant aanvaardt geen aansprakelijkheid voor niet beoogd gebruik en hieruit voortkomende schade Het product is niet bestemd voor commerc...

Page 15: ...persoon met gelijkaardige kwalificaties worden vervangen Het netsnoer 10 van dit product kan niet worden vervangen wanneer het netsnoer beschadigd is moet het product worden afgevoerd Gebruik het nets...

Page 16: ...om verwonding bij het uit elkaar klappen van de poten te voorkomen Neem het driepootelement 6 vast op de plek waar de poten ter hoogte van de kartelschroef driepootelement 8 verbonden zijn en druk di...

Page 17: ...hroeven van de kartelschroeven klapbeugel 13 op de schijnwerper Stel de schijnwerper op de gewenste positie op z zIn uitschakelen Steek de stekker van het netsnoer 10 in een correct ge nstalleerd stop...

Page 18: ...van het product begint er geen nieuwe garantietermijn te lopen Garantietijd en wettelijke garantieclaims De garantietijd wordt niet verlengd door de garantieverlening Dit geldt ook voor vervangen of...

Page 19: ...en neemt u eerst telefonisch of via e mail contact op met de hieronder vermelde serviceafdeling Een als defect geregistreerd product kunt u dan mits bijvoeging van het aankoopbewijs kassaticket en de...

Page 20: ...bens und Unfallgefahr f r Kleinkinder und Kinder Vorsicht Verbrennungsgefahr durch hei e Oberfl chen Warnung Stromschlaggefahr b a Entsorgen Sie Verpackung und Ger t umweltgerecht Nicht zur Raumbeleuc...

Page 21: ...r keine Haftung Das Produkt ist nicht f r den gewerblichen Einsatz bestimmt Das Produkt ist nicht f r die Raumbeleuchtung im Haushalt geeignet z zLieferumfang 1 x Arbeitsstrahler 1 x Dreibeinstativ Te...

Page 22: ...Verwenden Sie das Netzkabel nicht als Tragegriff Verlegen Sie das Netzkabel so dass niemand darauf treten oder dr ber stolpern kann VERMEIDEN SIE LEBENS GEFAHR DURCH ELEKTRISCHEN SCHLAG berpr fen Sie...

Page 23: ...ifen Sie das Dreibeinelement 6 an der Stelle wo die Beine auf H he der R ndelschraube Dreibeinelement 8 verbunden sind und dr cken Sie dieses nach unten sodass sich die Beine auseinanderfalten Wenn si...

Page 24: ...destens 10 cm auseinander siehe Abb C Fixieren Sie die Position indem Sie die R ndelschraube Klappb gel 13 am Strahler festziehen Stellen Sie den Strahler an einer gew nschten Position auf z zEin Auss...

Page 25: ...besteht und wann er aufgetreten ist Wenn der Defekt durch unsere Garantie gedeckt wird erhalten Sie das reparierte oder ein neues Produkt zur ck Mit Reparatur oder Austausch des Produkts beginnt kein...

Page 26: ...folgend benannte Service Abteilung telefonisch oder per E Mail Ein als defekt erfasstes Produkt k nnen Sie dann unter Beif gung des Kaufbelegs Kassenbon und der Angabe worin der Mangel besteht und wan...

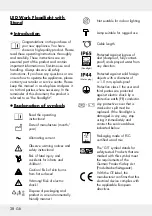
Page 27: ...ldren Caution Risk of skin burns from hot surfaces Warning Risk of electric shock b a Dispose of packaging and product in an environmentally friendly manner Not suitable for indoor lighting Lamp suita...

Page 28: ...general indoor lighting in the home z zSpecifications supplied 1 work floodlight 1 tripod stand telescopic pole and tripod base 1 instruction manual z zDescription of parts 1 Handle 2 Floodlight 3 LE...

Page 29: ...y Never use the product if it has any signs of damage Protect the mains power cable from sharp edges mechanical stress and hot surfaces When connecting or disconnecting the cable to from the power sup...

Page 30: ...kwise to fix the tripod stand 5 at the desired height see Fig A z zMounting the work floodlight on the tripod stand RISK OF ELECTRIC SHOCK Unplug the mains plug from the power outlet socket before mou...

Page 31: ...ree cloth for cleaning If the product is very dirty dampen the cloth slightly z zDisposal b a Note the labels on the packaging materials when sorting the waste they are marked with abbreviations a and...

Page 32: ...serviced To ensure proper use all instructions included in the manual must be followed carefully All uses and actions that users are discouraged from or warned of in the manual must be avoided under a...

Page 33: ...IAN 366811_2010 citygate24 GmbH Lange M hren 1 20095 Hamburg GERMANY 03 2021 Model No 1006 AS MIX Paper FSC C146112...

Reviews: