PBH 1500 E5
GB
│
IE
│
NI
│
CY
│
5
■
5 . Service
a)
Have your power tool serviced by a qualified
repair person using only identical replace-
ment parts.
This will ensure that the safety of
the power tool is maintained .
Appliance-specific safety instructions
for hammer drills
■
Wear hearing protection.
Exposure
to loud noise can lead to hearing loss .
■
Use the additional handle supplied with the
appliance.
Loss of control can lead to injuries .
■
Hold the appliance by the insulated handles
when you are carrying out work during which
the deployed tool may come into contact with
concealed power cables or its own power
cable.
Contact with a live wire may electrify
exposed metal parts of the power tool and
could give the operator an electric shock .
■
Wear a dust mask.
WARNING! TOXIC DUST!
►
Working with the tool can produce harmful/
toxic dusts which represent a health hazard
for the person operating the appliance and
for anyone else in the vicinity .
■
CAUTION, POWER CABLES! DANGER!
Ensure that you are not likely to hit power, gas
or water supply lines when you are working
with the power tool . If necessary, check with a
service line detector before you start to cut or
drill into a surface .
Original accessories/auxiliary
equipment
■
Use only the accessories and additional
equipment that are specified in the operating
instructions and are compatible with the
appliance.
Use
Additional handle
NOTE
►
For safety reasons, you should never use this
appliance without the additional handle
attached .
♦
Remove the additional handle by turning it
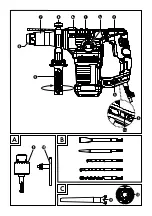
in a clockwise direction (see fold-out page) .
♦
Turn the additional handle to the desired
position .
♦
Fix the additional handle in the new position
by turning it anticlockwise .
Depth stop
♦
Undo the wing screw .
♦
Insert the depth stop into the additional
handle .
♦
Ensure that the toothing on the depth stop
is facing upwards .
♦
Pull the depth stop out until the distance
between the tip of the drill and the tip of the
depth stop corresponds with the required drill-
ing depth .
♦
Retighten the wing screw afterwards .
Summary of Contents for PBH 1500 E5
Page 3: ...A B 3a C...
Page 17: ...PBH 1500 E5 14 GR CY 1 2 3...
Page 18: ...PBH 1500 E5 GR CY 15 4 5...
Page 19: ...PBH 1500 E5 16 GR CY 3...
Page 20: ...PBH 1500 E5 GR CY 17 1 6 3 6 1 3 LED LED 3a LED ON OFF ON OFF...
Page 21: ...PBH 1500 E5 18 GR CY 50 2012 19 U a b 1 7 20 22 80 98...
Page 22: ...PBH 1500 E5 GR CY 19 Kompernass Handels GmbH 3...
Page 25: ...PBH 1500 E5 22 GR CY...
Page 35: ...PBH 1500 E5 32 DE AT CH...

