background image

Petrol Lawnmower   PBM 132 A1

Benzin-Rasenmäher

Originalbetriebsanleitung

Petrol Lawnmower

Translation of the original instructions

IAN 360067_2007

Summary of Contents for PBM 132 A1

Page 1: ...Petrol Lawnmower PBM 132 A1 Benzin Rasenm her Originalbetriebsanleitung Petrol Lawnmower Translation of the original instructions IAN 360067_2007...

Page 2: ...ourself with all functions of the device Klappen Sie vor dem Lesen die Seite mit den Abbildungen aus und machen Sie sich anschlie end mit allen Funktionen des Ger tes vertraut GB IE NI Translation of...

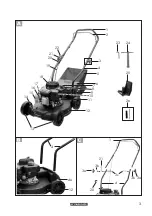
Page 3: ...24 1 2 3 4 1 4 5 6 7 13 23 3b 3a 3c 21 3b 3a 4 20 9 10 11 12 14 17 16 15 18 21 22 19 20 4a 8 25 26 12 3...

Page 4: ...e intervals 18 Storage 19 General storage instructions 19 Folding up the device 19 Storage during winter 19 Transport 19 Disposal environmental protection 20 Spare parts accessories 20 Troubleshooting...

Page 5: ...r bar Mounting accessories for the handlebar Grass collection box Cable clamp Spark plug wrench Mulch kit Screwdriver Quick guide Instruction manual The supplied screwdriver can be used as both a flat...

Page 6: ...ctane rating 95 98 Engine oil tank volume 0 4 l Spark plug Torch F5RTC Cutting circle 410 mm Cutting height 3 level 25 65 mm Grass collection box volume 40 l Weight incl grass collection box with an e...

Page 7: ...in operation Do not expose the device to moisture Never operate the device in rain Attention The lawnmower blade continues to move Switch off the engine when you leave the device Never mow if there ar...

Page 8: ...y In case of uncertainties consult some one for instruction concerning the use of the device and prohibited opera tions Pay attention be aware of what you are doing and take the utmost care when worki...

Page 9: ...lace defective mufflers Before use always perform a visual inspection to check whether the cutting tools fastening bolts and the entire cutting unit are worn out or damaged Worn or damaged tools and b...

Page 10: ...ting parts Always keep away from the ejector opening A moment of inattention when using the device can result in serious injuries Never lift or carry the device when the engine is running Shut off the...

Page 11: ...with any sealed engine speed control settings Initial start up Caution Risk of injury due to rotating blade Only perform work on the device when the engine is switched off and has come to a stop Befor...

Page 12: ...wheels 13 with a wheel bolt 13b over a safety washer 13c at the desired cutting height position 29 Select the same cutting height position for all four wheels 29 When assembling the wheels make sure y...

Page 13: ...k cap with dipstick 28 back on completely 4 Unscrew the oil tank cap with dipstick 28 and read the oil level on the dipstick after pulling it out The oil level must be in the marked field between the...

Page 14: ...grass if possi ble Make sure that the cutting tool does not touch either other objects or the ground For your safety Stand behind the device when starting it Regularly check the petrol and oil levels...

Page 15: ...eed to be fertilised much less frequently As a basic rule the lawn has to be mowed relatively often so that only small amounts of mulch remain on the lawn It is therefore best to mulch the lawn at lea...

Page 16: ...derlay under the petrol lawnmower 1 Fold the upper handlebar 1 up 2 Tilt the device back so that the spark plug faces upwards Make sure that a second person holds the device because there is a danger...

Page 17: ...de of the spark plug 5 Clean the spark plug 17 with a wire brush 6 Insert the cleaned and set spark plug or replace a damaged spark plug with a spare spark plug recommended tightening torque 20 Nm det...

Page 18: ...mance at the factory If any readjustments are necessary see Trouble shooting have the adjustments made by a specialist workshop Service intervals Carefully perform the maintenance tasks listed in the...

Page 19: ...fuel might leak out Before transporting between two loca tions empty the fuel tank with a petrol suction pump Do not empty the fuel tank indoors near fire or when smoking Gas vapours can cause explosi...

Page 20: ...t free of charge Do not throw cut grass into the rubbish bin instead take it for composting or spread it as a mulch below shrubs and trees Spare parts accessories You can get spare parts and accessori...

Page 21: ...r Sooty spark plug 17 Clean set or replace spark plugs see Cleaning and Servicing Engine over heated Ventilation holes 18 plugged Clean the ventilation holes Incorrect spark plug 17 Replace the spark...

Page 22: ...been carefully pro duced in accordance with strict quality guidelines and conscientiously checked prior to delivery The guarantee applies for all material and manufacturing defects This guarantee does...

Page 23: ...which will be happy to issue a cost estimate for you We can handle only equipment that has been sent with adequate packaging and postage Attention Please send your equipment to our service branch in...

Page 24: ...llen 39 Wartungsintervalle 39 Lagerung 40 Allgemeine Lagerungshinweise 40 Ger t zusammenklappen 40 Lagerung w hrend der Winterpause 40 Transport 41 Entsorgung Umweltschutz 41 Ersatzteile Zubeh r 42 Fe...

Page 25: ...sichtig aus der Packung und pr fen Sie ob die nachfol genden Teile vollst ndig sind Benzin Rasenm her 2x Unterer Holm Montagezubeh r f r den Griffholm Grasfangkorb Kabelklemme Z ndkerzenschl ssel Mulc...

Page 26: ...gter Messerber hrung wenn ohne Grasfangkorb gem ht wird Technische Daten Benzin Rasenm her PBM 132 A1 Motor Zongshen 132cc Easy Start Motorhubraum 132 cm3 cc Leistung 1 8 kW 2 45 PS Max Drehzahl n0 28...

Page 27: ...ole Bildzeichen auf dem Ger t Vorsicht Betriebsanleitung lesen Verletzungsgefahr durch wegge schleuderte Teile Umstehende Personen von dem Ger t fernhalten Verletzungsgefahr durch scharfe Messer Warnu...

Page 28: ...gen Sie beim Umgang mit dem Messer Handschuhe hochentz ndlich gifitg umweltgef hrdend Allgemeine Sicherheithinweise WARNUNG Lesen Sie alle Sicher heitshinweise und Anweisungen Vers umnisse bei der Ein...

Page 29: ...tfer nen Sie alle Gegenst nde z B Steine St cke Dr hte Spielzeug die erfasst und weggeschleudert werden k nnen Warnung Benzin ist hochgradig ent flammbar Feuer oder Explosionen k nnen zu schweren Verb...

Page 30: ...te Schutzeinrichtungen z B Prallschutz und oder Grasfangeinrichtungen Da mit wird sichergestellt dass die Sicher heit des Ger tes erhalten bleibt ndern Sie nicht die Reglereinstellung des Motors oder...

Page 31: ...Um Brandgefahr zu vermeiden halten Sie Motor Auspuff und den Bereich um den Benzintank frei von Gras Bl ttern oder austretendem Fett Motor l Pr fen Sie regelm ig die Grasfangein richtung auf Verschlei...

Page 32: ...f gest ngen 3 Schieben Sie jeweils eine Unterleg scheibe 3b auf die Schrauben 3c 4 Drehen Sie die Griffmuttern 3a auf die Schrauben 3c An der rechten Seite des Rasenm hers muss die Starterseil F hrung...

Page 33: ...af r vorgesehene Grasfang korb Aufh ngung 27 an der R ckseite des Ger tes ein 4 Legen Sie den hinteren Prallschutz 6 ab er h lt den Grasfangkorb 5 in Position Grasfangkorb demontieren 5 Heben Sie den...

Page 34: ...uchen Hautkontakt und das Einatmen der D mpfe vermeiden versch ttetes Benzin entfernen Benzin von Funken offenen Flammen und anderen Z ndquellen fernhalten Benzinreste umweltgerecht entsorgen siehe En...

Page 35: ...enzin in den Vergaser und der Motor ist schwie rig zu starten Motor stoppen Lassen Sie den Sicherheitsb gel 2 los Der Motor schaltet ab und das Messer wird abgebremst Messerstoppvorrichtung berpr fen...

Page 36: ...orb 5 gearbeitet werden Schnitth he einstellen Das Ger t besitzt 3 Positionen zur Einstel lung der Schnitth he 65 mm gro e Schnitth he 45 mm mittlere Schnitth he 25 mm geringe Schnitth he 1 Nehmen Sie...

Page 37: ...s sigkeiten k nnen auslaufen und der Motor kann besch digt werden Halten Sie das Ger t stets sauber Ver wenden Sie zum Reinigen eine B rste oder ein Tuch aber keine scharfen Rei nigungs oder L sungsm...

Page 38: ...htig biegen 5 Reinigen Sie die Z ndkerze 17 mit einer Drahtb rste 6 Setzen Sie die gereinigte und einge stellte Z ndkerze ein oder tauschen Sie eine besch digte Z ndkerze gegen eine Ersatzz ndkerze au...

Page 39: ...otorspindel anliegt Zwischen Messerschraube und Messer muss die Spannscheibe 33 positio niert sein 5 Ziehen Sie das Messer mit 45 Nm fest Vergaser einstellen Der Vergaser wurde werkseitig auf optima l...

Page 40: ...mit Starter seil 22 aus 3 Lockern Sie die Griffmutter 3a am Griffholm 1 Griffmutter 3a Un terlegscheibe 3b und Schrauben 3c k nnen montiert bleiben 4 Klappen Sie den Griffholm 1 nach unten Der Bowdenz...

Page 41: ...ern Vor einem Transport zwischen zwei Einsatzorten leeren Sie den Benzintank mit einer Benzinabsaugpumpe Leeren Sie den Benzintank nicht in geschlossenen R umen in der N he von Feuer oder beim Rauchen...

Page 42: ...en Sie sich an das Service Center siehe Seite 45 Position Betriebsan leitung Position Explosions zeichnung Bezeichnung Bestell Nr 1 22 30 Griffholm mit Sicherheitsb gel 91106017 19 31 Bowdenzug 911060...

Page 43: ...erru te Z ndkerze 17 Z ndkerzen reinigen einstellen oder er setzen siehe Reinigung und Wartung Motor wird berhitzt L ftungs ffnungen 18 verstopft L ftungs ffnungen reinigen Falsche Z ndkerze 17 Z ndke...

Page 44: ...fallende Reparaturen sind kostenpflichtig Garantieumfang Das Ger t wurde nach strengen Qualit ts richtlinien sorgf ltig produziert und vor Anlieferung gewissenhaft gepr ft Die Garantieleistung gilt f...

Page 45: ...assung durchf hren lassen Sie erstellt Ihnen gerne einen Kos tenvoranschlag Wir k nnen nur Ger te bearbeiten die ausreichend verpackt und frankiert einge sandt wurden Achtung Bitte senden Sie Ihr Ger...

Page 46: ...46...

Page 47: ...h the 2000 14 EC emissions guideline Sound power level guaranteed 96 dB A measured 94 5 dB A Compliance evaluation process carried out in accordance with Appendix VI 2000 14 EC 2005 88 EC Registered O...

Page 48: ...richtlinie 2000 14 EG best tigt Schallleistungspegel Garantiert 96 dB A Gemessen 94 5 dB A Angewendetes Konformit tsbewertungsverfahren entsprechend Anh VI 2000 14 EG und 2005 88 EG Benannte Stelle NB...

Page 49: ...49 Exploded Drawing Explosionszeichnung PBM 132 A1 informative informativ 20210120_rev01_ae...

Page 50: ...50 22 21 2 1 27 5 6 28 2 22 7 11 21 8 5a 25 6 1...

Page 51: ...51 13a 13 31 30 33 32 13c 29 13b 13b 17 16 9 10 0 7 0 8 mm 23 26...

Page 52: ...GRIZZLY TOOLS GMBH CO KG Stockst dter Stra e 20 DE 63762 Gro ostheim GERMANY Last Information Update Stand der Informationen 01 2021 Ident No 89420235012021 GB IE NI IAN 360067_2007...

Reviews: