background image

8

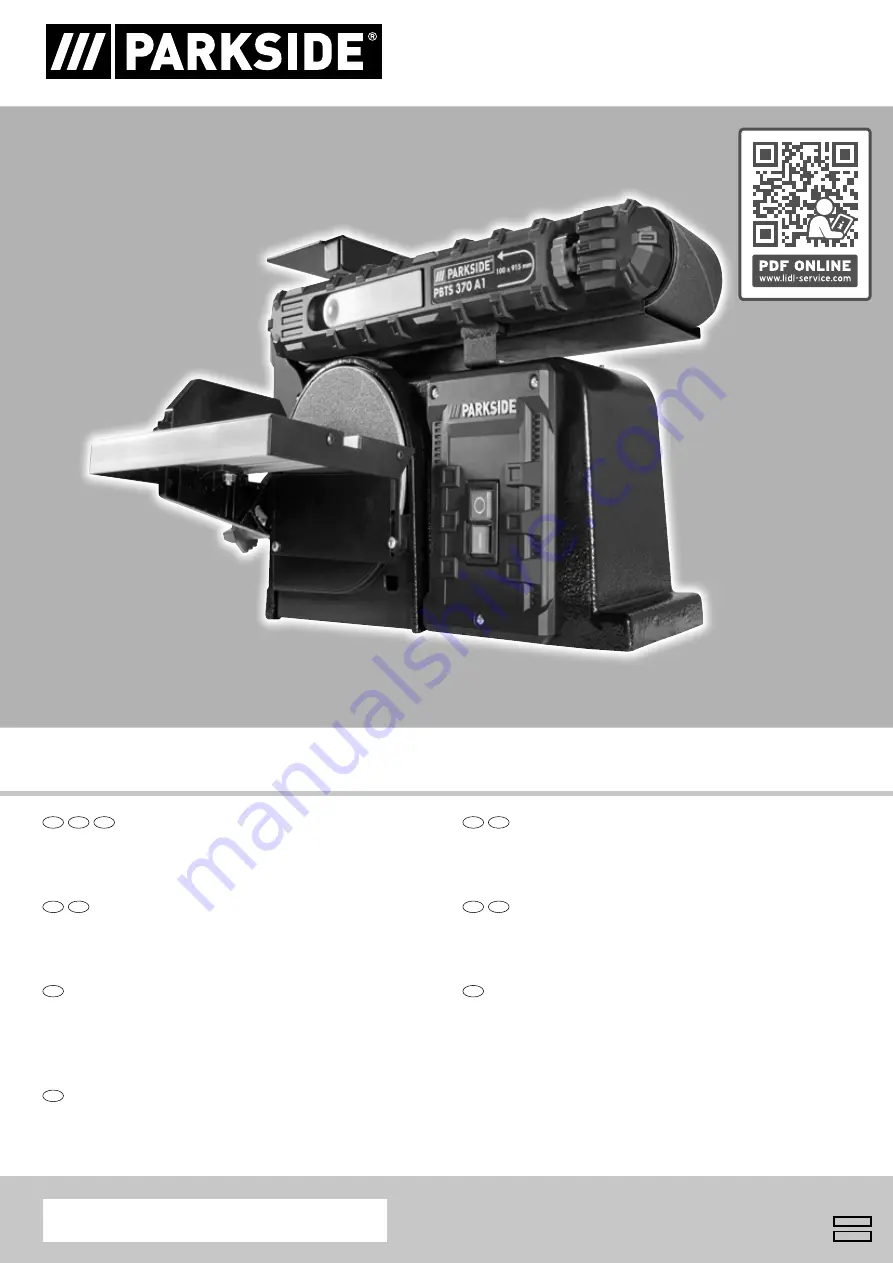
BAND- UND TELLERSCHLEIFER PBTS 370 A1

BELT & DISC SANDER PBTS 370 A1

PONCEUSE À BANDE/DISQUES PBTS 370 A1

IAN 339368_2001

CH

AT

BAND- UND TELLERSCHLEIFER

Bedienungs- und Sicherheitshinweise
Originalbetriebsanleitung

DE

BE

BAND- EN SCHIJFSCHUURMACHINES

Bedienings- en veiligheidsinstructies
Vertaling van de originele handleiding

NL

BELT & DISC SANDER

Operating and Safety Instructions
Translation of Original Operating Manual

GB

IE

BE

PONCEUSE À BANDE/DISQUES

Consignes d‘utilisation et de sécurité
Traduction des instructions d’origine

FR

SZLIFIERKA TAŚMOWA I TALERZOWA

Wskazówki dotyczące obsługi i bezpieczeństwa
Tłumaczenie oryginalnej instrukcji obsługi

PL

PÁSOVÁ A TANIEROVÁ BRÚSKA

Pokyny pre obsluhu a bezpečnostné pokyny
Preklad originálneho návodu na obsluhu

SK

PÁSOVÁ A TALÍŘOVÁ BRUSKA

Pokyny pro obsluhu a bezpečnostní pokyny
Překlad originálního provozního návodu

CZ

Summary of Contents for PBTS 370 A1

Page 1: ...C SANDER Operating and Safety Instructions Translation of Original Operating Manual GB IE BE PONCEUSE À BANDE DISQUES Consignes d utilisation et de sécurité Traduction des instructions d origine FR SZLIFIERKA TAŚMOWA I TALERZOWA Wskazówki dotyczące obsługi i bezpieczeństwa Tłumaczenie oryginalnej instrukcji obsługi PL PÁSOVÁ A TANIEROVÁ BRÚSKA Pokyny pre obsluhu a bezpečnostné pokyny Preklad origi...

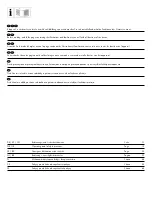
Page 2: ...AT CH Avant de lire le mode d emploi ouvrez la page contenant les illustrations et familiarisez vous ensuite avec toutes les fonctions de l appareil FR BE Vouw vóór het lezen de pagina met de afbeeldingen open en maak u vertrouwd met alle functies van het apparaat NL BE Před čtením si otevřete stranu s obrázky a potom se seznamte se všemi funkcemi přístroje CZ Before reading unfold the page contai...

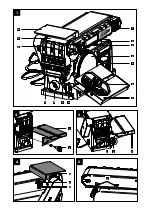
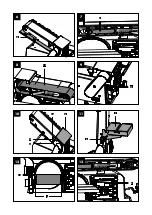
Page 3: ...1 1 2 3 4 5 6 7 8 9 10 11 14 13 12 3 8 9 7 7 8 2 4 17 14 17 5 18 ...

Page 4: ...6 19 7 3 8 8 13 9 12 10 20 14 17 17 11 7 8 12 15 16 13 5 ...

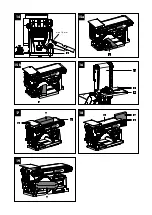
Page 5: ...14 max 1 6 mm 8 15a 6 15b 6 16 13 7 6 19 W 17 14 13 W 18 W R 13 ...

Page 6: ...timmungsgemäße Verwendung 3 6 Sicherheitshinweise 4 7 Technische Daten 6 8 Vor Inbetriebnahme 6 9 Aufbau und Bedienung 7 10 Transport 8 11 Arbeitshinweise 8 12 Reinigung und Wartung 8 13 Lagerung 9 14 Elektrischer Anschluss 9 15 Entsorgung und Wiederverwertung 9 16 Störungsabhilfe 10 17 Garantieurkunde 11 18 Konformitätserklärung 76 ...

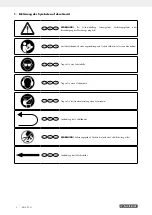
Page 7: ...Inbetriebnahme Bedienungsanleitung und Sicherheitshinweise lesen und beachten DE AT CH Tragen Sie eine Schutzbrille DE AT CH Tragen Sie einen Gehörschutz DE AT CH Tragen Sie bei Staubentwicklung einen Atemschutz DE AT CH Laufrichtung des Schleifbands DE AT CH WARNUNG Verletzungsgefahr Nicht in die laufende Schleifscheibe greifen DE AT CH Laufrichtung der Schleifscheibe ...

Page 8: ...mein anerkannten technischen Regeln zu beachten Wir übernehmen keine Haftung für Unfälle oder Schäden die durch Nichtbeachten dieser Anleitung und den Sicherheitshin weisen entstehen 3 Gerätebeschreibung Abb 1 19 1 Rändelschraube für Schleifbandeinstellung 2 Stützfuß 3 Schleifbandspanner 4 Schleifteller 5 Ein Ausschalter 6 Queranschlag 7 Schleiftisch 8 Feststellschraube für Schleiftisch 9 Winkelsk...

Page 9: ... e Wenn Sie mit einem Elektrowerkzeug im Freien arbeiten verwenden Sie nur Verlängerungslei tungen die auch für den Außenbereich geeig net sind Die Anwendung einer für den Außenbereich ge eigneten Verlängerungsleitung verringert das Risiko eines elektrischen Schlages f Wenn der Betrieb des Elektrowerkzeugs in feuchter Umgebung nicht vermeidbar ist ver wenden Sie einen Fehlerstromschutzschalter Der...

Page 10: ... ziertem Fachpersonal und nur mit Original Er satzteilen reparieren Damit wird sichergestellt dass die Sicherheit des Elektrowerkzeugs erhalten bleibt m WARNUNG Dieses Elektrowerkzeug erzeugt während des Betriebs ein elektromagnetisches Feld Dieses Feld kann unter bestimmten Umständen aktive oder passive medizinische Implantate beeinträchtigen Um die Gefahr von ernsthaften oder tödlichen Verletzun...

Page 11: ...können minimiert werden wenn die Sicher heitshinweise und die Bestimmungsgemäße Verwen dung sowie die Bedienungsanleitung insgesamt beach tet werden 7 Technische Daten Motor 230 240 V 50 Hz Aufnahmeleistung 370 W Baumaße L x B x H 460 x 360 x 280 mm ø Scheibe 150 mm Umdrehungen der Scheibe 2980 min 1 Schleifband Abmessungen 915 x 100 mm Schleifband Geschwindigkeit 7 5 m s Schrägstellung 0 90 Tisch...

Page 12: ...nachjustiert werden 9 4 Schleifposition des Schleifbands verstellen Abb 9 11 Die Inbusschraube 12 lockern Schleifband 13 nach oben in die gewünschte Position bewegen Inbusschraube 12 wieder festziehen um diese Position zu fixieren Zur Werkstückauflage kann in dieser Position der Schleif tisch 7 eingesetzt werden hierzu müssen Sie zuerst die beiden Inbusschrauben 17 lösen und danach die An schlagsc...

Page 13: ...tion zu fixieren Zur Werkstückauflage kann in dieser Position der Schleif tisch 7 eingesetzt werden hierzu müssen zuerst die beiden Inbusschrauben 17 lösen und danach die Anschlagschie ne 14 entfernen Der Schleiftisch 7 kann jetzt in das Loch des Halterohrs 20 geschoben und mit der Feststellschrau be 8 fixiert werden Hinweis Schleifen Sie lange Werkstücke in der vertikalen Po sition indem Sie das ...

Page 14: ...achen hierfür können sein Druckstellen wenn Anschlussleitungen durch Fenster oder Türspalten geführt werden Knickstellen durch unsachgemäße Befestigung oder Füh rung der Anschlussleitung Schnittstellen durch Überfahren der Anschlussleitung Isolationsschäden durch Herausreißen aus der Wandsteck dose Risse durch Alterung der Isolation Solch schadhafte Elektro Anschlussleitungen dürfen nicht ver wend...

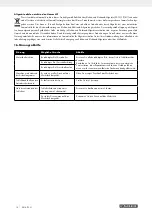
Page 15: ...äte erhalten Sie bei Ihrer Stadtverwaltung dem öffentlich recht lichen Entsorgungsträger einer autorisierten Stelle für die Entsorgung von Elektro und Elektronik Altgeräten oder Ihrer Müllabfuhr 16 Störungsabhilfe Störung Mögliche Ursache Abhilfe Motor läuft nicht an Beschädigter Ein Ausschalter Ersetzen Sie alle beschädigten Teile bevor Sie die Schleifmaschine benutzen Kontaktieren Sie Ihr lokale...

Page 16: ...e vorgenommen wurden Die Garantiezeit beträgt 3 Jahre und beginnt mit dem Kaufdatum des Gerätes Garantieansprüche sind vor Ablauf der Garantiezeit innerhalb von zwei Wochen nachdem Sie den Defekt erkannt haben geltend zu machen Die Geltendmachung von Garantieansprü chen nach Ablauf der Garantiezeit ist ausgeschlossen Die Reparatur oder der Austausch des Gerätes führt weder zu einer Verlänge rung d...

Page 17: ...ry 14 5 Proper use 14 6 Safety information 15 7 Technical data 16 8 Before commissioning 17 9 Attachment and operation 17 10 Transport 18 11 Working instructions 18 12 Cleaning and maintenance 19 13 Storage 19 14 Electrical connection 19 15 Disposal and recycling 20 16 Troubleshooting 20 17 Warranty certificate 21 18 Declaration of conformity 76 ...

Page 18: ...the operating and safety instructions before start up and follow them GB IE Wear eye protection GB IE Wear hearing protection GB IE If dust builds up wear respiratory protection GB IE Running direction of the sanding belt GB IE WARNING Danger of injury Do not reach into sanding disc while it is running GB IE Running direction of the sanding disc ...

Page 19: ...the safety instructions and the separate regula tions of your country the generally recognised technical rules for operating machines of the same type must also be ob served We accept no liability for accidents or damage that occur due to a failure to observe this manual and the safety instructions 3 Device description fig 1 19 1 Knurled screw for sanding belt adjustment 2 Support foot 3 Sanding b...

Page 20: ...ty shoes hard hat or hearing protection used for appropriate conditions will reduce per sonal injuries c Prevent unintentional starting Ensure the switch is in the off position before connecting to power source and or battery pack picking up or carrying the tool Carrying power tools with your finger on the switch or energising power tools that have the switch on invites accidents d Remove any adju...

Page 21: ...to maintain the workpiece pressed to the table By using the upward running side of the sanding disc the workpiece could be ejected and cause injury to persons Always keep a minimum distance of about 1 6 mm or less between the table or stop and the sanding belt or disc Do not wear gloves Do not hold the workpiece with a cloth during sanding Use sanding belt or disc of the correct grit corresponding...

Page 22: ...ust be possible for the sanding belt 13 and sanding disc 4 to run freely In case of previously machined wood be aware of any for eign bodies such as nails or screws etc Before pressing the on off switch 5 make sure that the sanding paper is correctly fitted and that moving parts run smoothly 9 Attachment and operation 9 1 Assembling the machine fig 1 4 Mount the sanding table 7 and secure with the...

Page 23: ...en pro cessing metals 10 Transport To transport the power tool disconnect the equipment from the power supply and set it up in the new position you want to use it in 11 Working instructions 11 1 Bevel sanding fig 14 The worktable can be infinitely adjusted from 0 to 45 To do so loosen the locking screw 8 Set the worktable to the desired angle Attention Even when tilted never position the worktable...

Page 24: ... paper grain size 80 120 180 respectively Protective goggles article number 7909601701 13 Storage Store the device and its accessories in a dark dry and frost free place that is inaccessible to children The optimum storage temperature lies between 5 and 30 C Cover the device in stationary use after work to protect it from dust or moisture Store the device in portable use in the original packaging ...

Page 25: ...ct or delivering it to an authorised collection point for the recycling of old electrical and electronic devices Improper handling of waste equipment may have negative consequences for the environment and human health due to potentially hazardous substances that are often contained in electrical and electronic equipment By properly disposing of this product you are also contributing to the effecti...

Page 26: ...tee is rendered null and void if any attempt is made to tamper with the device The guarantee is valid for a period of 3 years starting from the purchase date of the device Guarantee claims should be submitted before the end of the guarantee period within two weeks of the defect being noticed No guarantee claims will be accepted after the end of the guarantee period The original guarantee period re...

Page 27: ...Utilisation conforme 24 6 Consignes de sécurité 25 7 Caractéristiques techniques 27 8 Avant la mise en service 27 9 Configuration et utilisation 28 10 Transport 28 11 Consignes de travail 29 12 Nettoyage et maintenance 29 13 Stockage 30 14 Raccordement électrique 30 15 Mise au rebut et recyclage 30 16 Dépannage 31 17 Certificat de garantie 32 18 Déclaration de conformité 76 ...

Page 28: ...la mise en service lisez le mode d emploi et les consignes de sécurité et respec tez les FR BE Portez des lunettes de protection FR BE Portez une protection auditive FR BE Portez une protection respiratoire sur la génération de poussières FR BE Sens de déplacement de la bande abrasive FR BE AVERTISSEMENT Risque de blessure Ne pas toucher la meule en fonctionnement FR BE Sens de déplacement de la m...

Page 29: ...écurité et les prescriptions particulières en vigueur dans votre pays respectez également les règles techniques générales concernant l utilisation des machines similaires Nous n assumons aucune responsabilité concernant les acci dents et dommages qui surviendraient à la suite du non respect des instructions de la notice et des consignes de sécurité 3 Description de l appareil fig 1 19 1 Vis moleté...

Page 30: ... augmentent le risque de choc électrique e Si l outil électrique est utilisé à l extérieur se servir d une rallonge autorisée pour l exté rieur Le recours à une rallonge convenant à l extérieur réduit le risque de choc électrique f Si l outil électrique doit impérativement être utilisé en milieu humide utiliser un disjoncteur différentiel Le recours à un disjoncteur de protection à courant de fuit...

Page 31: ...agnétique Ce champ peut dans certaines circonstances nuire aux implants médicaux actifs ou passifs Pour réduire les risques de blessures graves voire mortelles nous recommandons aux personnes porteuses d implants médicaux de consulter leur médecin ainsi que le fabricant de leur implant avant d utiliser l outil électrique Règles de sécurité spéciales pour la ponceuse à bande et à disque m AVERTISSE...

Page 32: ...sion de mesure KpA 3 dB Niveau acoustique LWA non chargé 88 7 dB A chargé 89 4 dB A Imprécision de mesure KWA 3 dB Portez une protection auditive Les nuisances sonores peuvent entraîner une perte d audi tion Les valeurs globales d oscillation somme vectorielle des 3 directions ont été calculées conformément à la norme EN 62841 1 La valeur totale des vibrations et la valeur d émission de bruit indi...

Page 33: ...sur un établi Si la ponceuse à bande disque doit être utilisée dans un en droit définitif fixez la à un établi ou à une autre surface stable Pour ce faire marquez les trous de perçage placez la meu leuse dans la position d installation Marquez l emplacement des trous à percer sur l établi Percez les trous dans l établi Placez la meuleuse sur les trous et insérez les vis appropriées par le haut à t...

Page 34: ...ité d une pièce droite au niveau du tambour R libre La pièce usinée W peut être éjectée Risque de blessures Poncez toujours une surface concave sur la bande de ponçage 13 au niveau du rouleau libre Tenez fermement la pièce à poncer Faites attention à vos doigts Risque de blessures Guidez la pièce usinée de manière uniforme sur la bande abrasive 13 Attention Soyez particulièrement prudent si vous p...

Page 35: ...représentant doit s en charger afin d éviter les risques pour la sécurité 14 2 Moteur à courant alternatif La tension du réseau doit être de 230 240 V Les conducteurs des rallonges d une longueur maxi de 25 m doivent présenter une section de 1 5 mm2 Les raccordements et réparations de l équipement électrique doivent être réalisés par un électricien Pour toute question veuillez indiquer les données...

Page 36: ...r marche arrêt endommagé Relais de l interrupteur marche arrêt endommagé La machine ralentit pendant le travail La pression exercée sur la pièce à travailler est trop importante Exercez une pression moindre sur la pièce à travailler La bande abrasive se décentre par rapport au disque d entraînement Elle ne circule pas dans la trace Régler de nouveau la trace Le bois brûle pendant le ponçage La meu...

Page 37: ...luence extérieure comme par exemple les dommages dus à une chute ainsi que l usure normale conforme à l utilisation Ceci est particulièrement valable pour les accumulateurs pour lesquels nous offrons toutefois une période de garantie de 12 mois Le droit à la garantie disparaît dès lors que des interventions ont lieu sur l appareil 3 Le délai de garantie s élève à 3 ans et commence à la date de l a...

Page 38: ...ik conform de voorschriften 35 6 Veiligheidswaarschuwingen 36 7 Technische gegevens 38 8 Voor het eerste gebruik 38 9 Montage en bediening 39 10 Vervoer 40 11 Gebruiksvoorschriften 40 12 Reiniging en onderhoud 40 13 Opslag 41 14 Elektrische aansluiting 41 15 Afvalverwijdering en recyclage 41 16 Oplossing van storingen 42 17 Garantiebewijs 43 18 Conformiteitsverklaring 76 ...

Page 39: ...uig NL BE Lees voorafgaand aan de inbedrijfstelling de gebruikshandleiding en de veiligheids voorschriften NL BE Draag een veiligheidsbril NL BE Draag gehoorbescherming NL BE Bescherm de ademhalingswegen bij stofontwikkeling NL BE Looprichting van de schuurband NL BE Let op Gevaar voor letsel Raak de draaiende onderdelen niet aan NL BE Looprichting van de draaischijf ...

Page 40: ...gemeen erkende technische voorschriften in acht nemen voor de werking machi nes van hetzelfde type Wij zijn niet aansprakelijk voor ongevallen of schade die te wijten zijn aan niet naleving van deze handleiding en van de veiligheidsinstructies 3 Beschrijving van het apparaat afb 1 19 1 Kartelschroef voor schuurbandinstelling 2 Steunvoet 3 Schuurbandklem 4 Schuurplaat 5 Aan uit schakelaar 6 Verstek...

Page 41: ... van hitte scherpe randen of bewe gende delen Beschadigde of opgewikkelde snoeren ver hogen het risico op een elektrische schok e Als u met een elektrisch gereedschap in de open lucht werkt gebruik dan alleen een verlengsnoer dat ook geschikt is voor gebruik buitenshuis De toepassing van een voor buitenshuis gebruik geschikt verleng snoer vermindert het risico op een elektrische schok f Als het ge...

Page 42: ...eon derdelen Hiermee wordt de veiligheid van het elektri sche gereedschap gewaarborgd m WAARSCHUWING Dit elektrisch apparaat genereert een elektromagnetisch veld als het is ingeschakeld Dit veld kan onder bepaalde omstandigheden interfereren met actieve of passieve medische implantaten Om het risico op ernstig of dodelijk letsel te beperken raden we personen met medische implantaten aan om hun art...

Page 43: ...B A belast 82 2 dB A Onzekerheid KpA 3 dB Geluidsprestatieniveau LWA onbelast 88 7 dB A belast 89 4 dB A Onzekerheid KWA 3 dB Draag gehoorbescherming De invoer van ruis kan gehoorverlies veroorzaken Totale tril lingswaarden vectorsom van drie richtingen bepaald con form EN 62841 1 De opgegeven totale trillingswaarde en de opgegeven ge luidsemissiewaarde zijn gemeten volgens een standaardtest metho...

Page 44: ...er van de schuurplaat 4 en monteer de nieuwe klittenband 9 6 Inzet als stationaire machine Voor de continue inzet is de montage op een werkbank aan te bevelen Markeer hiervoor de boorgaten Plaats de schuurmaschine zoals u hem later wilt installeren Teken de locatie van de te boren gaten op de werkbank Boor de gaten door de werkbank Plaats de slijpmachine boven de gaten en breng geëigende schroeven...

Page 45: ...se kanten op de meenemeras R slijpen Daarbij kan het werkstuk W weggeslingerd worden Kans op verwondingen Concave rondingen altijd op de slijpband 13 aan de mee nemeras slijpen Houd het werkstuk vast Pas goed op uw vingers Kans op verwondingen Geleid het werkstuk gelijkmatig over de slijpband 13 Let op Bijzondere voorzichtigheid is geboden bij het slijpen in het bijzonder van dunne of lange materi...

Page 46: ...4 2 Wisselstroommotor De netspanning moet 230 240 V zijn Verlengsnoeren moeten tot een lengte van 25 m een door snede hebben van 1 5 vierkante millimeter Aansluitingen en reparaties van de elektrische uitrusting mo gen uitsluitend door een elektromonteur worden uitgevoerd Vermeld in geval van vragen de volgende gegevens Stroomtype van de motor Gegevens van het typeplaatje van de machine Gegevens v...

Page 47: ...dit niet door een gekwalificeerd vakman uitgevoerd wordt Beschadigde Aan Uit schakelkabel Beschadigd Aan Uit schakelrelais Machine wordt tijdens het werk langzamer Er wordt te grote druk op het werkstuk uitgeoefend Oefen minder druk op het werkstuk uit Slijpband loopt van de aandrijfschijven af Het loopt niet in het spoor Stel het spoor na Het hout brandt tijdens het slijpen Slijpschijf of band is...

Page 48: ...e die zich bij het doelmatig gebruik van het apparaat voordoet Er kan geen aanspraak op garantie worden gemaakt als op het apparaat reeds ingrepen werden uitgevoerd De garantieperiode bedraagt 3 jaar en gaat in op de datum van aankoop van het apparaat Garantieclaims dienen voor het verloop van de garantieperiode binnen de twee weken na het vaststellen van het defect geldend te worden gemaakt Het g...

Page 49: ...aczeniem 46 6 Wskazówki dotyczące bezpieczeństwa 47 7 Dane techniczne 49 8 Przed uruchomieniem 49 9 Montaż i obsługa 50 10 Transport 51 11 Wskazówki dotyczące pracy 51 12 Czyszczenie i konserwacja 51 13 Przechowywanie 52 14 Przyłącze elektryczne 52 15 Utylizacja i ponowne wykorzystanie 53 16 Pomoc dotycząca usterek 53 17 Gwarancja 54 18 Deklaracja zgodności 76 ...

Page 50: ...należy przeczytać niniejszą instrukcję obsługi i przestrzegać wskazówek dotyczących bezpieczeństwa PL Stosować okulary ochronne PL Nosić nauszniki ochronne PL W razie powstania pyłu należy nosić ochronę dróg oddechowych PL Kierunek biegu taśmy szlifierskiej PL OSTRZEŻENIE Niebezpieczeństwo odniesienia obrażeń Nie należy sięgać do pracującej tarczy szlifierskiej PL Kierunek biegu tarczy szlifierski...

Page 51: ...yczących bezpieczeń stwa oraz specjalnych przepisów obowiązujących w danym kraju należy przestrzegać ogólnie przyjętych zasad technicz nych dotyczących eksploatacji maszyn o tej samej budowie Nie ponosimy odpowiedzialności za wypadki ani szkody powstałe wskutek nieprzestrzegania niniejszej instrukcji oraz wskazówek bezpieczeństwa 3 Opis urządzenia rys 1 19 1 Śruba radełkowa do ustawiania taśmy szl...

Page 52: ...sza ryzyko porażenia prądem d Nie wykorzystywać przewodu przyłączenio wego niezgodnie z przeznaczeniem w celu przenoszenia zawieszania narzędzia elek trycznego lub w celu wyjęcia wtyczki z gniaz da Przewód przyłączeniowy przechowywać z dala od gorąca oleju ostrych krawędzi lub ru chomych części urządzeń Uszkodzone lub splątane przewody przełączeniowe zwiększają ryzyko porażenia prądem e W przypadk...

Page 53: ...lają na bezpieczne trzymanie elektronarzędzia i kontrolę nad nim w nieoczekiwanych sytuacjach 5 Serwis a Naprawę urządzenia może wykonywać wy łącznie wykwalifikowany personel i tylko przy użyciu oryginalnych części zamiennych Zapew nia to bezpieczeństwo dalszej pracy narzędzia elektrycz nego m OSTRZEŻENIE Niniejsze narzędzie elektryczne wytwa rza podczas pracy pole elektromagnetyczne Pole to może ...

Page 54: ...zówki bezpieczeństwa oraz Użytkowa nie zgodne z przeznaczeniem jak i całej instrukcji obsługi 7 Dane techniczne Silnik 230 240 V 50 Hz pobór mocy 370 W Wymiary montażowe dł x szer x wys 460 x 360 x 280 mm Ø podkładki 150 mm Obroty podkładki 2850 min 1 Wymiary taśmy szlifierskiej 915 x 100 mm Prędkość taśmy szlifierskiej 7 5 m s pozycja pochyła 0 90 Wymiary stołu 225 x 160 mm Pozycja pochyła stołu ...

Page 55: ...unąć taśmę szlifierską 13 w kierunku jej poruszania się Taśma szlifierska 13 musi poruszać się na środku po wierzchni szlifującej Jeśli tak nie jest można to wyregulo wać śrubą radełkową 1 9 4 Przestawienie pozycji szlifowania taśmy szli fierskiej rys 9 11 Poluzować śrubę imbusową 12 Przesunąć taśmę szlifierską 13 w górę do żądanej po zycji Ponownie dokręcić śrubę imbusową 12 w celu ustalenia tej ...

Page 56: ...tół szlifierski 7 do pod parcia przedmiotu obrabianego W tym celu należy naj pierw poluzować dwie śruby imbusowe 17 a następnie zdjąć szynę ogranicznika 14 Stół szlifierski 7 można teraz wcisnąć w otwór rury nośnej 20 i zamocować śru bą ustalającą 8 Wskazówka Szlifować długie przedmioty obrabiane w pozycji pionowej przesuwając je równomiernie nad taśmą szlifierską 13 11 4 Szlifowanie powierzchni t...

Page 57: ...ainstalowany silnik elektryczny jest gotowy do eksploatacji Przyłącze odpowiada właściwym przepisom VDE Związek Elektryków Niemieckich oraz normom DIN Przyłącze siecio we udostępniane przez klienta oraz przedłużacz muszą być zgodne z powyższymi przepisami 14 1 Uszkodzony elektryczny przewód przyłącze niowy Na przewodach elektrycznych powstają często uszkodzenia izolacji Przyczyną może być Ściskani...

Page 58: ... zużytym sprzętem może mieć nega tywny wpływ na środowisko i zdrowie ludzkie ze względu na potencjalnie niebezpieczne materiały które często znajdują się w zużytym sprzęcie elektrycznym i elektronicznym Po przez prawidłową utylizację tego produktu przyczyniają się Państwo także do efektywnego wykorzystania zasobów natu ralnych Informacje dotyczące punktów zbiórki zużytego sprzętu można otrzymać w ...

Page 59: ...niem się ciał obcych do urządzenia np piasek kamienie lub pył rezultaty użycia siły lub zewnętrznych czynników np uszkodzenie spowodowane upuszczeniem urządzenia i normalne zużycie wynikające z poprawnego użytkowania urządzenia Każda próba ingerencji w urządzenie lub jego modyfikacji skutkuje unieważnieniem gwarancji Gwarancja obowiązuje przez 3 lata od dnia zakupu urządzenia Roszczenia gwarancyjn...

Page 60: ...tí v souladu s určením 57 6 Bezpečnostní pokyny 58 7 Technické údaje 60 8 Před uvedením do provozu 60 9 Montáž a obsluha 60 10 Přeprava 61 11 Pracovní pokyny 61 12 Čištění a údržba 62 13 Skladování 62 14 Elektrické připojení 62 15 Likvidace a recyklace 63 16 Odstraňování poruch 63 17 Záruční list 64 18 Prohlášení o shodě 76 ...

Page 61: ...troje CZ Před uvedením do provozu si přečtěte a dodržujte návod k obsluze a bezpečnostní pokyny CZ Používejte ochranné brýle CZ Používejte ochranu sluchu CZ V případě tvorby prachu noste ochranu dýchacích cest CZ Směr chodu brusného pásu CZ VÝSTRAHA Nebezpečí zranění Nesahejte do běžícího brusného kotouče CZ Směr chodu brusného kotouče ...

Page 62: ...cně uznávaná technická pravidla Nepřebíráme žádnou záruku za nehody nebo škody způso bené nedodržením tohoto návodu a bezpečnostních pokynů 3 Popis přístroje obr 1 19 1 Rýhovaný šroub pro nastavení brusného pásu 2 Podpěrná noha 3 Napínač brusného pásu 4 Brusný talíř 5 Spínač vypínač 6 Příčný doraz 7 Brousicí stůl 8 Zajišťovací šroub pro brousicí stůl 9 Úhlová stupnice 10 Odsávací hrdlo 11 Základní...

Page 63: ...ktrickým proudem f Pokud není možno zabránit provozu elektric kého nástroje ve vlhkém prostředí používejte proudový chránič Použití vložky pro proudový chránič zmírňuje riziko zasažení elektrickým proudem 3 Bezpečnost osob a Při práci s elektrickým nástrojem buďte pozor ní a neustále dávejte pozor na to co děláte a postupujte vždy s rozvahou Nepoužívejte elektrický nástroj jste li unavení nebo pod...

Page 64: ...Stroj montujte a používejte pouze na horizontální ploše Montáž na ploše která není horizontální může způ sobit poškození motoru Má li stroj sklon se během provozu hlavně při broušení dlouhých nebo těžkých obrobků převracet nebo pohybovat musí se dobře spojit s nosným povrchem Přesvědčte se o tom že brusný pás běží správným směrem Řiďte se šipkou na zadní straně pásu Přesvědčete se že má brusný pás...

Page 65: ...e možností až do uplynutí záruční doby RIZIKO Zařízení a obalové materiály nejsou hračka S plastovými sáč ky fóliemi a drobným díly si nesmějí hrát děti Hrozí nebezpečí spolknutí těchto věcí a udušení 8 2 Obecná upozornění Před připojením se přesvědčte že jsou údaje na typovém štítku shodné s údaji sítě VAROVÁNÍ Než zahájíte nastavení přístroje vždy vytáhněte síťovou zástr čku ze zásuvky Před uved...

Page 66: ...e maximálních otáček 9 10 Přípojka odsávání prachu Stroj je vybaven odsávacím hrdlem 10 Při zpracování materiálů se silnou prašností připojte odsávání prachu Pozor Při obrábění kovů nesmí být odsávání prachu připojené 10 Přeprava Pro přepravu elektrického nástroje odpojte přístroj od elektric ké sítě a nainstalujte jej na jiném k tomu určeném místě 11 Pracovní pokyny 11 1 Broušení faset a hran obr...

Page 67: ... 240 Číslo výrobku 7903306601 Brusná sada 12ti dílná Číslo výrobku 7903302601 skládá se z po 3 brusných papírech zrnitost 80 120 180 po 1 brusném pásu zrnitost 80 120 180 Ochranné brýle Číslo výrobku 7909601701 13 Skladování Uložte přístroj a jeho příslušenství na tmavém suchém místě chráněném před mrazem a nedostupném pro děti Optimální skladovací teplota se pohybuje mezi 5 a 30 C Přístroj použív...

Page 68: ...ístě pro recyklaci odpadních elektrických a elektronických zaříze ní Nesprávné zacházení s odpadními zařízeními může mít vzhledem k potenciálně nebezpečným látkám které jsou v od padních elektrických a elektronických zařízeních často obsa žené negativní dopad na životní prostředí a lidské zdraví Správnou likvidací tohoto výrobku přispíváte také k efektivnímu využívání přírodních zdrojů Informace o...

Page 69: ...př písek kameny nebo prach použití násilí nebo poškození v důsledku cizích vlivů jako např škody způsobené pádem jakož také běžného opotřebení způsobeného používáním Nárok na záruku zaniká pokud bylo do přístroje již zasahováno Záruční doba činí 3 roky a začíná datem koupě přístroje Nároky na záruku před vypršením záruční doby je třeba uplatňovat během dvou týdnů od zjištění defektu Uplatňování ná...

Page 70: ...e s určením 67 6 Bezpečnostné upozornenia 68 7 Technické údaje 70 8 Pred uvedením do prevádzky 70 9 Zloženie a obsluha 70 10 Preprava 71 11 Pracovné pokyny 71 12 Čistenie a údržba 72 13 Skladovanie 72 14 Elektrická prípojka 72 15 Likvidácia a opätovné zhodnotenie 73 16 Odstraňovanie porúch 73 17 Záručný list 74 18 Vyhlásenie o zhode 76 ...

Page 71: ...stroja SK Pred uvedením do prevádzky si prečítajte návod na obsluhu a bezpečnostné upozornenia a dodržiavajte ich SK Noste ochranné okuliare SK Noste ochranu sluchu SK V prípade tvorby prachu noste ochranu dýchacích ciest SK Smer chodu brúsneho pásu SK VAROVANIE Nebezpečenstvo poranenia Nesiahajte do bežiaceho brúsneho kotúča SK Smer chodu brúsneho kotúča ...

Page 72: ...technické pravidlá pre prevádzku konštrukčne rovnakých strojov Nepreberáme zodpovednosť za žiadne nehody ani škody ku ktorým dôjde v dôsledku nedodržania tohto návodu a bezpeč nostných upozornení 3 Popis prístroja obr 1 19 1 Ryhovaná skrutka pre nastavenie brúsneho pásu 2 Podperná noha 3 Napínač brúsneho pásu 4 Brúsny tanier 5 Vypínač zap vyp 6 Priečny doraz 7 Brúsny stôl 8 Fixačná skrutka pre brú...

Page 73: ...ým prúdom f Ak sa nedá vyhnúť prevádzke elektrického ná radia vo vlhkom prostredí používajte ochran ný vypínač proti chybnému prúdu Používanie ochranného vypínača proti chybnému prúdu znižuje riziko zásahu elektrickým prúdom 3 Bezpečnosť osôb a Buďte pozorní dávajte pozor na to čo robí te a s elektrickým náradím pracujte rozumne Elektrické náradie nepoužívajte ak ste una vení alebo ste pod vplyvom...

Page 74: ...aru zraneniam alebo iným poško deniam výrobku Vždy používajte ochranné okuliare Tento stroj sa smie používať iba na práce v interiéri Dôležité Brúsku montujte a používajte iba na vodorovnej ploche Montáž na ploche ktorá nie je vodorovná môže viesť k poškodeniu motora Ak hrozí tendencia toho že by sa mohol stroj posúvať alebo prevrátiť počas prevádzky predovšetkým pri brúsení dlhých alebo ťažkých o...

Page 75: ...olujte či je rozsah dodávky kompletný Prístroj a diely príslušenstva skontrolujte ohľadom poškodení spôsobených prepravou Obal podľa možnosti uschovajte až do uplynutia záruč nej doby NEBEZPEČENSTVO Prístroj a obalové materiály nie sú hračkami pre deti Deti sa nesmú hrať s plastovými vreckami fóliami a malými dielmi Existuje nebezpečenstvo prehltnutia a zadusenia 8 2 Všeobecné pokyny Pred pripojen...

Page 76: ...ane Dôležité Kusy dreva by sa mali vždy brúsiť v smere textúry dreva aby sa zabránilo odlupovaniu Pozor Ak by sa pri prácach zablokoval brúsny tanier 4 alebo brúsny pás 13 odstráňte obrobok a počkajte kým nedosiahne váš prístroj opäť najvyššie otáčky 9 10 Prípojka odsávania prachu Stroj je vybavený odsávacím hrdlom 10 Zatvorte odsávanie prachu pri spracovaní silno prašných ma teriálov Pozor Pri ob...

Page 77: ...lo artikla 88000212 K 180 číslo artikla 88000221 K 80 číslo artikla 88000211 Ø brúsneho papiera 150 mm 10 kusov K 80 číslo artikla 88000208 K 120 číslo artikla 88000209 K 180 číslo artikla 88000220 K 240 číslo artikla 7903306601 12 dielny brúsny set číslo artikla 7903302601 pozostáva z 3x brúsny papier zrnitosť 80 120 180 1x brúsny pás zrnitosť 80 120 180 Ochranné okuliare číslo artikla 7909601701...

Page 78: ...dôjsť napríklad vrátením pri nákupe podob ného výrobku alebo odovzdaním autorizovanému zbernému stredisku na recykláciu odpadu zo starých elektrických a elek tronických zariadení Neodborné zaobchádzanie so starými zariadeniami môže mať v dôsledku potenciálne nebezpeč ných látok ktoré obsahuje odpad z elektrických a elektronic kých zariadení negatívny vplyv na životné prostredie a zdravie osôb Odbo...

Page 79: ...elies do prístroja ako napr piesok kamene alebo prach použitím násilia alebo cudzieho pôsobenia napr škody spôsobené pádom a taktiež je vylúčené bežné opotrebenie primerané použitiu Nárok na záruku zaniká ak už boli na prístroji svojvoľne uskutočnené zásahy Doba záruky je 3 roky a začína sa dátumom nákupu prístroja Nároky na záruku sa musia uplatniť pred koncom uplynutia záručnej doby do dvoch týž...

Page 80: ......

Page 81: ... 2011 65 EU des Europäischen Parlaments und des Rates vom 8 Juni 2011 zur Beschränkung der Verwendung bestimmter gefährlicher Stoffe in Elektro und Elektronikgeräten The object of the declaration described above fulfils the regulations of the directive 2011 65 EU of the European Parliament and Council from 8th June 2011 on the restriction of the use of certain hazardous substances in electrical an...

Page 82: ......

Page 83: ......
Page 84: ...r 69 D 89335 Ichenhausen 8 Stand der Informationen Last Information Update Version des informations Stand van de informatie Stan informacji Stav informací Stav informácií Update 04 2020 Ident No 339368_2001_ 39033069915 IAN 339368_2001 FSC C151396 FSC C151396 FSC C151396 ...

Reviews: