PDEXS 150 C2
■
8
│
US - EN
Lubrication
►
To avoid friction and corrosion damage,
regular lubrication is particularly important.
We recommend using a suitable special oil
for compressed air appliances (e.g. Liqui Moly
compressor oil).
–
Lubrication with mist oiler
–
A mist oiler (not supplied) continuously
and optimally lubricates the appliance
as a preparation stage after the pressure
reducer. A mist oiler gives off fine drops of
oil into the air flow and thus guarantees
a regular lubrication.
–
Manual lubrication
–
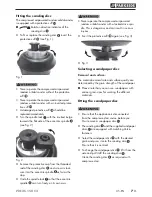
If you do not have a mist oiler, lubricate the
appliance before every use or longer work
sessions by dripping 3–4 drops of special
oil for compressed air appliances into the
connector nipple .
Refilling oil
To ensure that the compressed air-powered random
orbital sander remains operational for as long as
possible, make sure that there is sufficient pneu-
matic oil in the appliance.
The following options are available:
♦
Attach a maintenance unit with an oiler to the
compressor.
♦
Install a fitted oiler into the compressed air line
or the compressor.
♦
Add 3–5 drops of pneumatic oil into the con-
nector nipple every 15 minutes of operation.
Connecting to a compressed air source
►
Before connecting the compressed air source
–
the correct working pressure (3–6 bar)
must be fully reached
–
make sure that the trigger is in the upper
position
♦
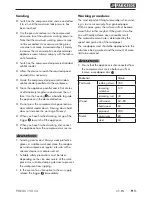
Attach the appliance to a compressor by con-
necting the connector nipple with the supply
hose of the compressed air source.
♦
To ensure that you can regulate the air pressure,
the compressed air source must be equipped
with a pressure reducer.
Operation
Switching on and off
Switching on:
♦
First press the locking mechanism forwards and
then the trigger to switch the appliance on.
Switching off:
♦
Let go of the trigger .
♦
When you have finished working, disconnect
the appliance from the compressed air source.
Regulation of vibration output
■
Use the speed controller to control the air-
flow and thus the vibration output (also during
operation).
■
The ideal speed depends on the material being
worked and can be determined through practical
tests.
Use the pressure reducer to set the correct working
pressure.
Summary of Contents for PDEXS 150 C2
Page 3: ...PARKSIDE...
Page 15: ...PDEXS 150 C2 12 US EN...


