background image

GB

IE

NI

 5


PDFS 1300 A1

Safety instructions for abrasive saws

a)  

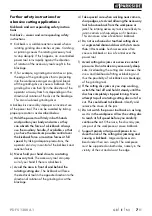
The blade guard, which is a part of the power 
tool, must be attached securely and set in a 
way that ensures maximum safety, i.e. the 
smallest possible amount of the grinding tool 
is exposed to the operator. Ensure that you 
and anyone else in the vicinity remain outside 
of the range of the rotating grinding disc. 

The 

blade guard is designed to protect the operator 
from fragments and accidental contact with the 
grinding tool .

b)  

Use only diamond-coated cutting discs for 
your power tool.

 Just because you can attach 

the accessories to your power tool does not 
guarantee they are safe to use .

c)  

The permissible speed of the accessory tool 
used must be at least as high as the maximum 
speed specified for the power tool.

 Accessories 

that rotate faster than the permissible rate can 
break and throw pieces into the air .

d)  

Grinding tools should only be used for the 
recommended applications. For example: 
Never grind with the side surface of a cutting 
disc.

 Cutting discs are designed to remove 

material with the edge of the disc . Any lateral 
application of force on these grinding tools can 
lead to a breakage .

e)  

Always use an undamaged clamping flange 
of the correct size and shape for the selected 
grinding disc.

 Suitable flanges support the 

grinding disc and reduce the risk of a disc 
breakage .

f)  

The external diameter and thickness of the 
attachment part used must comply with the 
dimensions of the power tool.

 Incorrectly  

dimensioned accessory tools cannot be suffi-
ciently shielded or controlled .

g)  

Grinding discs and flanges must fit precisely 
onto the grinding spindle of your power tool.


Accessory tools which do not fit precisely on 
the grinding spindle of the power tool will rotate 
unevenly, vibrate severely and can lead to a 
loss of control .

h)  

Do not use damaged grinding discs. Check 
the grinding discs for chips and cracks before 
each use. If the power tool or grinding disc is 
dropped, check to see if either is damaged, 
or use an undamaged grinding disc. After 
checking and inserting the grinding disc, 
ensure that you and any other people in the 
vicinity remain outside of the range of the 
rotating grinding disc and allow the tool to 
rotate at maximum speed for one minute.


Damaged grinding discs usually break during 
this test period .

i)  

Wear personal protective equipment.  
Depending on the application, ensure that 
you use full face protection, eye protection 
or goggles. If required, use a dust mask, ear 
muffs, protective gloves or a special apron to 
protect you from grindings and material par-
ticles.

 Protect your eyes from flying debris that 

may be created during certain applications . 
Dust or filter masks must be used to filter any 
dust created by the application . Long-term expo-
sure to loud noise can cause a hearing loss .

j)  

Ensure that other people remain at a safe dis-
tance to your workspace. Anyone who enters 
the workspace must wear personal protective 
equipment.

 Fragments of the workpiece or bro-

ken accessory tools can fly off and cause injury 
– even outside the immediate working area .

k)  

Hold the appliance only by its insulated grip-
ping surfaces when you are performing work 
during which the power tool may hit hidden 
power lines or its own power cord.

 Contact 

with a live cable can also make metal parts of 
the appliance live and could result in an electric 
shock .

l)  

Keep the power cord away from rotating 
tools

 . If you lose control of the appliance, the 

cord may get cut or caught and your hand or 
arm could get caught in the rotating accessory 
tool .

m)  

Never remove the power tool before the 
accessory tool has come to a complete stop.


The rotating accessory tool could come into 
contact with the surface and cause you to lose 
control of the power tool .

Summary of Contents for PDFS 1300 A1

Page 1: ...DIAMOND STONE CUTTER PDFS 1300 A1 DIAMOND STONE CUTTER Translation of the original instructions DIAMANTSCHNEIDER Originalbetriebsanleitung IAN 312517 ...

Page 2: ...ebsanleitung Seite 15 Before reading unfold both pages containing illustrations and familiarise yourself with all functions of the device Klappen Sie vor dem Lesen die beiden Seiten mit den Abbildungen aus und machen Sie sich anschließend mit allen Funktionen des Gerätes vertraut ...

Page 3: ...A B C ...

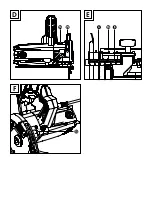
Page 4: ...E D F ...

Page 5: ...ng applications 7 Supplementary notes 8 Residual risks 8 Working procedures 8 Assembly 9 Fitting changing the cutting disc 9 Fitting setting the rip fence 9 Fitting the water inlet hose 9 Installing the dust extraction system 10 Operation 10 Residual current circuit breaker 10 Switching on and off 10 Setting the cutting angle 10 Setting the cutting depth 10 Handling the appliance 11 Maintenance an...

Page 6: ...itch Locking screw Dust outlet Rip fence slot Wing screw for cutting angle preselector Cutting angle scale Wing screw for rip fence slot Screws Rip fence Vacuum adapter for dust extraction Cutting disc Clamping flange Clamping screw washer Hex key Water inlet Accessory screw Valve Water inlet hose Water connection adapter RESET button Indicator Test button Residual current circuit breaker Spindle ...

Page 7: ... to follow the warnings and instructions may result in electric shock fire and or serious injury Save all warnings and instructions for future reference The term power tool in the warnings refers to your mains operated corded power tool or battery operated cordless power tool 1 Work area safety a Keep work area clean and well lit Cluttered or dark areas invite accidents b Do not operate power tool...

Page 8: ...ed for the connection of dust extraction and collection facilities ensure these are connected and properly used Use of dust collection can reduce dust related haz ards 4 Power tool use and care a Do not force the power tool Use the correct power tool for your application The correct power tool will do the job better and safer at the rate for which it was designed b Do not use the power tool if the...

Page 9: ... severely and can lead to a loss of control h Do not use damaged grinding discs Check the grinding discs for chips and cracks before each use If the power tool or grinding disc is dropped check to see if either is damaged or use an undamaged grinding disc After checking and inserting the grinding disc ensure that you and any other people in the vicinity remain outside of the range of the rotating ...

Page 10: ... stable platform It is important to properly support the workpiece to protect your body prevent the cutting disc from jamming and to maintain control of the tool u Never use damaged or incorrect washers or a damaged or incorrect bolt for the cutting disc The washers and bolts for the cutting disc are specially designed for your machine to achieve optimum performance and reliability v Do not unplug...

Page 11: ...back c Avoid the area in front of and behind the rotating cutting disc The kickback will force the electrical tool in the opposite direction to the direction of rotation of the grinding disc at the blockage d Take special care when working near corners sharp edges etc Avoid allowing the accessory tool to bounce back from the workpiece or jam The rotating accessory tool is more likely to jam in cor...

Page 12: ... workpiece Use clamps a vice to hold the workpiece firmly in place This is much safer than simply holding it in your hand Materials containing asbestos may not be processed Asbestos is a known carcinogen Tip This symbol indicates proper behaviour DANGER ALWAYS GUIDE THE APPLIANCE THROUGH THE WORK PIECE IN REVERSE ROTATION In the opposite direction there is a risk of kickback The appliance can be p...

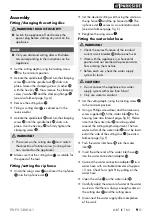
Page 13: ...lot The rip fence slot serves as an orientation mark see also fold out page fig E Retighten the wing screw Fitting the water inlet hose WARNING Check the correct function of the residual current circuit breaker before each use Work with the appliance in a horizontal position and not overhead to prevent water from entering the machine Before each use check the water supply system for leaks CAUTION ...

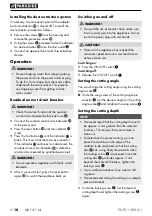
Page 14: ...ance with faulty circuit breakers After a successful test press the reset button again to switch the appliance back on Switching on and off WARNING To avoid the risk of electric shock make sure that no water gets into the appliance Do not touch the power plug with wet hands CAUTION Wait until the appliance has reached the maximum speed and use a low feed rate to achieve clean cuts Switching on Pre...

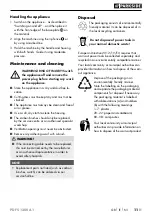
Page 15: ...e needs to be replaced this must be carried out by the manufacturer or an authorised representative in order to avoid safety hazards NOTE Replacement parts not listed such as carbon brushes switch can be ordered via our service hotline Disposal The packaging consists of environmentally friendly material It can be disposed of in the local recycling containers Do not dispose of power tools in your n...

Page 16: ...ts The warranty period is not prolonged by repairs effected under the warranty This also applies to replaced and repaired components Any damage and defects present at the time of purchase must be reported immediately after unpacking Repairs carried out after expiry of the warranty period shall be subject to a fee Scope of the warranty This appliance has been manufactured in accord ance with strict...

Page 17: ...ided to you Ensure that you enclose the proof of purchase till receipt and information about what the defect is and when it occurred You can download these instructions along with many other manuals product videos and installation software at www lidl service com This QR code will take you directly to the Lidl service page www lidl service com where you can open your operating instructions by ente...

Page 18: ...ration The object of the declaration described above complies with the requirements of the Directive 2011 65 EU of the European Parliament and Council of 8 June 2011 on the limitations of use of certain dangerous substances in electrical and electronic appliances Applied harmonised standards EN 60745 1 2009 A11 2010 EN 60745 2 22 2011 A11 2013 EN 55014 1 2017 EN 55014 2 2015 EN 61000 3 2 2014 EN 6...

Page 19: ...ennschleifmaschinen 19 Weitere Sicherheitshinweise für Trennschleifanwendungen 21 Ergänzende Anweisungen 22 Restrisiken 22 Arbeitshinweise 23 Montage 23 Trennscheibe montieren wechseln 23 Parallelanschlag montieren einstellen 23 Wasser Zulaufschlauch montieren 24 Staubabsaugung montieren 24 Bedienung 24 Fehlerstromschutzschalter 24 Ein und ausschalten 25 Schnittwinkel einstellen 25 Schnitttiefe ei...

Page 20: ...N AUS Schalter Feststellschraube Staubauswurf Parallelanschlagaufnahme Flügelschraube für Schnittwinkelvorwahl Schnittwinkelskala Flügelschraube für Parallelanschlagaufnahme Schrauben Parallelanschlag Adapter für Staubabsaugung Trennscheibe Spannflansch Spannschraube Unterlegscheibe Innensechskantschlüssel Wasserzulauf Zubehörschraube Ventil Wasser Zulaufschlauch Wasseranschlussadapter Reset Taste...

Page 21: ...e für Elektrowerkzeuge WARNUNG Lesen Sie alle Sicherheitshinweise und Anweisungen Versäumnisse bei der Einhal tung der Sicherheitshinweise und Anweisun gen können elektrischen Schlag Brand und oder schwere Verletzungen verursachen Bewahren Sie alle Sicherheitshinweise und Anweisungen für die Zukunft auf Der in den Sicherheitshinweisen verwendete Begriff Elektrowerkzeug bezieht sich auf netzbetrieb...

Page 22: ...gen Wenn Sie beim Tragen des Elektrowerkzeuges den Finger am Schalter haben oder das Gerät bereits einge schaltet an die Stromversorgung anschließen kann dies zu Unfällen führen d Entfernen Sie Einstellwerkzeuge oder Schrau benschlüssel bevor Sie das Elektrowerkzeug einschalten Ein Werkzeug oder Schlüssel der sich in einem drehenden Geräteteil befindet kann zu Verletzungen führen e Vermeiden Sie e...

Page 23: ...zeug befestigen können garantiert das keine sichere Verwendung c Die zulässige Drehzahl des Einsatzwerkzeugs muss mindestens so hoch sein wie die auf dem Elektrowerkzeug angegebene Höchst drehzahl Zubehör das sich schneller als zuläs sig dreht kann zerbrechen und umherfliegen d Schleifkörper dürfen nur für die empfohlenen Einsatzmöglichkeiten verwendet werden Zum Beispiel Schleifen Sie nie mit der...

Page 24: ...Sie es tragen Ihre Kleidung kann durch zufälligen Kontakt mit dem sich drehen den Einsatzwerkzeug erfasst werden und das Einsatzwerkzeug sich in Ihren Körper bohren o Reinigen Sie regelmäßig die Lüftungsschlitze Ihres Elektrowerkzeugs Das Motorgebläse zieht Staub in das Gehäuse und eine starke Ansammlung von Metallstaub kann elektrische Gefahren verursachen p Verwenden Sie das Elektrowerkzeug nich...

Page 25: ...schlag und entsprechende Sicherheitshinweise Rückschlag Ursachen und entsprechende Sicherheitshinweise Rückschlag ist die plötzliche Reaktion infolge einer hakenden oder blockierten drehenden Schleifscheibe Verhaken oder Blockieren führt zu einem abrupten Stopp des rotierenden Einsatzwerkzeugs Dadurch wird ein unkontrol liertes Elektrowerkzeug gegen die Drehrichtung des Einsatzwerkzeugs an der Blo...

Page 26: ...ehzahl erreichen bevor Sie den Schnitt vorsichtig fortsetzen Anderenfalls kann die Scheibe verhaken aus dem Werkstück springen oder einen Rückschlag verursachen i Stützen Sie Platten oder große Werkstücke ab um das Risiko eines Rückschlags durch eine eingeklemmte Trennscheibe zu vermin dern Große Werkstücke können sich unter ihrem eigenen Gewicht durchbiegen Das Werkstück muss auf beiden Seiten de...

Page 27: ...rauf was Sie tun und gehen Sie stets mit Vernunft vor Benutzen Sie das Gerät in keinem Fall wenn Sie unkonzentriert sind oder sich unwohl fühlen Montage Trennscheibe montieren wechseln WARNUNG VERLETZUNGSGEFAHR Schalten Sie vor allen Arbeiten am Gerät das Gerät aus und ziehen Sie den Netzstecker HINWEIS Verwenden Sie nur Diamanttrennscheiben mit Durchmessern entsprechend den Aufschriften auf dem G...

Page 28: ...ndere Ende des Wasser Zulaufschlauchs auf den Wasseranschluss adapter Schließen Sie den Wasseranschlussadapter an einen Wasserleitungsschlauch mit passen dem Durchmesser von ca 19 mm an Prüfen Sie den festen Sitz indem Sie am Wasserleitungs schlauch ziehen Öffnen Sie das Ventil am Wasserzulauf Stellen Sie die Wassermenge so gering wie nö tig an der Wasserquelle ein Es muss sich immer ausreichend W...

Page 29: ...hlen die Schnitttiefe möglichst ca 3 mm größer als die Materialstärke zu wählen Dadurch erzielen Sie einen sauberen Schnitt Um die korrekte Einstellung zu ermitteln können Sie das Gerät auf die Kante des zu bearbeitenden Materials stellen sodass die Trennscheibe bei gelöster Feststell schraube frei nach unten schwingen kann Wenn die Trennscheibe ca 3 mm über die Materialstärke hinausragt ziehen Si...

Page 30: ...toffe Möglichkeiten zur Entsorgung des ausgedienten Produkts erfahren Sie bei Ihrer Gemeinde oder Stadtver waltung Garantie der Kompernaß Handels GmbH Sehr geehrte Kundin sehr geehrter Kunde Sie erhalten auf dieses Gerät 3 Jahre Garantie ab Kaufdatum Im Falle von Mängeln dieses Produkts stehen Ihnen gegen den Verkäufer des Produkts gesetzliche Rechte zu Diese gesetzlichen Rechte werden durch unser...

Page 31: ...n und die Artikelnummer z B IAN 123456 als Nachweis für den Kauf bereit Die Artikelnummer entnehmen Sie bitte dem Ty penschild am Produkt einer Gravur am Produkt dem Titelblatt der Bedienungsanleitung unten links oder dem Aufkleber auf der Rück oder Unterseite des Produktes Sollten Funktionsfehler oder sonstige Mängel auftreten kontaktieren Sie zunächst die nachfol gend benannte Serviceabteilung t...

Page 32: ...rklärung trägt der Hersteller Der oben beschriebene Gegenstand der Erklärung erfüllt die Vorschriften der Richtlinie 2011 65 EU des Europäischen Parlaments und des Rates vom 8 Juni 2011 zur Beschränkung der Verwendung bestimm ter gefährlicher Stoffe in Elektro und Elektronikgeräten Angewandte harmonisierte Normen EN 60745 1 2009 A11 2010 EN 60745 2 22 2011 A11 2013 EN 55014 1 2017 EN 55014 2 2015 ...

Page 33: ...KOMPERNASS HANDELS GMBH BURGSTRASSE 21 DE 44867 BOCHUM GERMANY www kompernass com Last Information Update Stand der Informationen 04 2019 Ident No PDFS1300A1 022019 2 IAN 312517 ...

Reviews: