10 GB/IE/CY
Use sharp planer blades only.
Do not soak the materials or the sur-
face you are about to work on with
liquids containing solvents.
Avoid contact with rotating parts.
Never use the device for a purpose
for which it was not intended or with
non-original parts / accessories.
Hold the device securely when work-
ing.
Ensure that you are standing in a stable,
well-balanced position.
Always keep the device clean, dry
and free from oil or grease.
Original accessories/
attachments
Use only the accessories and attach-
ments detailed in the operating instruc-
tions.
The use of attachments or accessories
other than those recommended here could
lead to you suffering an injury.
Preparing for use
Switching On / Off
Switching on:
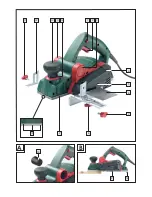
First press the safety lock-out
1
.
Then press and keep pressed the ON / OFF
switch
2
.
Switching off:
Release the ON / OFF switch
2
.
Note:
For safety reasons the ON / OFF switch
2
cannot be locked in the ON position.
Setting the cutting depth
The rotary control
13
can be used to set the cutting
depth in steps from 0 – 3.0 mm according to the
cutting depth scale
14
.
Vacuum extraction of dust /
debris (see Fig. A)
WARNING!
DANGER OF INJURY!
Before you carry out any work on the device al-
ways pull the mains plug out of the mains socket.
Planing debris removal port (right / left
selectable):
Release the planing debris removal port
3
by
turning it against the direction of the arrow (out
of the “Lock” position).
Pull the planing debris removal port
3
out of
the device.
The planing debris removal port
3
can be set
to face left or right in the planer.
Push the planing debris removal port
3
into
the device.
Lock the planing debris removal port
3
by
turning it into the “Lock” position.
External vacuum extraction:
If necessary fit the reducer piece
15
when using
a dust extraction system, e.g. a workshop dust
extraction system.
The vacuum cleaner / dust extraction device used
must be suitable for the material being planed.
Connection:
Place the reducer piece
15
firmly on to the
planing debris removal port
3
.
Push the hose of a suitable dust extraction device
approved for that purpose (e.g. a workshop
vacuum cleaner) on to the planing debris remov-
al port
3
or the reducer piece
15
.
Removal:
Pull the hose of the dust extraction device off
the planing debris removal port
3
or off the
reducer piece
15
.
Pull off the reducer piece
15
, if fitted.
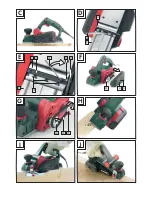
Parking shoe (see Figs. B / C)
The parking shoe
16
allows you to lay the device
down without the risk of damaging the workpiece.
General safety advice for electrical power tools / Preparing for use


