background image

PHKSA 12 A2

■ 

6 

GB

IE

NI

c)  

Set the cutting depth to match the thickness 
of the workpiece.

 The blade should not extend 

more than one full tooth depth under the work-
piece .

d)  

Never hold the workpiece to be sawn in your 
hand or over your leg. Fasten the workpiece 
onto a stable working surface.

 It is important 

to fasten the workpiece securely to minimise the 
danger of bodily contact, jamming of the saw 
blade or loss of control .

e)  

Hold the power tool only by the insulated 
handles when you are carrying out work 
in which the accessory tool may come into 
contact with concealed power cables.

 Contact 

with a live wire will also make exposed metal 
parts of the power tool live and could give the 
operator an electric shock .

f)  

When making longitudinal cuts, always use 
a rip fence or a straight edge guide.

 This will 

improve the accuracy of your cut and reduce 
the likelihood of the saw blade jamming .

g)  

Always use saw blades of the correct size 
and with an appropriate central fixing bore 
(e.g. diamond-shaped or circular).

 Blades that 

do not match the mounting hardware of the saw 
will run eccentrically, causing loss of control .

h)  

Never use damaged or incorrect blade 
washers or bolts.

 The saw blade washers and 

screws have been specially designed to provide 
optimum performance and operational safety 
for your saw .

Further safety instructions for all saws

Kickback – causes and corresponding safety 
instructions


A kickback is a sudden reaction caused as a 
result of the saw blade catching, jamming or 
being falsely aligned, causing the saw to jump 
up uncontrollably and out of the workpiece in 
the direction of the operator;


if the saw blade catches or jams in a narrowing 
saw cut, the blade can no longer rotate and the 
power of the motor throws the appliance back 
in the direction of the operator;


if the saw blade twists in the saw cut or be-
comes misaligned, the teeth at the rear edge of 
the saw blade can become caught in the wood 
surface, causing the saw blade to jump out of 
the cut and the saw to jump backwards in the 
direction of the operator .

Kickback is a result of saw misuse and/or incorrect 
operating procedures or conditions . This can be 
avoided by taking proper precautions as given 
below .
a)  

Hold the saw firmly and position your arms 
so that they can absorb the force of a kick-
back. Always stand to the side of the saw 
blade and never in line with it.

 If a kickback 

occurs, the circular saw may jump backwards . 
However, by taking appropriate precautions the 
operator can control the kickback forces .

b)  

If the saw blade jams or you stop working, 
switch the saw off and hold it steadily in the 
workpiece until the saw blade has completely 
stopped turning. Never attempt to remove 
the saw from the workpiece or pull it back-
wards while the saw blade is still moving as 
this could lead to a kickback.

 Investigate and 

take corrective actions to eliminate the cause of 
blade binding .

c)  

If you want to restart a saw that is still in the 
workpiece, centre the saw blade in the cut 
and check to ensure that the teeth are not 
caught anywhere in the workpiece.

 If the saw 

blade catches it can jump out of the workpiece 
or cause a kickback when the saw is restarted .

d)  

Support large panels to minimise the risk of 
blade pinching and kickback.

 Large panels 

tend to bend under their own weight . Panels/
boards must be supported on both sides: i .e . 
both in the vicinity of the saw cut and also at 
the edge .

e)  

Do not use blunt or damaged saw blades.


Saw blades with blunt or misaligned teeth may 
cause excessive friction as the saw cut is too 
narrow, and this can cause a saw blade jam 
and kickback .

f)  

Before sawing, ensure that the fastenings for 
the cut depth and cut angle settings are tight-
ened.

 If the settings change while sawing, the 

saw blade might jam and cause a kickback .

Summary of Contents for PHKSA 12 A2

Page 1: ...CORDLESS CIRCULAR SAW PHKSA 12 A2 CORDLESS CIRCULAR SAW Translation of the original instructions AKKU HANDKREISS GE Originalbetriebsanleitung IAN 320139_1901...

Page 2: ...riebsanleitung Seite 15 Before reading unfold the page containing the illustrations and familiarise yourself with all functions of the device Klappen Sie vor dem Lesen die Seite mit den Abbildungen au...

Page 3: ...A B C...

Page 4: ...APK 12 A1 A2 B1 battery pack 12V max 10 8V Charging times Charging currents 2 Ah Battery pack PAPK 12 A1 2 Ah Battery pack PAPK 12 A2 4 Ah Battery pack PAPK 12 B1 max 2 4 A Charger PLGK 12 A1 60 min 2...

Page 5: ...r saw blades 8 Original accessories auxiliary equipment 8 Before use 8 Removing charging inserting the battery pack 8 Checking blade guard functionality 8 Operation 9 Fitting changing the saw blade 9...

Page 6: ...mmercial use Features Figure A Safety lock out ON OFF switch Release button for battery pack Battery pack Cutting depth scale Locking screw Base plate Blade guard Wing screw for rip fence slot Spindle...

Page 7: ...nner in which the power tool is being used and in particular the kind of workpiece that is being worked the vibration and noise emission values can deviate from the values given in these instructions...

Page 8: ...to power source and or battery pack picking up or carrying the tool Carrying power tools with your finger on the switch or energising power tools that have the switch on invites accidents d Remove any...

Page 9: ...Under abusive conditions liquid may be ejec ted from the battery avoid contact If contact accidentally occurs flush with water If liquid contacts eyes additionally seek medical help Liquid ejected fr...

Page 10: ...erator if the saw blade twists in the saw cut or be comes misaligned the teeth at the rear edge of the saw blade can become caught in the wood surface causing the saw blade to jump out of the cut and...

Page 11: ...the lower blade guard is covering the blade before placing the saw down on the workbench or floor An unpro tected coasting saw blade will move the saw in the opposite direction to the cutting directio...

Page 12: ...e charger for at least 1 hour This guarantees full battery performance You can charge the lithium ion battery at any time without short ening its service life Interrupting the charging process does no...

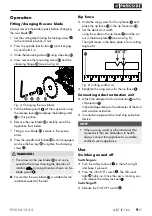
Page 13: ...on the blade guard Ensure that the saw blade is suitable for the rotational speed of the tool Rip fence Undo the wing screw for the rip fence and place the rip fence in the rip fence slot Set the desi...

Page 14: ...eference marks see arrow in fig D Retighten the locking screw Fig D Setting the cutting depth Working with the circular saw 1 Switch on the appliance as described in Switching on and off and then plac...

Page 15: ...year warranty valid from the date of purchase If this product has any faults you the buyer have certain statutory rights Your statutory rights are not restricted in any way by the warranty described...

Page 16: ...ttom of the product If functional or other defects occur please contact the service department listed either by telephone or by e mail You can return a defective product to us free of charge to the se...

Page 17: ...object of the declaration described above complies with the requirements of the Directive 2011 65 EU of the European Parliament and Council of 8 June 2011 on the limitations of use of certain dangero...

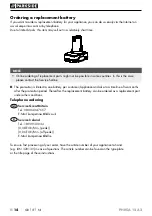
Page 18: ...on is limited to one battery per customer appliance and also to a timeline of two months after the promotion period Thereafter the replacement battery can be ordered as a replacement part under other...

Page 19: ...herheitshinweise f r Ladeger te 22 Sicherheitshinweise f r Kreiss gebl tter 23 Originalzubeh r zusatzger te 23 Vor der Inbetriebnahme 23 Akku Pack entnehmen laden einsetzen 23 Funktion der Schutzhaube...

Page 20: ...ttung Abbildung A Einschaltsperre EIN AUS Schalter Entriegelungstaste f r Akku Pack Akku Pack Schnitttiefenskala Feststellschraube Grundplatte Schutzhaube Fl gelschraube f r Parallelanschlagaufnahme S...

Page 21: ...orl ufigen Ein sch tzung der Belastung verwendet werden WARNUNG Die Schwingungs und Ger uschemissionen k nnen w hrend der tats chlichen Benutzung des Elektrowerkzeugs von den Angabewerten abweichen ab...

Page 22: ...hen Schlages e Wenn Sie mit einem Elektrowerkzeug im Freien arbeiten verwenden Sie nur Ver l ngerungsleitungen die auch f r den Au enbereich zugelassen sind Die Anwen dung einer f r den Au enbereich g...

Page 23: ...igten Start des Elektrowerkzeugs d Bewahren Sie unbenutzte Elektrowerkzeuge au erhalb der Reichweite von Kindern auf Lassen Sie keine Personen das Elektrowerk zeug benutzen die mit diesem nicht vertra...

Page 24: ...ssen Sie Ihr Elektrowerkzeug nur von qua lifiziertem Fachpersonal und nur mit Original Ersatzteilen reparieren Damit wird sicherge stellt dass die Sicherheit des Elektrowerkzeugs erhalten bleibt b War...

Page 25: ...rem K rper brin gen Bei einem R ckschlag kann die Kreiss ge r ckw rts springen jedoch kann die Bedienper son durch geeignete Vorsichtsma nahmen die R ckschlagkr fte beherrschen b Falls das S geblatt v...

Page 26: ...eblatt bedeckt Ein un gesch tztes nachlaufendes S geblatt bewegt die S ge entgegen der Schnittrichtung und s gt was ihm im Weg ist Beachten Sie dabei die Nachlaufzeit des S geblatts Sicherheitshinweis...

Page 27: ...Sie die volle Leistung des Akkus Sie k nnen den Li Ionen Akku jederzeit aufladen ohne die Lebensdauer zu verk r zen Eine Unterbrechung des Ladevorgangs sch digt den Akku nicht Falls sich der Akku im B...

Page 28: ...en Sie den Parallelanschlag in die Parallelanschlagauf nahme ein Stellen Sie die gew nschte Schnittbreite ein Unter zu Hilfenahme der Skala auf dem Paral lelanschlag und den Aussparungen in der Grundp...

Page 29: ...n Schnitt L sen Sie die Feststellschraube und stellen Sie die gew nschte Schnitttiefe an der Schnitt tiefenskala anhand der Referenzmarke ein siehe Pfeilmarkierung Abb D Ziehen Sie die Feststellschrau...

Page 30: ...e die Kennzeichnung auf den verschiedenen Verpackungsmate rialien und trennen Sie diese gegeben enfalls gesondert Die Verpackungsma terialien sind gekennzeichnet mit Abk rzungen a und Ziffern b mit fo...

Page 31: ...f r den privaten und nicht f r den gewerblichen Gebrauch bestimmt Bei missbr uchlicher und unsachgem er Behandlung Gewaltanwendung und bei Eingriffen die nicht von unserer autorisierten Serviceniederl...

Page 32: ...hergestellt dass die Sicherheit des Ger tes erhalten bleibt Service Deutschland Tel 0800 5435 111 kostenfrei aus dem dt Festnetz Mobilfunknetz E Mail kompernass lidl de Service sterreich Tel 0820 201...

Page 33: ...r gt der Hersteller Der oben beschriebene Gegenstand der Erkl rung erf llt die Vorschriften der Richtlinie 2011 65 EU des Europ ischen Parlaments und des Rates vom 8 Juni 2011 zur Beschr nkung der Ver...

Page 34: ...Kunde Ger t sowie auf eine Laufzeit von zwei Monaten nach dem Aktionszeitraum Danach kann der Ersatzakku als Ersatzteil zu anderen Konditionen weiter hin bestellt werden Telefonische Bestellung Servi...

Page 35: ...KOMPERNASS HANDELS GMBH BURGSTRASSE 21 44867 BOCHUM GERMANY www kompernass com Last Information Update Stand der Informationen Ident No 06 2019 Ident No PHKSA12 A2 062019 1 IAN 320139_1901...

Reviews: