background image

10 GB/IE/CY

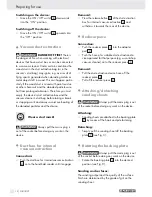
Switching on the device:

   Move the ON / OFF switch 

8

 downwards 

into the “ON” position.

Switching off the device:

   Move the ON / OFF switch 

8

 upwards into 

the “OFF” position.


Vacuum dust extraction

WARNING!

 DANGER OF FIRE!

 There is 

the danger of fire when working with electrical 
devices that have a dust box or can be connected 
to a vacuum cleaner. Under certain conditions the 
wood dust in the dust extraction bag (or in the 
vacuum‘s dust bag) may ignite, e.g. as a result of 
flying sparks generated when abrading metals or 
metal objects left in wood. This can happen partic-
ularly if the wood dust is mixed with paint residue 
or other chemicals and the abraded particles are 
hot from prolonged abrasion. Therefore you must 
empty the device’s dust collection box and the 
vacuum cleaner’s dust bag before taking a break 
or stopping work and always avoid overheating of 
the abraded particles and the device.

  Wear a dust mask!

WARNING!

 Always pull the mains plug is 

out of the socket before doing any work on the  
device.


Dust box for internal 
vacuum extraction

Connection:

   Push the dust box for internal vacuum extraction 

4

 on to the hand-held sander until it engages.

Removal:

   Press the release button 

5

 of the dust extraction 

box for internal vacuum extraction 

4

 and 

withdraw it towards the rear of the device.


Reducer piece

Connection:

   Push the reducer piece 

3

 into the adapter 

port 

2

   Push the hose of a suitable dust extraction de-

vice approved for that purpose (e.g. a workshop 
vacuum cleaner) on to the reducer piece 

3

Removal:

   Pull the dust extraction device hose off the 

reducer piece 

3

.

  Pull off the reducer piece 

3

.


Attaching / detaching 
sanding sheets

WARNING!

 Always pull the mains plug is out  

of the socket before doing any work on the device.

Attaching:


Sanding sheets are attached to the backing plate 

7

 by means of the hook and pile fastening.

Detaching:


Simply pull the sanding sheet off the backing 
plate 

7

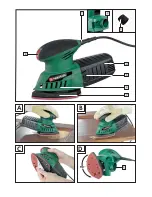
 (see Fig. C). 


Rotating the backing plate

WARNING!

 Always pull the mains plug is out  

of the socket before doing any work on the device.


 Rotate the backing plate 

7

 into the desired 

position (see Fig. D).

Sanding and surfaces:

The sanding output and the quality of the surface 
finish are determined by the grade of grit on the 
sanding sheet.

Preparing for use

Summary of Contents for PHS 160

Page 1: ...och s kerhetsanvisningar vers ttning av bruksanvisning i original H NDSLIBER Brugs og sikkerhedsanvisninger Overs ttelse af den originale driftsvejledning 3 K SIHIOMAKONE K ytt ja turvaohjeet Alkuper...

Page 2: ...liarise yourself with all functions of the device K nn ennen lukemista kuvallinen sivu esiin ja tutustu seuraavaksi laitteen kaikkiin toimintoihin Vik ut bildsidan och ha den till hands n r du l ser i...

Page 3: ...A B C D 1 2 4 5 6 7 8 2 90 3...

Page 4: ...dling and use of electrical power tools Page 8 Safety advice relating speci cally to this device Page 9 Preparing for use Page 9 Vacuum dust extraction Page 10 Dust box for internal vacuum extraction...

Page 5: ...r damage arising from improper use Not suitable for commercial use Features 1 Mains lead 2 Adapter port 3 Reducer piece for external vacuum extraction 4 Dust box for internal vacuum extraction 5 Relea...

Page 6: ...of time when the device is switched o or is running but is not actually in use This can result in a much lower vibration load over the whole of the period of working General safety advice for electric...

Page 7: ...of elec trical power tool used and work undertaken reduces the risk of injury c Avoid unintentional operation of the device Check that the electrical power tool is switched off before you connect it...

Page 8: ...e rear of the device DANGER OF FIRE FROM FLYING SPARKS Abrading metal creates ying sparks For this reason always make sure that nobody is placed in any danger and that there are no in ammable material...

Page 9: ...r internal vacuum extraction Connection Push the dust box for internal vacuum extraction 4 on to the hand held sander until it engages Removal Press the release button 5 of the dust extraction box for...

Page 10: ...ny liquids to enter the inside of the device Always keep the ventilation slots 6 clear Service centre WARNING Have your device repaired only by qualified specialist personnel using original manufactur...

Page 11: ...ty for more details of how to dispose of your worn out electrical devices Declaration of Conformity Manufacturer We Komperna GmbH the person responsible for documents Mr Dennis Dohm Burgstr 21 D 44867...

Page 12: ...Henkil iden turvallisuus Sivu 16 4 S hk ty kalujen huolellinen k sittely ja k ytt Sivu 16 Laitekohtaisia turvallisuusohjeita Sivu 17 K ytt notto P lynpoisto Sivu 17 P lyrasia p lynimuun Sivu 18 Supis...

Page 13: ...ytt n Varustus 1 Verkkojohto 2 Adapterin liit nt 3 Supistuskappale jolla kone voidaan liitt erilliseen imulaitteeseen 4 P lylaatikko omaa p lynimua varten 5 P lynkeruulaatikon avauspainike 6 Tuuletus...

Page 14: ...itt v sti liikerasitusta kokonaisty skentelyajan kest ess S hk ty kaluja koskevat yleiset turvaohjeet VAROLTUS Lue kaikki turva ja muut ohjeet Turva ja muiden ohjeiden laiminly nti voi aiheuttaa s hk...

Page 15: ...l tai laite on kytketty p lle d Poista kaikki ty kalut ja ruuviavaimet paikalta ennen kuin kytket laitteen Py riv ss laiteosassa oleva ty kalu tai avain voi johtaa tapaturmaan e V lt ty skentelem st...

Page 16: ...s ty skentelet pitemm n aikaa puun parissa tai erityisesti jos ty st t aineita joista syntyy terveydelle vaarallisia p lyj liit laite tarkoitukseen sopivaan p lynpoistoon K yt suojalaseja ja p lynsuoj...

Page 17: ...supistuskappale 3 pois Hioma arkin kiinnitys irrotus VAROLTUS Ennen kuin teet t it laitteessa ved aina verkkopistoke pistorasiasta Kiinnitys Voit kiinnitt hioma arkin tarran avulla hiomalaikkaan 7 Irr...

Page 18: ...varmasti l hetetty tuotteen veloituksetta T m takuu koskee vain ensimm ist ostajaa eik sit voi luovuttaa tuotteen mukana Takuu koskee ainoastaan materiaali tai valmistus virheit tai akkujen Takuu ei k...

Page 19: ...2 EC Pienj nnitedirektiivi 2006 95 EC Elektromagneettista yhteensopivuutta koskevat direktiivit 2004 108 EC Sovelletut harmonisoidut normit EN60745 1 2003 A1 EN60745 2 4 2003 EN55014 1 2000 A1 A2 EN55...

Page 20: ...ll hantering och anv ndning av elverktyg Sidan 24 S kerhetsanvisningar speciellt avsedda f r denna apparat Sidan 25 Anv ndning Dammsugning Sidan 25 Damml da f r intern uppsugning Sidan 26 Reducerstyck...

Page 21: ...sett f r privat bruk Utrustning 1 N tkabel 2 Adapteranslutning 3 Reduceringsstycke f r dammsugare 4 Damml da f r intern uppsugning 5 Knapp f r att lossa dammuppsamlingsboxen 6 Ventilations ppningar 7...

Page 22: ...av nedan angivna s kerhetsinstruktioner och anvisningar kan medf ra elst tar brand och eller allvarliga skador F RVARA ALLA S KERHETSINSTRUKTIONER OCH ANVISNINGAR F R FRAMTIDA BEHOV BEGREPPET ELVERKT...

Page 23: ...g vid en roterande maskindel kan medf ra allvarliga skador e Undvik att arbeta med obekv m kroppsh llning Se till att du st r stadigt D rmed kan du kontrollera verktyget b ttre om of rutsedda situatio...

Page 24: ...er lack osv Dr nk inte materialet eller arbetsytan med v tska inneh llande l sningsmedel Bearbeta inga fuktiga material eller fuktiga ytor Undvik att slipa i blyhaltig m larf rg eller andra h lsov dli...

Page 25: ...Avverkningen och ytans kvalitet beror p sliparkets grovlek Se till att anv nda r tt typ av slipark med olika grovlek Arbetstips F r verktyget mot arbetsstycket endast i p slaget tillst nd Arbeta med...

Page 26: ...uppladd ningsbara batterier Produkten r endast avsedd f r privat bruk inte f r yrkesm ssigt bruk Vid missbruk och ofackm ssig behandling anv n dande av v ld och vid ingrepp som inte genomf rs av v r a...

Page 27: ...42 EC L gsp nningsdirektiv 2006 95 EC Elektromagnetisk kompatibilitet 2004 108 EC anv nda harmoniserade normer EN60745 1 2003 A1 EN60745 2 4 2003 EN55014 1 2000 A1 A2 EN55014 2 1997 A1 EN61000 3 2 200...

Page 28: ...2 4 Omhu i omgangen med og anvendelsen af elektriske redskaber Side 32 Sikkerhedsinstrukser for dette apparat Side 33 Ibrugtagning St vopsugning Side 34 St vbeholder til selvopsugning Side 34 Reduktio...

Page 29: ...i strid med form let Maskinen er ikke beregnet til erhvervsm ssig anvendelse Udstyr 1 Ledning 2 Adapterforbindelse 3 Reduceringsstykke til fremmedopsugning 4 St vboks til egenafsugning 5 Opl sningskn...

Page 30: ...er hvor apparatet er slukket eller ganske vist er t ndt men egentlig ikke anvendes Dette kan reducere sving ningsbelastningen over hele tidsrummet betydeligt Generelle sikkerhedsinstrukser for elektri...

Page 31: ...r altid sikkerhedsbriller Personligt sikkerhedsudstyr som f eks st vmaske skridsik kert fodt j sikkerhedshjelm eller h rev rn alt efter det elektriske redskabs art og anvendelse neds tter risikoen fo...

Page 32: ...der idet der er fare for tilskadekomst hvis De eller apparatet skrider ud I faretilf lde skal stikket straks tr kkes ud af stikd sen Ledningen skal altid f res bagud og bort fra maskinen BRANDFARE FRA...

Page 33: ...t If r Dem et ndedr tsv rn ADVARSEL F r der gennemf res arbejde p maskinen skal stikket v re trukket ud af stiksd sen St vbeholder til selvopsugning Forbindelse St vbeholderen til egenopsugningen 4 an...

Page 34: ...n opl s ningsmidler eller reng ringsmidler der angriber syntetisk materiale Undg at der kommer v ske ind i maskinen Ventilations bningerne 6 skal altid holdes frie Service ADVARSEL Deres apparater m k...

Page 35: ...serkl ring Fremstiller Vi Komperna GmbH ansvarlig for dokumenter Dennis Dohm Burgstr 21 D 44867 Bochum Tysk land erkl rer hermed at dette produkt stemmer overens med de f lgende normer normative doku...

Page 36: ...37 GR CY E 38 38 39 39 1 39 2 40 3 40 4 41 41 42 43 43 43 43 43 43 44 44 44 45...

Page 37: ...38 GR CY E E 1 2 3 4 5 6 7 360 8 W Watt V Volt II...

Page 38: ...39 GR CY E 1 1 1 1 160W 230V 50Hz n0 13 000min 1 n0 26 000min 1 360 II 60745 A 76dB A 90dB A K 3dB ah 2 309m s2 K 1 5m s2 EN 60745 A 1...

Page 39: ...40 GR CY 2 3...

Page 40: ...41 GR CY 4...

Page 41: ...42 GR CY 8 ON 8 OFF...

Page 42: ...43 GR CY 4 5 4 3 2 3 3 3 7 7 C 7 D 7...

Page 43: ...44 GR CY 6 3 GR Kompernass Service Greece Tel 801 200 10 18 local charge 0 031EUR minute including VAT 19 e mail support gr kompernass com 2002 96 EC...

Page 44: ...44867 Bochum 2006 42 EC C 2006 95 EC 2004 108 EC EN60745 1 2003 A1 EN60745 2 4 2003 EN55014 1 2000 A1 A2 EN55014 2 1997 A1 EN61000 3 2 2000 A2 EN61000 3 3 1995 A1 EN50366 2003 CE Date of manufacture...

Page 45: ...46...
Page 46: ...Seite 50 4 Verwendung und Behandlung des Elektrowerkzeugs Seite 51 Ger tespezi sche Sicherheitshinweise f r Handschleifer Seite 51 Inbetriebnahme Staubabsaugung Seite 52 Staubbox zur Eigenabsaugung S...

Page 47: ...ng Nicht f r den gewerblichen Gebrauch bestimmt Ausstattung 1 Netzleitung 2 Adapteranschluss 3 Reduzierst ck zur Fremdabsaugung 4 Staubbox zur Eigenabsaugung 5 Entriegelungstaste Staubbox 6 L ftungs n...

Page 48: ...chlich im Einsatz ist Dies kann die Schwingungsbelastung ber den gesamten Arbeitszeitraum deutlich reduzieren Allgemeine Sicherheitshinweise f r Elektrowerkzeuge WARNUNG Lesen Sie alle Sicherheits hi...

Page 49: ...unter dem Ein uss von Drogen Alkohol oder Medikamenten stehen Ein Moment der Unachtsamkeit beim Gebrauch des Elektrowerk zeuges kann zu ernsthaften Verletzungen f hren b Tragen Sie pers nliche Schutz...

Page 50: ...vorgesehenen An wendungen kann zu gef hrlichen Situationen f hren Ger tespezi sche Sicherheitshinweise f r Handschleifer Sichern Sie das Werkst ck Benutzen Sie Spannvorrichtungen Schraubstock um das...

Page 51: ...hr Unter ung nstigen Bedingungen wie z B bei Funken ug beim Schlei fen von Metall oder Metallresten in Holz kann sich Holzstaub im Staubsack oder im Staubbeutel des Staubsaugers selbst entz nden Dies...

Page 52: ...igen Sie hin und wieder das Schleifblatt mit dem Staubsauger Schleifen Sie schwer erreichbare Stellen mit der vorderen oder seitlichen Kante des Schleif blattes an der Schleifplatte 7 F hren Sie den S...

Page 53: ...orisierten Service Niederlassung vorgenommen wurden erlischt die Garantie Ihre gesetzlichen Rechte werden durch diese Garantie nicht eingeschr nkt DE Schraven Service und Dienstleistungs GmbH Tel 49 0...

Page 54: ...2006 42 EC EC Niederspannungsrichtlinie 2006 95 EC Elektromagnetische Vertr glichkeit 2004 108 EC angewandte harmonisierte Normen EN60745 1 2003 A1 EN60745 2 4 2003 EN55014 1 2000 A1 A2 EN55014 2 199...

Page 55: ...58 KOMPERNASS GMBH Burgstra e 21 D 44867 Bochum by ORFGEN Marketing Last Information Update Tietojen tila Informationsstatus Tilstand af information Stand der Informationen 01 2010 Ident No PHS1600120...

Reviews: