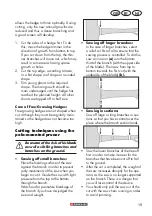
15
NI
IE
GB
B
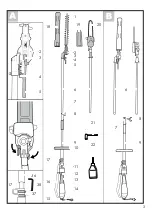
Mounting the tubular
shaft
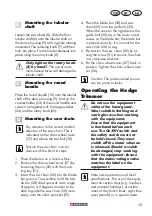
Loosen the star wheel (8). Slide the front
tubular shaft (6) onto the tubular shaft on
the device housing (9) with a gentle rotating
movement. The retaining knob (7) will then
lock into place. Fix the tubular elements into
place using the rotary knob (8).
Only tighten the rotary knob
(8) by hand!
The use of maxi-
mum manual force will damage the
tubular shaft.
C
Mounting the round
handle
Place the round handle (10) onto the tubular
shaft of the device housing (9). Fold on the
counter-holder (23) of the round handle and
screw it on together with the large washer
(24) and the rotary knob (25).
Mounting the saw chain
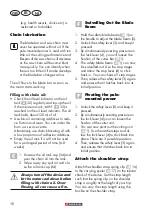
Pay attention to the correct rotation
direction of the saw chain. This is
indicated on the chain wheel cover
(27) and above the bar bolt (30).
Tension the saw chain in accor-
dance with the irst 5-6 steps.
1. Place the device on a level surface.
2. Remove the chain wheel cover (27) by
loosening the nut (26) with the moun-
ting key (21).
3. Insert the saw chain (20) into the blade
bar groove. To assemble, hold the bla-
de bar (28) tilted upwards at an angle
of approx. 45 degrees in order to be
able to guide the saw chain (20) more
easily onto the chain sprocket (29).
4. Place the blade bar (28) and saw
chain (20) onto the rail bolts (30).
When the nose on the right below the
guide bolt (30) sits in the lower round
recess on the blade bar, the blade bar
is placed correctly. It is normal for the
saw chain (20) to sag.
5. Pre-tension the saw chain (20) by tur-
ning the screw (31) to tension the chain
in a clockwise direction.
6. Put the chain wheel cover (27) back in
position. Tighten the chain wheel cover
nut (26).
Caution! The pole-mounted pruner
can be prone to leaks.
Operating the Hedge
Trimmer
Do not use the equipment
without the hand guard.
Wear suitable clothing and
work gloves when working
with the equipment.
Ensure that the equipment
is functional before each
use. The On/Off switch and
the safety switch must not
be held closed. They must
switch off the motor when on
is released. Should a switch
be damaged, stop working
with the equipment. Ensure
that the mains voltage value
matches the label on the
equipment.
Note noise protection and local
speciications. The use of the equip
-
ment on certain days (e.g. Sundays
and national holidays), at certain
times of day (lunch times, night time
quiet periods) or in special areas
Summary of Contents for PHSHE 900 A1
Page 3: ...3 A B 1 2 3 4 5 6 6 8 8 9 9 10 11 36 38 37 12 13 14 15 16 17 17 18 20 19 7 7 2 3 4 5 21 22...
Page 4: ...4...
Page 49: ...49...
Page 52: ...52...
Page 53: ...53 20181203_rev02_sh Explosionszeichnung Exploded Drawing PHSHE 900 A1 informativ informative...
Page 54: ...C E 5 3 3 4 4 10 23 9 25 32 33 11 34 21 31 35 26 20 30 29 28 27 24 D...
Page 55: ......


