13
GB
CY
Mounting/removing the
auxiliary handle
Operate the device only with a
mounted auxiliary handle (15).
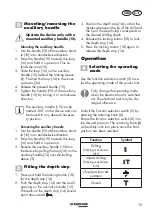
Mounting the auxiliary handle
1. Turn the handle (19) of the auxiliary hand
-
le (15) in an anticlockwise direction.
2. Press the handle (19) towards the loop
(16) and hold it in position. This ex
-
tends the loop (16).
3. Slide the loop (16) on the auxiliary
handle (15) behind the locking sleeve
(3). Position the loop (16) in the reces-
sed area (3a).
4. Release the pressed handle (19).
5. Tighten the handle (19) of the auxiliary
handle (15) by turning it in a clockwise
direction.
The auxiliary handle (15) can be
rotated 360° on the device and can
be moved to any desired/necessa-
ry position.
Removing the auxiliary handle
1. Turn the handle (19) of the auxiliary hand
-
le (15) in an anticlockwise direction.
2. Press the handle (19) towards the loop
(16) and hold it in position.
3. Remove the auxiliary handle (15) from
the device by pulling the loop (16) on the
auxiliary handle (15) over the locking
sleeve (3).
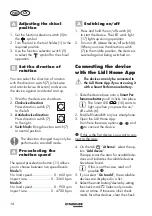
Fitting the depth stop
1. Press and hold the locking button (18)
for the depth stop (14).
2. Push the depth stop (14) into the small
opening on the auxiliary handle (15).
The teeth on the depth stop (14) should
point downwards
.
3. Position the depth stop (14) so that the
distance between the tip of the drill and
the tip of the depth stop corresponds to
the desired drilling depth.
4. Release the locking button (18) to lock
the depth stop (14).
5. Press the locking button (18) again to
release the depth stop (14).
Operation
Selecting the operating
mode
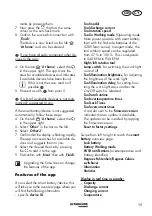
Use the function selection switch (5) to se-
lect the operating mode of the power tool.
Only change the operating mode
when the electrical tool is switched
on! The electrical tool may be da
-
maged otherwise.
Unlock the function selection switch (5) by
pressing the retaining knob (4).
Rotate the function selection switch (5) into
the desired position. The retaining knob (4)
will audibly lock into place once the final
position has been reached.
Function
Symbol
Drilling
(Striking mechanism
OFF)
Impact drilling
(Striking mechanism
ON)
Chisel position ad-
justment
Chisels
Summary of Contents for PKHAP 20-Li B2
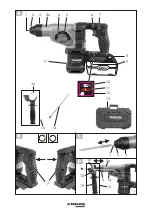
Page 3: ...28 4 mm x 28 4 19 18 14 3a 1 2 3 6 5 4 13 8 16 17 9 15 10 14 7 7 16 2 3 11 12 1 15 3 3a...
Page 78: ...78 GR CY 1 A...
Page 79: ...79 CY GR 2 3...
Page 80: ...80 GR CY 4 N...
Page 81: ...81 CY GR 5 130 C 6 1...
Page 82: ...82 GR CY 2 A O B 7...
Page 85: ...85 CY GR 4 18 14 5 18 14 5 5 4 5 4 1 5 2 1 3 5 7 1 2 7 3 7 4 7...
Page 88: ...88 GR CY Lidl Home 1 2 3 4 1 2 3...
Page 89: ...89 CY GR 3 2 1 1 13 0 C 45 C 2012 19...
Page 90: ...90 GR CY 800 25 2006 66 EG 5...
Page 91: ...91 CY GR 391005_2201 e mail...
Page 93: ...93 CY GR www grizzlytools shop Service Center 92 91110028 91110029 9 9 6 6...
Page 112: ...112...
Page 118: ...118...
Page 120: ...120...

