background image

7 1

DE

A T

C H

Zusammenbau

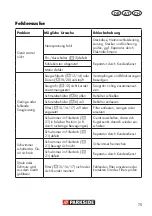
  Ziehen Sie den Netzstecker. Es 

besteht Verletzungsgefahr durch 

elektrischen Schlag.

  Bei Lieferung des Gerätes ist der 

Textil-Filterbeutel (

16) bereits 

montiert.

 1.  Schrauben Sie den Tragegriff 

(2) mit den beiliegenden Kreuz-

schlitzschrauben (2a) fest.


2.  Stecken Sie die Füße (7) auf und 

befestigen Sie diese mit den bei-

liegenden Kreuzschlitzschrauben 

(7a).


3.  Setzen Sie den Filter ein: 

-   Schaumstoff-Filter zum 

Nass-Saugen (

15),

-  

Textil-Filterbeutel (

16) zum 

Trockensaugen,

-   Papierfi lterbeutel (

17).


  Saugen Sie nie ohne Filter!


4.  Setzen Sie den Motorkopf (1) 

auf den Schmutzbehälter (6) auf 

und verschließen Sie   ihn mit 

den Verschlussclips (10).


5.  Schließen Sie Saugschlauch (13) 

(Bajonettverschluss) und Zubehör 

an.

Bedienung

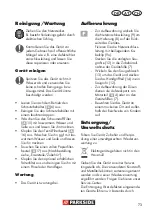
  Wickeln Sie den Saugschlauch (

13) zum Arbeiten ganz ab.

Ein-/Ausschalten

  Stecken Sie den Netzstecker des 

Gerätes ein.

Einschalten:

Ein-/Ausschalter (

3) in Stellung „

I

“.

Ausschalten:

Ein-/Ausschalter (

3) in Stellung „

0

“.

Einsatz der Düsen

Bodendüse (

18) mit 

Steckaufsatz (

19):

zum Nass- und Trockensaugen von glatten 

Flächen und Teppichböden.

Bodendüse (

18) ohne 

Steckaufsatz (

19):

zum Nass- und Trockensaugen von Teppich-

böden, zum Entfernen von hartnäckigem 

Schmutz.

•  Drücken Sie die Laschen rechts und links 

an der Bodendüse (

18) und nehmen 

Sie den Steckaufsatz (

19) ab.

  Achten Sie darauf, dass empfi nd-

liche Oberfl ächen beim Arbeiten 

ohne Steckaufsatz verkratzt werden 

können.

Fugendüse 

(

20):


zum Saugen von Fu-

gen, Ecken und Heizkörpern.

 Nass-Saugen

1.  Zum Nass-Saugen setzen Sie den 

Schaumstoff-Filter (15) auf den Filterkorb 

(21) auf. 


Um das Einreißen des Schaumstoffi lters 

(15) zu vermeiden, 

-  setzen Sie nur einen trockenen Filter 

ein;

-  schlagen Sie den Rand des Filters 

zum Einsetzen etwas um und rollen 

Sie ihn danach wieder zurück.

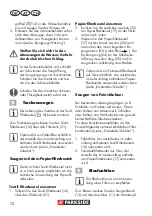
2.  Absaugen (Abpumpen): Tauchen Sie 

den Saugschlauch (

13) am Hand-

Summary of Contents for PNTS 1300 C3

Page 1: ...UHI USISAVA Prijevod originalnih uputa za uporabu WET DRY VACUUM CLEANER Translation of the original instructions WET DRY VACUUM CLEANER PNTS 1300 C3 IAN 279418 NASS TROCKENSAUGER Originalbetriebsanle...

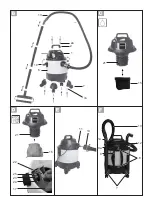
Page 2: ...e yourself with all functions of the device Prije nego to pro itate tekst otvorite stranicu sa slikama i upoznajte se na osnovu toga sa svim funkcijama ure aja nainte de a citi instruc iunile privi i...

Page 3: ...15 1 3 4 5 6 7 9 10 9a 11 2 12 14 13 16 17 18 20 19 8...

Page 4: ...ipment is therefore guaranteed It cannot be ruled out that residual quantities of water or lubricants will remain on or in the equipment hose lines in isolated cases This is not a fault or defect and...

Page 5: ...rs make the appliance very easy to manoeuvre The suction flow is switched off by a float dur ing wet vacuuming once the waste tank is full The appliance is also equipped with a blower function The fol...

Page 6: ...tone dust or wood dust Technical data Rated voltage U 220 240 V 50 60 Hz Rated power input Power consumption P 1300 W Safety class II Protection category IPX4 Suction force 15 kPA 150 mbar Mains cable...

Page 7: ...le the device properly General notes on safety Please read the following safety guidelines in order to avoid risk of fire electric shock personal injury and damage to objects To avoid accidents and in...

Page 8: ...r to pull the appliance Protect the mains lead from heat oil and sharp edges Make sure that the mains volt age corresponds with the infor mation on the rating plate Only plug the appliance into a sock...

Page 9: ...on O Nozzle usage Floor nozzle 18 with insert at tachment 19 for wet and dry vacuuming of smooth sur faces and fitted carpets Floor nozzle 18 without insert attachment 19 for wet and dry vacuuming of...

Page 10: ...Fit the paper filter bag 17 with the short flap 22 upwards over the intake connections 23 see arrow The sealing ring 24 at the filter bag open ing must completely surround the lip 25 on the suction p...

Page 11: ...h Maintenance The equipment is maintenance free Storage For storage wind the power cord 9 around the retaining bracket 8 on the back of the device Fix the power supply cable using the cable clip suppl...

Page 12: ...king clip 91096877 12 11 3 part vacuum tube 91099439 13 14 10 Vacuum hose with handle 72800218 15 12 Foam filter wet filter pack of 3 30250101 16 14 Material filter 20 l blue 30250135 17 13 Paper filt...

Page 13: ...on pipe correctly Container 6 open Close container Container 6 full Empty container Filter 15 16 17 full or clogged Empty clean or replace filter Float in filter basket 21 incorrectly positioned e g d...

Page 14: ...chargeable Guarantee Cover The equipment has been carefully pro duced in accordance with strict quality guidelines and conscientiously checked prior to delivery The guarantee applies for all material...

Page 15: ...e guarantee can be carried out by our ser vice branch which will be happy to issue a cost estimate for you We can handle only equipment that has been sent with adequate packaging and postage Attention...

Page 16: ...aja Ne mo e se isklju iti da se u pojedina nim slu ajevima na ili u ure aju odn u crijevnim vodovima nalaze preostale koli ine vode ili maziva To nije nedostatak ili kvar i razlog za brigu Uputa za u...

Page 17: ...uju veliku okretnost ure aja Prilikom mo krog usisavanja struju zraka za usisavanje isklju uje plovak kada je spremnik za prljav tinu pun Ure aj dodatno posjeduje funk ciju puhanja O funkciji sastavn...

Page 18: ...a instvu gara ama i radioni cama Filtar za usisavanje fine pra ine npr kamene i drvene pra ine Tehni ki podaci Nazivni napon U 220 240 V 50 60 Hz Nazivna snaga Priklju na snaga P 1300 W Klasa za tite...

Page 19: ...nakovi upozorenja s infor macijama za bolje postupa nje s ure ajem Op e sigurnosne upute Pozor Pri uporabi elektri nog alata u svrhu za tite protiv elektri nog udara ozlijeda i opasnosti od po ara osn...

Page 20: ...o te en ili zamr en poslije kontakta sa stranim tijelima ili kod nenormalne vibracije Priklju ni kabel ne koristite za izvla enje utika a iz uti nice niti za povla enje ure aja Priklju ni kabel za ti...

Page 21: ...nje 3 u polo aju I Isklju enje usisava a Prekida za uklju ivanje isklju ivanje 3 u polo aju O Primjena mlaznica Mlaznica za pod 18 s nati nim umetkom 19 za mokro i suho usisavanje glatkih povr i na i...

Page 22: ...ir noj filtarskoj vre ici 17 na perforaciji prema dolje 3 Prebacite papirnu filtarsku vre icu 17 s kratkim jezi kom 22 prema gore preko unutarnjeg usisnog nastavka 23 vidi strelicu Brtveni prsten 24 n...

Page 23: ...i dijelovi Pribor Protresite dodatno dostupan naborani filtar i o istite ga kistom ili etkom za pra inu Odr avanje Ure aj je bez odr avanja uvanje Za pohranu namotajte mre ni kabel 9 oko ru ke 8 na st...

Page 24: ...11 Trodijelna usisna cijev 91099439 13 14 10 Usisno crijevo s dijelom za ru ku 72800218 15 12 Pjenasti filtar pak 3 kom 30250101 16 14 Platneni filtar plavo 30250135 17 13 Papirne filtarske vre ice pa...

Page 25: ...6 otvoren Zatvorite spremnik Spremnik 6 pun Ispraznite spremnik Filtar 15 16 17 pun ili za epljen Ispraznite o istite ili zamijenite filtar Plovak u ko ari filtra 21 u pogre nom polo aju npr uslijed...

Page 26: ...eka garancijskog perioda podlije u pla anju Opseg garancije Ure aj je bri ljivo proizveden prema stro gim smjernicama o kvaliteti i prije isporuke je savjesno ispitan Garancijska usluga vrijedi za gre...

Page 27: ...i nalog za izvr enje poprava ka koji ne podlije u garanciji u na oj Ser visnoj poslovnici uz obra un usluge Ona e Vam rado izraditi Predra un tro kova Mi mo emo obraditi samo one ure aje koji se po al...

Page 28: ...Dvs a fost garan tat Nu este exclus ca n cazuri izolate s se g seasc resturi de ap sau lubrifian i pe sau n aparat respectiv n furtunuri Aceasta nu constituie o lips sau un defect i de asemenea nu est...

Page 29: ...tul de depozitare a murd riei este plin are loc deconectarea fluxului de aer de absorb ie prin intermediul unui flotor n plus aparatul are i o suflant Func ia unit ii de comand se reg se te n descrier...

Page 30: ...iltru pentru aspirarea prafului fin de ex a prafului de piatr i a pra fului de lemn Date tehnice Tensiune efectiv U 220 240 V 50 60 Hz Admisie efectiv putere conectat P 1300 W Clas de izolare II Tip d...

Page 31: ...e despre operarea facil a aparatului Instruc iuni generale de siguran Aten ie La folosirea de apara te electrice trebuie luate urm toarele m suri principale de protec ie pentru a evita perico lele de...

Page 32: ...puri str ine sau la vibra ii anormale Nu utiliza i cablul de conectare la re ea pentru a scoate tec rul din priz sau pentru a trage aparatul Proteja i cablul de co nectare la re ea de c ldur ulei i mu...

Page 33: ...atului n priz Conectare Conector Deconector 3 n pozi ia I Deconectare Conector Deconector 3 n pozi ia 0 Utilizarea duzelor Duz pentru cur area pardoselilor 18 cu adaptor pentru conector 19 pentru aspi...

Page 34: ...e de dec t este normal De aceea recomand m utilizarea unei pungi suplimentare de filtrare a prafului Montarea filtrului textil 1 Rabata i filtrul textil 16 pe co ul filtrului 21 Montarea sacului de h...

Page 35: ...iltrul burduf care este disponi bil op ional i cur a i l cu o pensul sau cu o m turic Mentenan Aparatul nu necesit mentenan Depozitare Pentru depozitare nf ura i ca blul de racordare la re ea 9 n juru...

Page 36: ...are din 3 segmente 91099439 13 14 10 Furtun de aspirare cu m ner 72800218 15 12 Filtru de spum 3 piese 30250101 16 14 Filtru textil albastru 30250135 17 13 Sac de h rtie cu filtru 5 piese 30250132 18...

Page 37: ...ientul Recipient 6 plin Goli i recipientul Filtru 15 16 17 plin sau colmatat Goli i cur a i sau nlocui i filtrele Flotorul din tamburul filtrant 21 este n pozi ie necores punz toare de ex datorit unor...

Page 38: ...p achizi ie Dup expirarea garan iei repara iile necesare sunt realiza te contra cost Con inutul garan iei Aparatul este fabricat n conformitate cu standarde de calitate foarte nalte i este testat n de...

Page 39: ...si i un ambalaj suficient de solid Repara ii Service Lucr rile de repara ii neincluse n garan ie pot fi executate contra cost n departamen tul nostru de service n acest sens vom fi nc nta i s v transm...

Page 40: ...4 0 BG 4 0 4 0 4 1 41 41 42 42 4 2 4 3 43 43 4 5 4 5 45 45 45 46 47 4 7 47 47 4 7 4 8 4 9 5 0 5 1 5 2 S e r v i c e C e n t e r 5 2 5 2 CE 8 2 8 5...

Page 41: ...4 1 BG 1 10 1 2 6 4 12 13 15 16 1 18 20 6 1 2 3 4 4 5 6 4 8 10 2 11 12 13 14 15 16 1 18 1 20 21 22 23 24 25...

Page 42: ...4 2 BG 220 240 50 60 1300 4 15 150 4 20 12 4 6...

Page 43: ...4 3 BG 8...

Page 44: ...4 4 BG 16 30...

Page 45: ...4 5 BG 16 1 2 2 2 3 15 16 1 4 1 6 1 10 5 13 13 3 I 3 0 18 19 18 19 18 1 20 1 15 21 15...

Page 46: ...4 6 BG 2 13 14 3 16 16 21 1 16 21 2 22 1 3 1 22 23 24...

Page 47: ...4 7 BG 1 16 2 1 13 11 6 15 16 1 8 12 13 14 12 4...

Page 48: ...4 8 BG...

Page 49: ...i c e e u 52 1 2 1 10 6884 2 1 10 6886 6 5 10 68 8 28000 2 10 3 10 68 12 11 10 43 13 14 10 2800218 15 12 30250101 3 16 14 20 30250135 1 13 30250132 5 18 1 8 280021 20 280003 20 5 2 30250111 91092030 9...

Page 50: ...5 0 BG 3 13 14 18 20 12 6 6 15 16 1 21 21 21 21 15 16 1...

Page 51: ...5 1 BG 3 2 418...

Page 52: ...5 2 BG Service Center BG 00800 111 4 20 I A N 2 7 9 4 1 8 Gr i zzl y T o o l s Gm b H C o K G 20 63 62...

Page 53: ...5 3 GR 5 3 5 3 5 4 54 54 55 55 5 5 5 6 56 56 5 8 5 8 58 58 59 59 60 6 0 60 60 6 1 6 1 6 2 6 3 6 4 6 5 S e r v i c e C e n t e r 6 5 6 5 CE 8 3 o 8 5...

Page 54: ...5 4 GR 1 1 10 1 2 6 4 12 13 15 16 1 18 20 6 1 2 3 4 5 6 4 8 10 2 11 12 13 14 15 16 1 18 1 20 21 22 23 24 25...

Page 55: ...5 5 GR 220 240 50 60 1300 II 4 15 150 4 20 12 4 6...

Page 56: ...5 6 GR 8...

Page 57: ...5 7 GR 16 A 30...

Page 58: ...5 8 GR 16 1 2 2 2 3 15 16 1 4 1 6 10 5 13 13 3 I 3 O 18 19 18 19 18 1 20...

Page 59: ...5 9 GR 1 15 21 3 15 2 13 14 3 v 16 16 21 1 16 21 2 22 1 3 1 23 24...

Page 60: ...6 0 GR 1 16 2 1 13 11 6 15 16 1...

Page 61: ...6 1 GR 8 12 13 14 12 4 0 xx...

Page 62: ...e e u 65 Ap Ap o 1 2 1 91096884 2 1 10 6886 6 5 10 68 8 28000 2 10 3 10 68 12 11 10 43 13 14 10 2800218 15 12 30250101 3 16 14 30250135 1 13 5 30250132 18 1 8 280021 20 280003 20 5 2 30250111 91092030...

Page 63: ...6 3 GR 3 13 14 18 20 12 6 6 15 16 1 21 21 21 21 15 16 1...

Page 64: ...6 4 GR 3...

Page 65: ...6 5 GR 2 418 e m a i l Service Center GR 801 5000 01 0 03 I A N 2 7 9 4 1 8 Gr i zzl y T o o l s Gm b H C o K G 20 63 62...

Page 66: ...t t gepr ft und einer Endkontrolle unterzogen Die Funktionsf higkeit Ihres Ger tes ist somit sichergestellt Es ist nicht auszuschlie en dass sich in Einzelf llen am oder im Ger t bzw in Schlauchleitun...

Page 67: ...ilter 16 Textil Filterbeutel bereits montiert 17 Papierfilterbeutel 18 Bodend se 20 Fugend se 6 Kreuzschlitzschrauben Betriebsanleitung Entsorgen Sie das Verpackungsmaterial ordnungsgem bersicht Geh u...

Page 68: ...ll f r die Autoreinigung Filter zum Aufsaugen von Fl ssig keiten Filter nicht zum Aufsaugen von Fl ssigkeiten geeignet Filter zum Aufsaugen von trockenem Schmutz aus Haushalt Garage und Werkstatt Filt...

Page 69: ...ichen mit Informati onen zum besseren Umgang mit dem Ger t Allgemeine Sicherheitshinweise Achtung Beim Gebrauch von Elektroger ten sind zum Schutz gegen elektrischen Schlag Verletzungs und Brandgefahr...

Page 70: ...nutzen Sie die Netzanschluss leitung nicht um den Stecker aus der Steckdose zu ziehen oder um das Ger t zu ziehen Sch tzen Sie die Netzanschlussleitung vor Hitze l und scharfen Kanten Achten Sie darau...

Page 71: ...ab Ein Ausschalten Stecken Sie den Netzstecker des Ger tes ein Einschalten Ein Ausschalter 3 in Stellung I Ausschalten Ein Ausschalter 3 in Stellung 0 Einsatz der D sen Bodend se 18 mit Steckaufsatz 1...

Page 72: ...xtil Filterbeutel 16 ber den Filterkorb 21 Papierfilterbeutel einsetzen 2 Knicken Sie die seitlichen Laschen 22 am Papierfilterbeutel 17 an der Perfo ration nach unten 3 St lpen Sie den Papierfilterbe...

Page 73: ...Faltenfilter aus und reinigen Sie ihn mit einem Pinsel oder Handfeger Wartung Das Ger t ist wartungsfrei Aufbewahrung Zur Aufbewahrung wickeln Sie die Netzanschlussleitung 9 um die Halterung 8 auf der...

Page 74: ...ussclip 91096877 12 11 Dreiteiliges Saugrohr 91099439 13 14 10 Saugschlauch mit Handgriffteil 72800218 15 12 Schaumstoff Filter 3er Pack 30250101 16 14 Textil Filterbeutel Trockenfilter blau 30250135...

Page 75: ...chmutzbeh lter 6 offen Beh lter schlie en Schmutzbeh lter 6 voll Beh lter entleeren Filter 15 16 17 voll oder zugesetzt Filter entleeren reinigen oder ersetzen Schwimmer im Filterkorb 21 in falscher P...

Page 76: ...werden Nach Ablauf der Garantiezeit anfallende Reparaturen sind kostenpflichtig Garantieumfang Das Ger t wurde nach strengen Qualit ts richtlinien sorgf ltig produziert und vor Anlieferung gewissenha...

Page 77: ...vice Sie k nnen Reparaturen die nicht der Ga rantie unterliegen gegen Berechnung von unserer Service Niederlassung durchf hren lassen Sie erstellt Ihnen gerne einen Kos tenvoranschlag Wir k nnen nur G...

Page 78: ...7 8 D E A T C H...

Page 79: ...335 2 2 2010 A1 2013 EN 55014 1 2006 A2 2011 EN 55014 2 1997 A2 2008 EN 61000 3 2 2014 EN 61000 3 3 2013 EN 62233 2008 This declaration of conformity 16 is issued under the sole responsibility of the...

Page 80: ...2 2010 A1 2013 EN 55014 1 2006 A2 2011 EN 55014 2 1997 A2 2008 EN 61000 3 2 2014 EN 61000 3 3 2013 EN 62233 2008 Isklju ivu odgovornost za izdavanje ove izjave o sukladnosti 16 nosi proizvo a Grizzly...

Page 81: ...2 2011 EN 55014 2 1997 A2 2008 EN 61000 3 2 2014 EN 61000 3 3 2013 EN 62233 2008 R spunderea exclusiv pentru emiterea acestei declara ii de conformitate 16 i revine produc torului Grizzly Tools GmbH C...

Page 82: ...EU EN 60335 1 2012 A11 2014 EN 60335 2 2 2010 A1 2013 EN 55014 1 2006 A2 2011 EN 55014 2 1997 A2 2008 EN 61000 3 2 2014 EN 61000 3 3 2013 EN 62233 2008 16 Grizzly Tools GmbH Co KG Stockst dter Stra e...

Page 83: ...EU EN 60335 1 2012 A11 2014 EN 60335 2 2 2010 A1 2013 EN 55014 1 2006 A2 2011 EN 55014 2 1997 A2 2008 EN 61000 3 2 2014 EN 61000 3 3 2013 EN 62233 2008 16 Grizzly Tools GmbH Co KG Stockst dter Stra e...

Page 84: ...A2 2011 EN 55014 2 1997 A2 2008 EN 61000 3 2 2014 EN 61000 3 3 2013 EN 62233 2008 Die alleinige Verantwortung f r die Ausstellung dieser Konformit tserkl rung 16 tr gt der Hersteller Grizzly Tools Gmb...

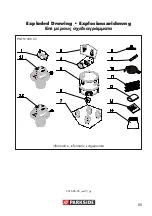
Page 85: ...8 5 Exploded Drawing Explosionszeichnung o informative informativ 2016 08 05_rev02_gs 1300 3...

Page 86: ...8 7 23 22 2 7 1 10 13 11 13 12 6 B C F 15 7 13 12 C F E 15 D 15 16 17 21 8 7 23 22 2 7 1 10 13 11 13 12 6 B 15 16 17 21 21 2a 1 7a 7 8 9 9a 12 13 14 13 C F E 15 D 15 16 17 21 8 7 23 22 2 7 1 10 13 11...

Page 87: ......
Page 88: ...20 63762 Gro ostheim Germany Last Information Update Stanje informacija Versiunea informa iilor Stand der Informationen 08 2016 Ident No 72079607082016 HR RO BG GR IAN 279418 279418_par_Nass Trockensa...

Reviews: