background image

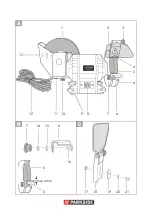
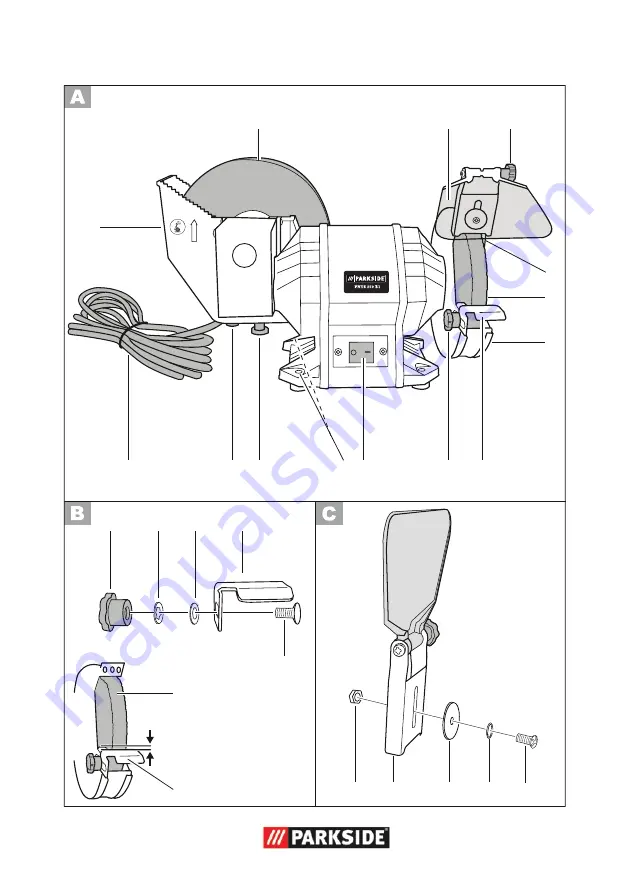
max. 2 mm

1

4

5

4

7

8

9

11 10

12

6

3

2

13

7

6

6

5

14

15

16

17

21

20

18

19

Summary of Contents for PNTS 250 B1

Page 1: ...WET DRY BENCH GRINDER PNTS 250 B1 NASS TROCKENSCHLEIFER Originalbetriebsanleitung WET DRY BENCH GRINDER Translation of the original instructions IAN 304988 ...

Page 2: ...yourself with all functions of the device Klappen Sie vor dem Lesen die Seite mit den Abbildungen aus und machen Sie sich anschließend mit allen Funktionen des Gerätes vertraut GB IE NI Translation of the original instructions Page 5 DE AT CH Originalbetriebsanleitung Seite 21 ...

Page 3: ...max 2 mm 1 4 5 4 7 8 9 11 10 12 6 3 2 13 7 6 6 5 14 15 16 17 21 20 18 19 ...

Page 4: ...22 5 23 24 24 4 23 22 5 25 11 13 9 10 13 ...

Page 5: ...ng hazardous mate rials such as asbestos cial use 6 are permitted to use the equipment only not be liable for damages caused by use other than for the intended purpose or by incorrect operation Content Introduction 5 Intended use 5 General description 6 Scope of delivery 6 Function description 6 Summary 6 Technical specifications 7 Safety Instructions 8 Symbols and icons 8 General safety instructi...

Page 6: ...ipped with a dry grinding disc and a wet grinding disc with different tion and protective hoods for the protection of the user For the function of the operating parts please refer to the descriptions below Summary 1 Wet grinding disc 2 Spark protection 3 Adjusting screw nut for spark pro tection 4 Dry grinding disc cover 5 Dry grinding disc 6 Workpiece support 7 workpiece support 9 Drillholes for ...

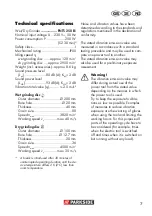
Page 7: ...perating duration until the de vice temperature differs 2 K 2 C less than room temperature Noise and vibration values have been determined according to the standards and regulations mentioned in the declaration of conformity measured in accordance with a standard testing procedure and may be used to com pare one power tool to another also be used for a preliminary exposure assessment Warning diffe...

Page 8: ...chine to the power supply Pull out the mains plug Help symbols with information on improving tool handling Symbols on the device Keep hands away from the mains before carrying out maintenance and repair work Read the instruction manual Wear ear protection Wear eye protection Wear breathing protection Wear cut resistant gloves Use grinding disc only for dry grinding Use grinding disc only for grind...

Page 9: ...l Do not use tools for purposes not intended for example do not use cir cular saws to cut tree limbs or logs Use of the power tool for operations dif ferent from those intended could result in a hazardous situation Dress properly Do not wear loose clothing or jewel lery they can be caught in moving parts Anti slip footwear is recommended when working outdoors Wear protective hair covering to con t...

Page 10: ...y other condi tions that may affect its operation A guard or other part that is dam aged should be properly repaired or replaced by an authorized service centre unless otherwise indicated in this instruction manual Have defective switches replaced by an authorized service centre Do not use the tool if the switch does not turn it on and off Warning other than one recommended in this instruction man...

Page 11: ... medical ous or lethal injuries we recommend that persons with medical implants consult their doctor and the manu Only use grinding tools recommended by the manufacturer Do not use any saw blades Ensure that the dimensions match those of the device Only use grinding discs where the printed rotational speed is at least as name plate of the device Carry out a visual inspection of the grinding disc b...

Page 12: ...inding wheel 5 and the workpiece support 6 must not exceed 2 mm Periodically readjust the workpiece support in order to offset the wear and tear of the grinding disc dis tance max 2 mm Assemble adjust spark protection 1 Screw the spark protection holder 18 onto the protective hood 25 For this use the adjus ting screw 21 including the snap nut 17 2 Adjust the spark protection holder 18 with the aid...

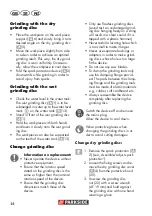
Page 13: ...rk piece support and grinding disc distance maximum 2 mm placed once the spark protection holder and workpiece support on the grinding disc do not have distance of max 2 mm Switch on the equipment only when it is safely installed on the work surface Keep your hands away from the grinding disc when the device is in operation Injury hazard Despite the spark protection you should always wear protecti...

Page 14: ...peed stated on the grinding disc is the same or higher than the nominal rotation speed of the device Ensure that the grinding disc dimensions match those of the device sound test an undamaged grind ing disc hanging freely on a string will result in a clear sound if it is tapped with a plastic hammer Never re drill a locating hole which is too small to make it larger Never use separate bushings or ...

Page 15: ...e 4 attachment screws box housing 28 and take off the water tank 13 2 Unscrew the grinding disc nut 22 and hold against the wet grinding disc 1 with one hand wearing a glove Unscrew the nut right hand th read turn counter clockwise ge 26 and the wet grinding disc 1 4 Fit on the new wet grinding disc ge 26 and screw the grinding disc nut 22 manually onto the right side nut right hand thread turn cl...

Page 16: ...fects such as loose worn or damaged components and check that screws or other parts are sitting correctly place damaged parts Storage Empty the water tank 13 before storage Pull the rubber closure 11 from the drain opening of the wa ter tank and allow the water to drain off Store the appliance in a dry place well out of reach of children Grinding discs must be stored dry and upright and are not to...

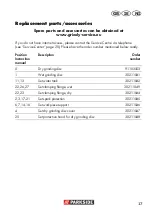
Page 17: ...Position Description Order Instruction number manual 5 Dry grinding disc 91103553 1 Wet grinding disc 30211041 11 13 Set water tank 30211042 6 7 2 3 17 21 Set spark protection 30211045 6 7 14 16 Set workpiece support 30211046 4 Set dry grinding disc cover 30211047 25 Set protective hood for dry grinding disc 30211048 ...

Page 18: ...e Engine faulty Grinding tools do not move although the engine is run ning Grinding disc nut 22 loose Workpiece remaining work pieces or remaining grinding tools block drive Remove blockages Engine is slower and stops Device is overloaded through workpiece Reduce pressure on grinding tool Workpiece unsuitable Grinding disc does not rotate smoothly abnormal noises can be heard Grinding disc nut 22 ...

Page 19: ...ing after expiry of the guarantee period are chargeable Guarantee Cover in accordance with strict quality guidelines and conscientiously checked prior to delivery does not extend to cover product parts that are subject to normal wear and may therefore be considered as wearing parts per protective screen or to cover damage to breakable parts e g switches uct has been damaged used incorrectly or not...

Page 20: ...will be happy to issue a cost estimate for you We can handle only equipment that has been sent with ad equate packaging and postage Attention Please send your equipment to our service branch in clean condition and with an indication of the defect Equipment sent carriage forward or by bulky goods express or other special freight will not be accepted We will dispose of your defective devices free of...

Page 21: ...icht für den gewerblichen Dauereinsatz konzipiert Das Gerät ist zum Gebrauch durch Erwachsene 6 das Gerät nur unter Aufsicht benutzen Der Hersteller haftet nicht für Schäden die durch bestimmungswidrigen Gebrauch oder falsche Bedienung verursacht wurden Original EG Konformitäts erklärung 41 Inhalt Einleitung 21 Bestimmungsgemäße Verwendung 21 Allgemeine Beschreibung 22 Lieferumfang 22 Funktionsbes...

Page 22: ...er Nassschleifscheibe mit unterschiedlicher Körnung für den Grob und Feinschliff Zum Schutz des Anwen ders ist das Gerät mit Funkenschutz und Schutzhauben versehen Die Funktion der Bedienteile entnehmen Sie bitte den nachfolgenden Beschreibungen Übersicht 1 Nassschleifscheibe 2 Funkenschutz 3 Justiermutter für Funkenschutz 4 Schleifscheiben Abdeckung 5 6 7 10 Gummifuß Wasserbehälter 11 Gummiversch...

Page 23: ...rt ist nach einem genormten Prüfverfah ren gemessen worden und kann zum Ver gleich eines Elektrowerkzeugs mit einem anderen verwendet werden Der angegebene Schwingungsemissionswert kann auch zu einer einleitenden Einschät zung der Aussetzung verwendet werden Warnung Der Schwingungsemissionswert kann sich während der tatsäch lichen Benutzung des Elektro werkzeugs von dem Angabewert unterscheiden ab...

Page 24: ...ge nicht dem Regen aus Benutzen Sie Elektrowerkzeuge nicht in feuchter oder nasser Umgebung Das Eindringen von Wasser in ein Elektrowerkzeug erhöht das Risiko eines elektrischen Schlages Sorgen Sie für gute Beleuchtung des Arbeitsplatzes Benutzen Sie Elektrowerkzeuge nicht wo Brand oder Explosionsgefahr besteht Elektrowerkzeuge erzeugen Symbole und Bildzeichen Symbole in der Betriebsanleitung Gefa...

Page 25: ...n Sie Schutzausrüstung Nichtbeachtung können Augenver letzungen durch Funken oder Schleif partikel entstehen Verwenden Sie bei stauberzeugen den Arbeiten eine Atemmaske Schließen Sie die Staubabsaug Einrichtung an Falls Anschlüsse zur Staubabsaugung und Auffangeinrich tung vorhanden sind überzeugen Sie sich dass diese angeschlossen und rich tig benutzt werden Verwenden Sie das Kabel nicht für Zwec...

Page 26: ...uges kann zu ernsthaften Verletzungen führen Überprüfen Sie das Elektro werkzeug auf eventuelle Be schädigungen Damit wird sichergestellt dass die Sicherheit des Elektrowerkzeuges erhal ten bleibt Vor weiterem Gebrauch des Elektro werkzeugs müssen Schutzvorrichtungen auf ihre einwandfreie und bestimmungs gemäße Funktion untersucht werden Überprüfen Sie ob die beweglichen sein und alle Bedingungen ...

Page 27: ...seln Sie die Schleifscheibe spä testens aus wenn der Funkenschutz und stellt werden kann Achten Sie darauf dass beim Schlei fen entstehende Funken keine Gefahr hervorrufen z B Personen treffen oder heitshandschuhe einen Atemschutz und einen Gehörschutz Halten Sie nie die Finger zwischen Schleifscheibe und Funkenschutz oder in die Nähe der Schutzhauben Es besteht Gefahr durch Quetschen aus funktion...

Page 28: ...e Personen nicht zu gefährden Befestigen Sie das Gerät immer mittels Schrauben ausreichender Länge und Stärke auf der Arbeits das Gerät zu verlieren Abdeckungen und Schutzvorrichtun gen ordnungsgemäß montiert sein Ziehen Sie den Netzstecker bevor Sie Einstellungen am Gerät vornehmen Werkstückauflagen montieren einstellen 1 Schrauben Sie die Werkstückauf lage 6 an dem Gerät fest Verwenden Sie hierz...

Page 29: ... die Angaben tragen über Hersteller Art der Bindung Abmessung und zulässige Umdre hungszahl Verwenden Sie nur Schleifschei ben deren aufgedruckte Drehzahl mindestens so hoch ist wie die auf gegebene Drehzahl Verwenden Sie keine abgebroche nen gesprungenen oder anderwei tig beschädigten Schleifscheiben Betreiben Sie das Gerät niemals ohne Schutzeinrichtungen Kontrollieren Sie die Schleifschei be vo...

Page 30: ...en nach unten um Verlet zungen durch Funkenbildung zu vermei den Schleifen mit der Nassschleifscheibe Prüfen Sie den Wasserstand im Was serbehälter Die Nassschleifscheibe 1 soll sich bis zur Wasserstands markierung am Wasserbehälter Stellen Sie sich vor die Nassschleif scheibe 1 Halten Sie das Werkstück mit beiden Händen und senken es langsam auf die Nassschleifscheibe ab Das Werkstück kann auch a...

Page 31: ...schei Mutter Rechtsgewinde aufschrau ben 6 Ziehen Sie die Schleifscheiben schlüssel SW19 mit mäßiger Handkraft an 7 Schrauben Sie die Schleifschei ben Abdeckung 4 an 8 Stellen Sie den Funkenschutzhal ter 18 und die Werkstück 6 ein Der Abstand 5 nicht zu fest angezogen werden um ein Brechen von Schleifscheibe 9 Probelauf Führen Sie vor dem ersten Arbeiten und nach jedem Schleifschei benwechsel eine...

Page 32: ... Schleif scheibenwechsel einen Probelauf von durch Schalten Sie das Gerät sofort aus wenn die Schleifscheibe unrund läuft be trächtliche Schwingungen auftreten oder abnorme Geräusche zu hören sind Reinigung und Wartung Ziehen Sie vor jeglicher Einstellung den Netzstecker Lassen Sie Arbeiten die nicht in dieser Betriebsanleitung beschrieben sind von einer Fachwerkstatt durchführen Verwenden Sie nur...

Page 33: ...erechten Wiederver wertung zu Elektrogeräte gehören nicht in den Hausmüll Führen Sie die Umverpackung aus Wellpappe einer umweltgerechten Wiederverwertung zu Geben Sie das Gerät an einer Verwer tungsstelle ab Die verwendeten Kunst getrennt werden und so einer Wieder verwertung zugeführt werden Fragen Sie hierzu unser Service Center deten Geräte führen wir kostenlos durch Ersatzteile Zubehör Ersatz...

Page 34: ... Kundendienst Schleifwerkzeuge bewegen sich tor läuft 22 locker siehe Schleifscheiben wech Werkstück Werkstückreste oder Reste der Schleifwerkzeu ge blockieren Antrieb Blockaden entfernen samer und bleibt stehen Gerät wird durch Werkstück überlastet Druck auf Schleifwerkzeug ver ringern Werkstück ungeeignet Schleifscheibe läuft unrund abnorme Geräu sche sind zu hören 22 locker siehe Schleifscheibe...

Page 35: ...d cken gemeldet werden Nach Ablauf der Garantiezeit anfallende Reparaturen sind Garantieumfang Das Gerät wurde nach strengen Qualitäts richtlinien sorgfältig produziert und vor Anlieferung gewissenhaft geprüft Fabrikationsfehler Diese Garantie erstreckt sich nicht auf Geräteteile die normaler Abnutzung ausgesetzt sind und daher als Verschleißteile angesehen werden können Diese Garantie verfällt we...

Page 36: ...ur Service Sie können Reparaturen die nicht der Ga rantie unterliegen gegen Berechnung von unserer Service Niederlassung durchführen tenvoranschlag Wir können nur Geräte bearbeiten die ausreichend verpackt und frankiert einge sandt wurden Achtung nigt und mit Hinweis auf den Defekt an unsere Service Niederlassung Nicht angenommen werden unfrei per Sperrgut Express oder mit sonstiger Son derfracht ...

Page 37: ...37 ...

Page 38: ...38 ...

Page 39: ...een applied EN 61029 1 2009 A11 2010 EN 61029 2 4 2011 EN 12413 2007 A1 2011 EN 55014 1 2017 EN 55014 2 2015 EN 61000 3 2 2014 EN 61000 3 3 2013 manufacturer Christian Frank Documentation Representative Stockstädter Straße 20 63762 Großostheim 30 06 2018 The object of the declaration described above satisfies the provisions of Directive 2011 65 EU of the European Parliament and the Council of 8 Ju...

Page 40: ...40 ...

Page 41: ...stimmungen angewendet EN 61029 1 2009 A11 2010 EN 61029 2 4 2011 EN 12413 2007 A1 2011 EN 55014 1 2017 EN 55014 2 2015 EN 61000 3 2 2014 EN 61000 3 3 2013 Die alleinige Verantwortung für die Ausstellung dieser Konformitätserklärung trägt der Hersteller Christian Frank Dokumentationsbevollmächtigter Stockstädter Straße 20 63762 Großostheim 30 06 2018 Der oben beschriebene Gegenstand der Erklärung e...

Page 42: ...13 13a 13a 13c 13d 13b 22 1 26 28 29 27 28 22 1 ...

Page 43: ......

Page 44: ...GRIZZLY TOOLS GMBH CO KG Stockstädter Straße 20 DE 63762 Großostheim GERMANY Last Information Update Stand der Informationen 06 2018 Ident No 72036877062018 GB IE NI IAN 304988 ...

Reviews: