PPHA 20-Li B2
■
8
│
GB
│
CY
♦
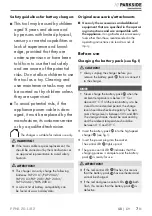
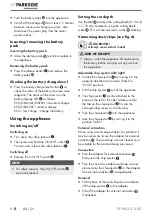
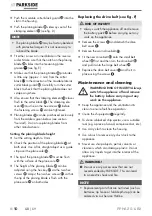
Push the battery pack into the appliance.
♦
Switch off the charger for at least 15 minutes
between successive charging sessions. Also
disconnect the power plug from the mains
power socket.
Inserting/removing the battery
pack
Inserting the battery pack
♦
Allow the battery pack to click into place in
the appliance.
Removing the battery pack
♦
Press the release button and remove the
battery pack .
Checking the battery charge level
♦
Press the battery charge level button to
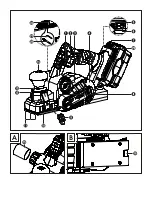
check the status of the battery (see also main
diagram). The status will be shown on the
battery display LED as follows:
RED/ORANGE/GREEN = maximum charge
RED/ORANGE = medium charge
RED = low charge – charge the battery
Using the appliance
Switching on/off
Switching on
♦
First, press the safety lock-out .
♦
Then press and hold the ON/OFF switch .
You can now release the safety lock-out .
Switching off
♦
Release the ON/OFF switch .
NOTE
►
For safety reasons, the ON/OFF switch
cannot be locked.
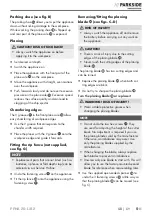
Setting the cut depth
Use the dial to adjust the cutting depth (0–2 mm)
in 1/10 mm increments using the cutting depth
scale . This can then be read via the marking.
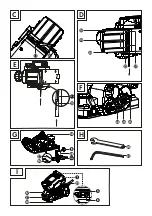
Vacuuming dust/chips (see fig. A)
WARNING!
Always wear a dust mask!
RISK OF INJURY!
►
Always switch the appliance off and remove
the battery before carrying out any work on
the appliance.
Adjustable chip ejector (left/right)
♦
Unlock the chip ejector by turning it in the
opposite direction to the arrow (from the
"LOCK" position).
♦
Pull the chip ejector out of the appliance.
♦
The chip ejector can be attached to the
plane on the left or the right. Make sure that
the tab on the chip ejector fits into the
corresponding recess on the housing.
♦
Push the chip ejector into the appliance.
♦
Lock the chip ejector by turning it to the
position "LOCK".
External extraction
When using a workshop extractor, for example, it
may be necessary to use the adapter for external
extraction . The workshop vacuum cleaner must
be suitable for the material being processed.
Connection
♦
Push the adapter for external extraction
firmly onto the chip ejector .
♦
Push the hose of a suitable workshop vacuum
cleaner onto the chip ejector or the adapter
for external extraction , as applicable.
Removal
♦
Pull the hose of the workshop vacuum cleaner
off the chip ejector or the adapter.
♦
Pull off the adapter for external extraction ,
if attached.
Summary of Contents for PPHA 20-Li B2
Page 3: ...B A...
Page 4: ...H C D F E 20a G 28a I...
Page 24: ...PPHA 20 Li B2 16 GB CY...
Page 58: ...PPHA 20 Li B2 50 BG 20 V PPHA20 Li B2 V 20a 28a v Ready2Connect b 1 20 V 1 G 1 G 1 1 1...
Page 60: ...PPHA 20 Li B2 52 BG 1 a 2 a...
Page 61: ...PPHA 20 Li B2 BG 53 3 a 4 a...
Page 62: ...PPHA 20 Li B2 54 BG 5 a 130 C 265 F...
Page 63: ...PPHA 20 Li B2 BG 55 6 a...
Page 65: ...PPHA 20 Li B2 BG 57 15 0 2 mm 1 10 mm LOCK...
Page 66: ...PPHA 20 Li B2 58 BG LOCK B V V V e G...
Page 67: ...PPHA 20 Li B2 BG 59 C E 3 C 20a D 1 mm 0 mm...
Page 68: ...PPHA 20 Li B2 60 BG F PARKSIDE 2012 19 EU...
Page 69: ...PPHA 20 Li B2 BG 61 2006 66 a b 1 7 20 22 80 98 5 II 5...
Page 70: ...PPHA 20 Li B2 62 BG X 20 V Team 3 s IAN 402247_2201...
Page 73: ...PPHA 20 Li B2 BG 65 www kompernass com 00800 111 4920 IAN 402247_2201...
Page 74: ...PPHA 20 Li B2 66 BG...
Page 78: ...PPHA 20 Li B2 70 GR CY 1 2...
Page 79: ...PPHA 20 Li B2 GR CY 71 3 4...
Page 80: ...PPHA 20 Li B2 72 GR CY 5 130 C 265 F...
Page 81: ...PPHA 20 Li B2 GR CY 73 6...
Page 83: ...PPHA 20 Li B2 GR CY 75 LED LED LED LED 15 LED ON OFF ON OFF ON OFF 0 2 mm 1 10 mm A LOCK...
Page 84: ...PPHA 20 Li B2 76 GR CY LOCK B V V V G...
Page 85: ...PPHA 20 Li B2 GR CY 77 C E 3 C D 20a 1 mm...
Page 86: ...PPHA 20 Li B2 78 GR CY 0 mm F PARKSIDE...
Page 87: ...PPHA 20 Li B2 GR CY 79 2012 19 U 2006 66 C a b 1 7 20 22 80 98...
Page 88: ...PPHA 20 Li B2 80 GR CY Kompernass Handels GmbH 5 5 5 2251 1994 X 20 V Team 3...
Page 91: ...PPHA 20 Li B2 GR CY 83 www kompernass com Tel 00800 490826606 CY Tel 8009 4241 402247_2201...
Page 92: ...PPHA 20 Li B2 84 GR CY...
Page 110: ...PPHA 20 Li B2 102 DE AT CH...

