background image

53

2017-04-28_rev02_sh

PSBS 240 B2

infor

mat

iv, infor

mat

ive, 

ενημερω

τικ

ό

Explosionszeichnung Exploded Drawing 

  

Summary of Contents for PSBS 240 B2

Page 1: ...NDSCHLEIFER Originalbetriebsanleitung BENCH GRINDER WITH BELT SANDER Translation of the original instructions ΤΑΙΝΙΟΛΕΙΑΝΤΗΡΑΣ ΠΑΓΚΟΥ ΜΕ ΤΡΟΧΟ ΛΕΙΑΝΣΗΣ Μετάφραση των αυθεντικών οδηγιών λειτουργίας 283029_par_Standbandschleifer_cover_IE_NI_CY indd 2 04 04 17 17 14 ...

Page 2: ...he illustrations and familiarise yourself with all functions of the device Πριν ξεκινήσετε την ανάγνωση ανοίξτε τη σελίδα με τις εικόνες και εξοικειωθείτε με όλες τις λειτουργίες της συσκευής Klappen Sie vor dem Lesen die Seite mit den Abbildungen aus und machen Sie sich anschließend mit allen Funktionen des Gerätes vertraut 283029_par_Standbandschleifer_cover_IE_NI_CY indd 3 04 04 17 17 14 4 18 3...

Page 3: ...3 1 1 19 3 2a 2 19 18 18 17 17a 17b 17c 1 2 3 4 8 9 7 5 6 10 11 12 13 16 15 14 17 18 19 14b 14a ...

Page 4: ...ng with unsuitable grinding tools grinding with a coolant solution grinding hazardous mate rials such as asbestos The equipment is intended for use in the field of DIY It is not designed for commer cial use The equipment is designed for use by adults Young people under the age of 16 are permitted to use the equipment only under supervision Content Introduction 4 Intended use 4 General description ...

Page 5: ...and protective hoods for the protec tion of the user For the function of the operating parts please refer to the descriptions below Summary 1 Spark protection two piece 2 Adjusting screw for spark protec tion 3 Protective hood grinding disc 4 Engine housing 5 Star grip nut to install the work piece support grinding belt 6 Workpiece support grinding belt 7 Clamping lever grinding belt 8 Clamping sc...

Page 6: ...ion value may differ during actual use of the power tool from the stated value depending on the manner in which the power tool is used Try to keep the exposure to vibra tions as low as possible Examples of measures to reduce vibration exposure are the wearing of gloves when using the tool and limiting the working hours For this purpose all parts of the operating cycle have to be considered for exa...

Page 7: ...work touch the tool or the extension cord and keep them away from the work area Store idle tools When not in use tools should be stored in a dry locked up place out of reach of children Do not force the tool It will do the job better and safer at the rate for which it was intended Use the right tool Do not force small tools to do the job of a heavy duty tool Do not use tools for purposes not inten...

Page 8: ...r tool Do not use a power tool while you are tired or under the influence of drugs alcohol or medication A moment of in attention white operating power tools may result in serious personal injury Check damaged parts This will ensure that the safety of the power tool is maintained Before further use of tool it should be carefully checked to determine that it will operate properly and per form its i...

Page 9: ...max 2 mm at the latest Make sure that the sparks produced by grinding do not present a danger e g reach people or ignite flammable substances Always wear safety goggles safety gloves respiratory protection and ear protection when grinding brushing and separating Never keep the fingers between the grinding disc and spark protection or in close proximity to the protective hoods There is a risk of cr...

Page 10: ... 4 screws and nuts Insert the screws through the 4 bore holes 13 on the base of the device d Damage to your health caused by swinging your hands and arms when operating the appliance for longer pe riods of time or if the unit is not held or maintained properly Warning During operation this electric tool generates an electro magnetic field which under certain circumstances may impair the functional...

Page 11: ... maximum 2 mm The grinding disc must be replaced once the spark protection and workpiece support on the grinding disc do not have distance of max 2 mm Switch on the equipment only when it is safely installed on the work sur face Keep your hands away from the grinding disc and grind ing belt when the device is in operation Injury hazard Switching on and off Ensure that the mains voltage matches the...

Page 12: ...e upper 20a and lower 20b rollers and let go of the clamping lever 7 5 Tighten the clamping screw 8 and mount the grinding belt cover 12 Set the tape run 6 Loosen the nut 21a of the ad justable screw 21 with a ring spanner The tape run accuracy is set by the turning the adjustable screw 21 with a screwdriver 7 Check the tape run by manually turning the grinding belt 8 Re tighten the nut 21a Change...

Page 13: ...m see Assembly The grinding disc nut must not be screwed too tightly in order to avoid a breaking of the grinding disc and nut Test run Before starting work and after each change of grinding disk carry out a test run of at least 60 seconds with no load Switch off the equipment immediately if the disk runs lumpy substantial vibrations oc cur or abnormal noises are generated Cleaning and maintenance...

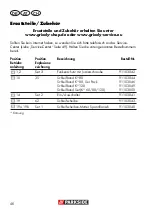
Page 14: ...d Ask your Service Center about this Defec tive units returned to us will be disposed of for free Replacement parts accessories Spare parts and accessories can be obtained at www grizzly service eu If you do not have internet access please contact the Service Centre via telephone see Service Center page 16 Please have the order number mentioned below ready Position Position Description Order numbe...

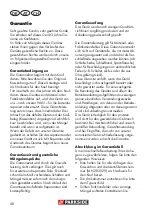
Page 15: ...od are chargeable Guarantee Cover The equipment has been carefully pro duced in accordance with strict quality guidelines and conscientiously checked prior to delivery The guarantee applies for all material and manufacturing defects This guarantee does not extend to cover product parts that are subject to normal wear and may therefore be considered as wearing parts e g grinding disks carbon brushe...

Page 16: ...a cost estimate for you We can handle only equipment that has been sent with adequate packaging and postage Attention Please send your equipment to our service branch in clean condition and with an indication of the defect Equipment sent carriage forward or by bulky goods express or other special freight will not be accepted We will dispose of your defective devices free of charge when you send th...

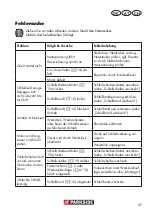
Page 17: ...g disc Grinding belt 10 loose Increase grinding belt tension see Changing the grinding belt Drive is blocked Grinding belt 10 block ing drive Re mount grinding belt see Changing the grinding belt Workpiece remaining work pieces or remaining grinding tools block drive Remove blockages Engine is slower and stops Device is overloaded through workpiece Reduce pressure on grinding tool Workpiece unsuit...

Page 18: ... λείανσης λείανση με ψυκτικό υγρό λείανση υλικών επιβλαβών για την υγεία όπως αμίαντος Το μηχάνημα προορίζεται για χρήση στον τομέα οικιακών κατασκευών Δε σχεδιάστη κε για τη συνεχή επαγγελματική χρήση Το μηχάνημα προορίζεται για τη χρήση από ενήλικες Νέοι άνω των 16 ετών επι τρέπεται να χρησιμοποιούν το μηχάνημα μόνο υπό επιτήρηση Περιεχόμενα Εισαγωγή 18 Σκοπός χρήσης 18 Γενική περιγραφή 19 Παραδ...

Page 19: ...οστατευτικό σπινθήρων και προστατευτικές επικαλύψεις Μπορείτε να βρείτε τη λειτουργία των εξαρτημάτων χειρισμού στις κατωτέρω περιγραφές Σύνοψη 1 Προστατευτικό σπινθήρων δύο εξαρτήματα 2 Βίδα ρύθμισης για το προστατευτικό σπινθήρων 3 Προστατευτική επικάλυψη δίσκου λείανσης 4 Περίβλημα κινητήρα 5 Αστεροειδές παξιμάδι για τη συναρμολόγηση της διάταξης απόθεσης τεμαχίου επεξεργασίας ιμάντα λείανσης 6...

Page 20: ... συσκευής με μία άλλη Η αναφερόμενη τιμή μετάδοσης δόνησης μπορεί επίσης να χρησιμοποιηθεί και για αρχική εκτίμηση της έκθεσης Προειδοποίηση Η τιμή μετάδοσης της δόνησης μπορεί να διαφέρει κατά την πραγ ματική χρήση της ηλεκτρικής συ σκευής από την αναφερόμενη τιμή ανάλογα με τον τρόπο χρήσης της Προσπαθείτε να διατηρείτε την επιβάρυνση λόγω κραδασμών όσο μικρότερη γίνεται Μέτρα για τη μεί ωση της...

Page 21: ... τις επιδράσεις του περιβάλλοντος Μην εκθέτετε ηλεκτρικές συσκευές σε βροχή Ποτέ μη χρησιμοποιείτε τα ηλε κτρικά εργαλεία σε υγρό περιβάλλον Η διείσδυση νερού σε ηλεκτρική συ σκευή αυξάνει τον κίνδυνο ηλεκτρο πληξίας Να φροντίζετε για καλό φωτισμό της θέσης εργασίας Μη χρησιμοποιείτε ηλεκτρικά εργα λεία σε σημεία όπου υφίσταται κίνδυ νος πυρκαγιάς ή έκρηξης Τα ηλεκτρικά εργαλεία παράγουν σπινθήρες...

Page 22: ...καλώδιο για να τραβήξετε το βύσμα από την πρίζα Να προστατεύετε το καλώδιο από ψηλές θερμοκρασίες λάδι και αιχμηρά αντι κείμενα Να ασφαλίζετε το εργαλείο Να χρη σιμοποιείτε συστήματα συγκράτησης ή μία μέγγενη για τη συγκράτηση του κα τεργαστέου αντικειμένου Με τον τρόπο αυτό συγκρατείται ασφαλέστερα από ό τι με το χέρι Να αποφεύγετε τη μη φυσιολογική στάση του σώματος Φροντίστε να στέκεστε σταθερά...

Page 23: ... ή να αντικαθίστανται σωστά από αναγνω ρισμένο εξειδικευμένο συνεργείο εάν δεν αναφέρεται κάτι διαφορετικό στις οδηγίες χρήσης Οι ελαττωματικοί διακόπτες να αντι καθίστανται σε συμβεβλημένο συ νεργείο Μη χρησιμοποιείτε εργαλεία στα οποία ο διακόπτης δεν ενεργοποιεί ται και δεν απενεργοποιείται Προσοχή Η χρήση άλλων εργαλείων και αξεσουάρ μπορεί να προκαλέσουν κίνδυνο τραυματισμού Ενδεχόμενες επισκ...

Page 24: ...είται κατάλληλη προστασία για την ακοή Για τη δική σας ασφάλεια χρησιμοποι είτε μόνο αξεσουάρ και επιπρόσθετες συσκευές οι οποίες αναφέρονται στις οδηγίες λειτουργίας ή συστήνονται ή έχουν υποδειχθεί από τον κατασκευα στή εργαλείου Χρησιμοποιείτε μόνο εργαλεία λείαν σης που προτείνονται από τον κατα σκευαστή Μη χρησιμοποιείτε πριονο λάμες Βεβαιώνεστε ότι οι διαστάσεις ταιριάζουν στη συσκευή Χρησιμ...

Page 25: ...εια εργασίας ώστε να μη χάσετε τον έλεγχο της συσκευής Πριν από τη θέση σε λειτουργία πρέπει να έχουν συναρμολογη θεί σωστά όλες οι επικαλύψεις και οι διατάξεις προστασίας Τραβήξτε το βύσμα δικτύου προτού διεξάγετε ρυθμίσεις στη συσκευή Συναρμολόγηση Ρύθμιση προστατευτικού σπινθήρων 1 Βιδώστε το προστατευτικό σπιν θήρων 1 με τη βοήθεια της βίδας ρύθμισης 2 και του παξι μαδιού 2a στο προστατευτικό ...

Page 26: ...ε μόνο εργαλεία λείανσης τα οποία αναφέρουν στοιχεία σχετικά με τον κατα σκευαστή τον τύπο σύνδεσης διαστάσεις και επιτρεπόμενο αριθμό περιστροφών Χρησιμοποιείτε μόνο δίσκους λείανσης των οποίων ο εκτυπω μένος αριθμός στροφών είναι τουλάχιστον τόσο υψηλός όσο αναφέρεται στην πινακίδα τύπου της συσκευής Μη χρησιμοποιείτε σπασμένους ραγισμένους ή κατά άλλον τρόπο ελαττωματικούς δίσκους λείανσης Ποτέ...

Page 27: ...ιουργίας σπινθήρων διπλώνετε προς τα κάτω το προστατευτικό σπινθήρων 1 κατά τη λείανση Το βέλος στο προστατευτικό κά λυμμα 3 δείχνει την κατεύ θυνση περιστροφής του δίσκου λείανσης Τοποθετήστε το τεμάχιο επεξεργασίας στη διάταξη απόθεσης τεμαχίου επε ξεργασίας 18 και οδηγήστε το αργά στην επιθυμητή γωνία στο δίσκο λείανσης 19 Μετακινήστε το τεμάχιο επεξεργασίας ελαφρώς πέρα δώθε ώστε να επιτύ χετε...

Page 28: ...ολύ μικρή οπή υποδοχής στο δίσκο λείανσης Μη χρησιμοποιείτε ξεχωριστές υποδοχές μείωσης ή αντάπτορες για να ταιριάζουν οι δίσκοι λείαν σης με μεγάλη οπή Μη χρησιμοποιείτε πριονολάμες Για τη σύσφιξη των εργαλείων λείανσης επιτρέπεται να χρησι μοποιούνται μόνο οι απεσταλμέ νες φλάντζες σύσφιξης Οι ενδι άμεσες θέσεις μεταξύ φλάντζας σύσφιξης και εργαλείων λείαν σης πρέπει να αποτελούνται από ελαστικά...

Page 29: ...ολογικοί θόρυβοι Καθαρισμός και συντήρηση Τραβάτε πριν από κάθε ρύθμιση προληπτική συντήρηση ή επισκευή το ρευματολήπτη Δώστε εργασίες που δεν περι γράφονται στις οδηγίες αυτές προς εκτέλεση σε ειδικό συνερ γείο Χρησιμοποιείτε μόνο αυ θεντικά εξαρτήματα Αφήνετε το μηχάνημα να ψυχθεί πριν από κάθε εργασία συντήρησης και καθαρισμού Υφίσταται κίνδυνος πρόκλησης εγκαυμάτων Ελέγχετε το μηχάνημα πριν απ...

Page 30: ...ρο σέρβις της εταιρίας μας Τη απόρριψη των ελαττωματικών σας συσκευών που μας στέλνετε την αναλαμβάνουμε δωρεάν Ανταλλακτικά Αξεσουάρ Ανταλλακτικά και αξεσουάρ μπορείτε να βρείτε στη σελίδα www grizzly service eu Εάν δεν έχετε Internet απευθυνθείτε τηλεφωνικά στο Κέντρο Σέρβις βλέπε Service Center στη σελίδα 33 Να έχετε πρόχειρους τους αριθμούς παραγγελίας που αναφέ ρονται πιο κάτω Αρ Αρ Χαρακτηρι...

Page 31: ...η σης είναι μπλοκα ρισμένη Ο ιμάντας λείανσης 10 μπλοκάρει τη μετάδοση κίνησης Συναρμολογήστε εκ νέου τον ιμάντα λείανσης βλέπε Αλλαγή ιμάντα λείανσης Το τεμάχιο επεξεργασίας τα υπο λείμματα τεμαχίου επεξεργασίας ή άλλα υπολείμματα των τεμαχίων λείανσης μπλοκάρουν τη μετάδο ση κίνησης Απομακρύνετε τις εμφράξεις Ο κινητήρας γίνε ται πιο αργός και ακινητοποιείται Η συσκευή υπερφορτώνεται από το τεμά...

Page 32: ...ια της εγγύησης δεν επεκτείνεται από την παροχή εγγύησης Αυτό ισχύει και για αντικαταστημένα και επισκευασμέ να εξαρτήματα Ενδεχόμενα ελαττώματα που διαπιστώνονται κατά την αγορά πρέπει να δηλωθούν αμέσως μετά το ξε πακετάρισμα Για όλες τις επισκευές που καθίστανται απαραίτητες μετά τη λήξη της εγγύησης επιβαρύνεστε με τις σχετικές δαπάνες Έκταση της εγγύησης Η συσκευή κατασκευάστηκε βάσει αυστη ρ...

Page 33: ... μαζί με όλα τα αξεσουάρ που σας παραδόθηκαν κατά την αγορά και φροντίστε για ασφαλή συσκευασία Σέρβις επισκευής Επισκευές που δεν καλύπτονται από την εγγύηση μπορούν να εκτελεστούν από το υποκατάστημά μας για σέρβις έναντι πλη ρωμής Το υποκατάστημα σέρβις θα σας υποβάλει προϋπολογισμό εξόδων Μπορούμε να αναλάβουμε την επεξερ γασία συσκευών που μας απεστάλησαν καλά συσκευασμένες και με πληρωμένα τ...

Page 34: ...ktionsfähigkeit Ihres Gerätes ist somit sichergestellt Die Betriebsanleitung ist Bestandteil dieses Gerätes Sie enthält wichtige Hinweise für Sicherheit Gebrauch und Entsorgung Machen Sie sich vor der Benutzung des Gerätes mit allen Bedien und Sicherheitshin weisen vertraut Benutzen Sie das Gerät nur wie beschrieben und für die angegebenen Einsatzbereiche Bewahren Sie die Betriebsanleitung gut auf...

Page 35: ...usgestattet mit einer Schleifscheibe und ei nem justierbaren Schleifband Zum Schutz des Anwenders ist das Gerät mit einem Funkenschutz und Schutzhauben versehen Die Funktion der Bedienteile entnehmen Sie bitte den nachfolgenden Beschreibungen Übersicht 1 Funkenschutz zweiteilig 2 Justierschraube für Funkenschutz 3 Schutzhaube Schleifscheibe 4 Motorgehäuse 5 Sternmutter zur Montage der Werkstückauf...

Page 36: ...eich eines Elektrowerkzeugs mit einem anderen verwendet werden Der angegebene Schwingungsemissi onswert kann auch zu einer einleitenden Einschätzung der Aussetzung verwendet werden Warnung Der Schwingungsemissionswert kann sich während der tatsäch lichen Benutzung des Elektro werkzeugs von dem Angabewert unterscheiden abhängig von der Art und Weise in der das Elektro werkzeug verwendet wird Versuc...

Page 37: ...zünden können Schützen Sie sich vor elektri schem Schlag Vermeiden Sie Kör perberührung mit geerdeten Teilen z B Rohren Radiatoren Elektroherden Kühlgeräten Halten Sie andere Personen fern Lassen Sie andere Personen insbeson dere Kinder nicht das Elektrowerkzeug oder das Kabel berühren Halten Sie sie von Ihrem Arbeitsbereich fern Symbole und Bildzeichen Bildzeichen auf dem Gerät Achtung Verletzung...

Page 38: ... an Falls Anschlüsse zur Staubabsaugung und Auffangeinrich tung vorhanden sind überzeugen Sie sich dass diese angeschlossen und rich tig benutzt werden Verwenden Sie das Kabel nicht für Zwecke für die es nicht be stimmt ist Benutzen Sie das Kabel nicht um den Netzstecker aus der Steck dose zu ziehen Schützen Sie das Kabel vor Hitze Öl und scharfen Kanten Beschädigte oder verwickelte Kabel erhöhen ...

Page 39: ...b die beweglichen Teile einwandfrei funktionieren und nicht klemmen oder ob Teile beschä digt sind Sämtliche Teile müssen richtig montiert sein und alle Bedin gungen erfüllen um den einwandfrei en Betrieb des Elektrowerkzeugs zu gewährleisten Beschädigte Schutzvorrichtungen und Teile müssen bestimmungsgemäß durch eine anerkannte Fachwerkstatt repariert oder ausgewechselt werden soweit nichts ander...

Page 40: ...en oder entflammbare Substanzen entzünden Tragen Sie beim Schleifen Bürsten und Trennen stets eine Schutzbrille Sicher heitshandschuhe einen Atemschutz und einen Gehörschutz Halten Sie nie die Finger zwischen Schleifscheibe und Funkenschutz oder in die Nähe der Schutzhauben Es besteht Gefahr durch Quetschen Die rotierenden Teile des Gerätes kön nen aus funktionellen Gründen nicht abgedeckt werden ...

Page 41: ...rlieren Vor Inbetriebnahme müssen alle Abdeckungen und Schutzvorrich tungen ordnungsgemäß montiert sein Ziehen Sie den Netzstecker be vor Sie Einstellungen am Gerät vornehmen Funkenschutz montieren einstellen 1 Schrauben Sie den Funkenschutz 1 mit Hilfe der Justierschraube 2 und der Mutter 2a an der Schutzhaube 3 fest Hierzu benötigen Sie einen Schraubendreher und einen Ringschlüssel mit dem Sie g...

Page 42: ...des Gerätes angegebene Verwenden Sie keine abgebro chenen gesprungenen oder an derweitig beschädigten Schleif scheiben Betreiben Sie das Gerät niemals ohne Schutzeinrichtungen Verwenden Sie trotz Funkenschutz immer eine Schutzbrille Kontrollieren Sie die Schleifschei be vor ihrer Verwendung Prüfen Sie den Abstand zwischen Funkenschutz und Schleifscheibe sowie Werkstückauflage und Schleifscheibe Ab...

Page 43: ...eb nis zu erhalten Die Schleifscheibe wird so gleichmäßig abgenutzt Lassen Sie das Werkstück zwischendurch abküh len Bandschleifen Der Pfeil auf der Schutzhaube 9 zeigt die Drehrichtung des Schleifbands an Halten Sie das Werkstück beim Schlei fen gut fest üben Sie keinen großen Druck aus Bewegen Sie das Werkstück leicht hin und her um ein einseitiges Abnutzen des Schleifbands zu verhindern Schleif...

Page 44: ...ren Sie das Gerät nach dem Schleifscheibenwechsel wie der vollständig Schalten Sie das Gerät aus und zie hen Sie den Netzstecker Lassen Sie das Gerät abkühlen Tragen Sie beim Schleifscheiben wechsel Schutzhandschuhe um Schnittverletzungen zu vermeiden 1 Nehmen Sie den Funkenschutz 1 ab siehe Funkenschutz montieren einstellen 2 Lösen Sie die 3 Befestigungsschrau ben 15 und nehmen Sie die Schleifsch...

Page 45: ...Sie beschädigte Teile aus Reinigung Verwenden Sie keine Reinigungs bzw Lösungsmittel Chemische Sub stanzen können die Kunststoffteile des Gerätes angreifen Reinigen Sie das Gerät niemals unter fließendem Wasser Reinigen Sie das Gerät nach jedem Ge brauch gründlich Reinigen Sie die Lüftungsöffnungen und die Oberfläche des Gerätes mit einer weichen Bürste einem Pinsel oder ei nem Tuch Wartung Das Ge...

Page 46: ...alten Sie die unten genannten Bestellnummern bereit Position Position Bezeichnung Bestell Nr Betriebs Explosions anleitung zeichnung 1 2 Set 3 Funkenschutz mit Justierschraube 91103042 10 35 Schleifband K 80 91103044 Schleifband K 80 5er Pack 91103046 Schleifband K 120 91103049 Schleifband Set K 60 80 120 91103050 14 Set 2 Ein Ausschalter 91103041 19 62 Schleifscheibe 91103043 19a 19b Set 1 Schlei...

Page 47: ...annung erhöhen siehe Schleifband wechseln Antrieb ist blockiert Schleifband 10 blockiert Antrieb Schleifband neu montieren siehe Schleifband wechseln Werkstück Werkstückreste oder Reste der Schleifwerkzeu ge blockieren Antrieb Blockaden entfernen Motor wird lang samer und bleibt stehen Gerät wird durch Werkstück überlastet Druck auf Schleifwerkzeug ver ringern Werkstück ungeeignet Schleifscheibe l...

Page 48: ...lauf der Garantiezeit anfallende Reparaturen sind kostenpflichtig Garantieumfang Das Gerät wurde nach strengen Qualitäts richtlinien sorgfältig produziert und vor Anlieferung gewissenhaft geprüft Die Garantieleistung gilt für Material oder Fabrikationsfehler Diese Garantie erstreckt sich nicht auf Geräteteile die normaler Ab nutzung ausgesetzt sind und daher als Ver schleißteile angesehen werden kö...

Page 49: ...t der Ga rantie unterliegen gegen Berechnung von unserer Service Niederlassung durchführen lassen Sie erstellt Ihnen gerne einen Kos tenvoranschlag Wir können nur Geräte bearbeiten die ausreichend verpackt und frankiert einge sandt wurden Achtung Bitte senden Sie Ihr Gerät gerei nigt und mit Hinweis auf den Defekt an unsere Service Niederlassung Nicht angenommen werden unfrei per Sperrgut Express ...

Page 50: ...010 EN 61029 2 4 2011 EN 12413 2007 A1 2011 EN 55014 1 2006 A2 2011 EN 55014 2 1997 A2 2008 EN 61000 3 2 2014 EN 61000 3 3 2013 EN 62321 2009 Die alleinige Verantwortung für die Ausstellung dieser Konformitätserklärung trägt der Hersteller Christian Frank Dokumentationsbevollmächtigter Grizzly Tools GmbH Co KG Stockstädter Straße 20 D 63762 Großostheim Germany 20 05 2017 Der oben beschriebene Gege...

Page 51: ... 2014 EN 61000 3 3 2013 EN 62321 2009 Η αποκλειστική ευθύνη για την έκδοση της παρούσας δήλωσης συμμόρφωσης ανήκει στον κατασκευαστή Christian Frank υπεύθυνος τεκμηρίωσης Grizzly Tools GmbH Co KG Stockstädter Straße 20 D 63762 Großostheim Germany 20 05 2017 Το ανωτέρω περιγραφόμενο αντικείμενο της δήλωσης πληροί τις προδιαγραφές της Οδηγίας 2011 65 ΕΕ του Ευρωπαϊκού Κοινοβουλίου και του Συμβουλίου...

Page 52: ...d EN 61029 1 2009 A11 2010 EN 61029 2 4 2011 EN 12413 2007 A1 2011 EN 55014 1 2006 A2 2011 EN 55014 2 1997 A2 2008 EN 61000 3 2 2014 EN 61000 3 3 2013 EN 62321 2009 This declaration of conformity is issued under the sole responsibility of the manufac turer Christian Frank Documentation Representative Grizzly Tools GmbH Co KG Stockstädter Straße 20 D 63762 Großostheim Germany 20 05 2017 The object ...

Page 53: ...53 2017 04 28_rev02_sh PSBS 240 B2 informativ informative ενημερωτικό Explosionszeichnung Exploded Drawing ...

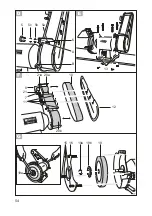
Page 54: ...54 13 15 16 19a 19a 19b 19 5 5c 5b 5a 6 A B 8 21 11 21a 7 10 12 20a 20b ...

Page 55: ......

Page 56: ...ädter Straße 20 DE 63762 Großostheim GERMANY Last Information Update Έκδοση των πληροφοριών Stand der Informationen 04 2017 Ident No 72037032042017 IE NI CY IAN 283029 283029_par_Standbandschleifer_cover_IE_NI_CY indd 1 04 04 17 17 14 ...

Reviews: