1 7
G B
I E
Alternating Current Motor
• The mains voltage must be 230 V~.
• Extension cables up to 25 m in length
must have a cross-section of 2.5 mm².
Connections and repairs to the electrical
equipment may only be performed by
a qualified electrician. If you have any
queries, please provide the following
information:
• Current type of the engine
• Data from the machine type plate
• Data from the motor type plate
Assembly
Assembly, Replacement of Parts
and Adjustments
Caution! The mains plug must be
removed before all servicing, ret-
ooling and assembly work.
Place all of the parts supplied on a flat
surface. Form groups of the parts which
are similar.
Note:
If connections are secured with a
bolt (round head/or hexagonal), hexago-
nal nuts and a washer, the washer must be
placed under the nut.
Insert the bolts from the outside to the in-
side in each case, securing the connections
with nuts from the inside.
Note:
Tighten the nuts and bolts during as-
sembly only to the extent that they cannot
fall off.
If you tighten the nuts and bolts any further
before final assembly, it is not possible for
final assembly to be carried out.
Additional tool required:
- Phillips screwdriver
Mounting of the Frame
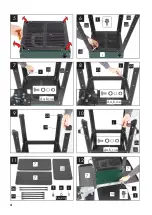
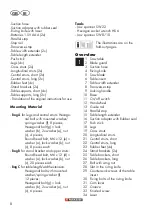
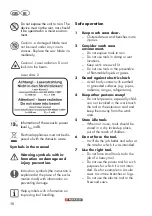
Abb.4-10
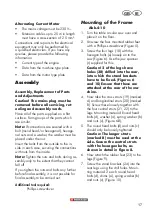
1. Turn the table circular saw over and
place it on the floor.
2. Unscrew the four mounted rubber feet
with a Phillips screwdriver (Figure 5).
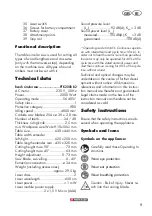
3. Screw the four legs (18) with the
hexagon bolts (e) loosely on to the
saw (Figure 6). Use the jaw spanner
(r) supplied for this.
Caution! 2 of the legs have
holes (38) drilled into the rear,
into which the stand brackets
have to be fixed. (Figures 6
and 10) Ensure that these are
attached at the rear of the ma-
chine.
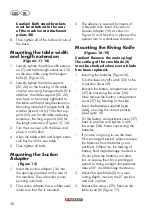
4. Now take the cross struts (19) (marked
A) and longitudinal struts (20) (marked
B). Screw these loosely together with
the four central struts (21, 22) to the
legs. Mounting material: Round head
bolts (d), washer (a), spring washer (b)
and nuts (c), (Figure 6-8).
5. The round head bolts (d) and nuts (c)
should only be loosely tightened.
Caution: The longer struts
(marked B) must be used at the
side. Secure the central struts
with the hexagon bolts, as
shown in detail in Figure 8.
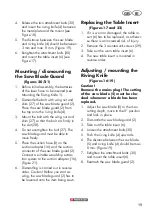
6. Now attach the rubber feet (23) to the
legs (Figure 9).
7. Screw the stand brackets (24) into the
rear legs using the drill holes. Moun-
ting material: 2 each: round head
bolts (d), shims (a), spring washer (b)
and nuts (c), (Figure 10).

