background image

49

GB

e)   Never cross your hand over the intended line of 

cutting either in front or behind the saw blade. 

Supporting the workpiece “cross handed” i.e. holding the 
workpiece to the right of the saw blade with your left hand 
or vice versa is very dangerous.

f)   Do not reach behind the fence with either hand 

closer than 100 mm from either side of the saw 
blade, to remove wood scraps, or for any other 
reason while the blade is spinning. 

The proximity 

of the spinning saw blade to your hand may not be obvi-
ous and you may be seriously injured.

g)   Inspect your workpiece before cutting. If the 

workpiece is bowed or warped, clamp it with 
the outside bowed face toward the fence. Al-
ways make certain that there is no gap be-
tween the workpiece, fence and table along 
the line of the cut. 

Bent or warped workpieces can 

twist or shift and may cause binding on the spinning saw 
blade while cutting. There should be no nails or foreign 
objects in the workpiece.

h)   Do not use the saw until the table is clear of all 

tools, wood scraps, etc., except for the work-
piece. 

Small debris or loose pieces of wood or other ob-

jects that contact the revolving blade can be thrown with 
high speed.

i)   Cut only one workpiece at a time. 

Stacked multiple 

workpieces cannot be adequately clamped or braced and 
may bind on the blade or shift during cutting.

j)   Ensure the mitre saw is mounted or placed on 

a level, firm work surface before use. 

A level and 

firm work surface reduces the risk of the mitre saw becom-
ing unstable.

k)   Plan your work. Every time you change the 

bevel or mitre angle setting, make sure the 
adjustable fence is set correctly to support the 
workpiece and will not interfere with the blade 
or the guarding system. 

Without turning the tool 

“ON” and with no workpiece on the table, move the saw 
blade through a complete simulated cut to assure there will 
be no interference or danger of cutting the fence.

l)   Provide adequate support such as table exten-

sions, saw horses, etc. for a workpiece that is 
wider or longer than the table top. 

Workpieces 

longer or wider than the mitre saw table can tip if not se-
curely supported. If the cut-off piece or workpiece tips, it 
can lift the lower guard or be thrown by the spinning blade.

m)  Do not use another person as a substitute for a 

table extension or as additional support. 

Unsta-

ble support for the workpiece can cause the blade to bind 
or the workpiece to shift during the cutting operation pull-
ing you and the helper into the spinning blade.

n)   The cut-off piece must not be jammed or pressed 

by any means against the spinning saw blade.  

If confined, i.e. using length stops, the cut-off piece could 
get wedged against the blade and thrown violently.

o)   Always use a clamp or a fixture designed to 

properly support round material such as rods 
or tubing. 

Rods have a tendency to roll while being cut, 

causing the blade to “bite” and pull the work with your 
hand into the blade.

p)   Let the blade reach full speed before contact-

ing the workpiece. 

This will reduce the risk of the work-

piece being thrown.

q)   If the workpiece or blade becomes jammed, 

turn the mitre saw off. Wait for all moving parts 
to stop and disconnect the plug from the power 
source and/or remove the battery pack. Then 
work to free the jammed material. 

Continued 

sawing with a jammed workpiece could cause loss of con-
trol or damage to the mitre saw.

r)   After finishing the cut, release the switch, hold 

the saw head down and wait for the blade to 
stop before removing the cut-off piece. 

Reaching 

with your hand near the coasting blade is dangerous.

s)   Hold the handle firmly when making an incom-

plete cut or when releasing the switch before 
the saw head is completely in the down posi-
tion. 

The braking action of the saw may cause the saw 

head to be suddenly pulled downward, causing a risk of 
injury.

Safety Instructions for the handling of saw blades

1  Do not use damaged or deformed saw blades.
2  Do not use any insertion tools with cracks. Sort out cracked 

insertion tools. Repairs are not permitted.

3  Do not use saw blades made of high speed steel.
4  Check the condition of the saw blades before using the 

crosscut, drag and mitre saw.

5  Make sure that a suitable saw blade for the material to 

be cut is selected.

6  Only use saw blades recommended by the manufacturer.

Saw blades designed to cut wood and similar materials 
must comply with EN 847-1.

7  Do not use saw blades made of high-speed alloy steel 

(HSS steel).

8  Only use saw blades for which the maximum permissible 

speed is not lower than the maximum spindle speed of the 
crosscut, drag and mitre saw and which are suitable for 
the material to be cut.

9  Observe the saw blade direction of rotation.
10  Only insertion the saw blade if you have mastered their 

use.

11  Observe the maximum speed. The maximum speed speci-

fied on the insertion tool may not be exceeded. If specified, 
observe the speed range.

12  Clean grease, oil and water off of the clamping surfaces.
13  Do not use any loose reducing rings or bushes for the 

reducing of holes on saw blades.

14  Make sure that fixed reducer rings for securing the inser-

tion tool have the same diameter and have at least 1/3 
of the cutting diameter.

15  Make sure that fixed reducer rings are parallel to each 

other.

16  Handle insertion tool with caution. They are ideally stored 

in the originally package or special containers. Wear 
protective gloves in order to improve grip and to further 
reduce the risk of injury.

17  Prior to the use of insertion tools, make sure that all protec-

tive devices are properly fastened.

Summary of Contents for PZKS 2000 A1

Page 1: ...SEGA CIRCOLARE PER TAGLI OBLIQUI Indicazioni per l uso e per la sicurezza Traduzione delle istruzioni d uso originali IT CH SCIE ONGLET RADIALE Consignes d utilisation et de s curit Traduction des in...

Page 2: ...nd machen Sie sich anschlie end mit allen Funktionen des Ger tes vertraut DE AT CH Avant de lire le mode d emploi ouvrez la page contenant les illustrations et familiarisez vous ensuite avec toutes le...

Page 3: ...2 4 1 3 5 1 10 2 4 5 7 24 25 32 23 24a 12 13 14 15 16 17 7 11 8 9 3 16a 23 11 35 35 21 22 27a 26a 19 18 20 16b 7a 27 22 26 6 16a 8 36 D...

Page 4: ...10 6 7 13 9 8 8 14 11 12 19 18 14 6 1 14 2 7 20 C C 6 4 16a 3 A max 8 mm 4 6 B 4 4 7 7 14 14 14 24 24a 25 5a 26 27 14 7 22 13 max 8 mm...

Page 5: ...16 17 18 19 15 20 21 22 5 29 34 31 33 30 28 C 6 17 32 32a 32b E E E 32b...

Page 6: ...g 3 4 Bestimmungsgem e Verwendung 4 5 Sicherheitshinweise 4 6 Technische Daten 8 7 Vor Inbetriebnahme 9 8 Aufbau und Bedienung 9 9 Transport 12 10 Wartung 12 11 Lagerung 12 12 Elektrischer Anschluss 1...

Page 7: ...nd Sicherheitshinweise lesen und beachten DE AT CH Schutzbrille tragen DE AT CH Geh rschutz tragen DE AT CH Bei Staubentwicklung Atemschutz tragen DE AT CH Achtung Verletzungsgefahr Nicht in das laufe...

Page 8: ...n und sorgf ltig beachtet werden An dem Ger t d rfen nur Personen arbeiten die im Gebrauch des Ger tes unterwiesen und ber die damit verbundenen Gefahren unterrichtet sind Das geforderte Mindestalter...

Page 9: ...erwendung in geschlossenen R umen Bitte beachten Sie dass unsere Ger te bestimmungsgem nicht f r den gewerblichen handwerklichen oder industriellen Einsatz konstruiert wurden Wir bernehmen keine Gew h...

Page 10: ...Elektrowerkzeug in unerwarteten Situationen bes ser kontrollieren f Tragen Sie geeignete Kleidung Tragen Sie keine weite Kleidung oder Schmuck Halten Sie Haare Kleidung und Handschuhe fern von sich be...

Page 11: ...F r einen Schnitt heben Sie den S gekopf und ziehen ihn ber das Werkst ck ohne zu schneiden Dann schalten Sie den Mo tor ein schwenken den S gekopf nach unten und dr cken die S ge durch das Werkst ck...

Page 12: ...Ver letzungsrisiko f hrt Sicherheitshinweise f r den Umgang mit S gebl ttern 1 Verwenden Sie keine besch digten oder deformierten S gebl tter 2 Verwenden Sie keine S gebl tter mit Rissen Mustern Sie...

Page 13: ...s zu einer Leistungsverminderung der Maschine bei der Verarbeitung und in der Schnittgenauigkeit f hrt Beim Schneiden von Plastikmaterial verwenden Sie bitte im mer Klemmen die Teile die ges gt werden...

Page 14: ...das S geblatt abdecken 8 Aufbau und Bedienung 8 1 Kapp und Zugs ge aufbauen Abb 1 2 4 5 Zum Verstellen des Drehtisches 14 den Handgriff 11 ca 2 Umdrehungen lockern und den Raststellungshebel 35 mit d...

Page 15: ...11 auf den gew nschten Winkel ein Der Zeiger 12 auf dem Drehtisch muss mit dem gew nsch tem Winkelma der Skala 13 auf dem feststehenden S ge tisch 15 bereinstimmen Den Handgriff 11 wieder festziehen u...

Page 16: ...els zusammen und bringen Sie ihn an der Auslass ffnung im Motorbereich an Der Sp nefangsack 17 kann ber den Rei verschluss auf der Unterseite entleert werden Anschluss an eine externe Staubabsaugung S...

Page 17: ...Pr fen Sie die Kohleb rstenb rsten bei einer neuen Maschine nach den ersten 50 Betriebsstunden oder wenn neue B rsten montiert wurden Pr fen Sie sie nach der ersten Pr fung alle 10 Betriebsstunden Wen...

Page 18: ...rn Diese Verpackung ist Rohstoff und ist somit wieder verwend bar oder kann dem Rohstoffkreislauf zur ckgef hrt werden Das Ger t und dessen Zubeh r bestehen aus verschiedenen Materialien wie z B Metal...

Page 19: ...in Netzanlage berlastet Lampen andere Motoren etc Verwenden Sie keine andere Ger te oder Motoren auf demselben Stromkreis Motor berhitzt sich leicht berlastung des Motors ungen gende K hlung des Moto...

Page 20: ...dem Ger t bereits Eingriffe vorgenommen wurden Die Garantiezeit betr gt 3 Jahre und beginnt mit dem Kaufdatum des Ger tes Garantieanspr che sind vor Ablauf der Garantie zeit innerhalb von zwei Wochen...

Page 21: ...livraison 18 4 Utilisation conforme 19 5 Consignes de s curit 19 6 Caract ristiques techniques 23 7 Avant la mise en service 23 8 Montage et utilisation 24 9 Transport 26 10 Maintenance 26 11 Stockage...

Page 22: ...s consignes de s curit et respectez les FR CH Portez des lunettes de protection FR CH Portez une protection auditive FR CH Portez un masque anti poussi re FR CH Attention Risque de blessure Ne mettez...

Page 23: ...ger de la salet et de l humidit aupr s de la machine Avant de commencer travailler avec la machine chaque utilisateur doit lire le manuel d utilisation puis le suivre attentivement Seules les personne...

Page 24: ...quivalente 5 Consignes de s curit Consignes de s curit g n rales relatives aux ou tils lectriques m AVERTISSEMENT Lisez et consultez toutes les consignes de s curit conseils photos descriptives et ca...

Page 25: ...x et de mani re plus s re dans Ia plage de puissance indiqu e b N utilisez pas les outils lectriques qui ont des interrupteurs d fectueux Les outils lectriques qui ne peuvent pas tre mis en marche ou...

Page 26: ...a lame en rotation peuvent tre ject s une vitesse lev e i Ne coupez qu une seule pi ce la fois Plusieurs pi ces empil es ne peuvent tre serr es ou maintenues de mani re appropri e et peuvent bloquer l...

Page 27: ...xigences techniques de l outil lectrique et ce qu elle soit bien fix e 19 Utilisez la lame de scie fournie exclusivement pour scier du bois et jamais pour scier du m tal 20 Utilisez exclusivement des...

Page 28: ...normalis et peuvent servir comparer les valeurs d un outil lectrique un autre Les valeurs d mission de bruit indiqu es peuvent galement servir valuer pr alablement les risques encourus lors de l expos...

Page 29: ...serr e et ce que la t te de machine 4 soit mobile dans le sens radial Attention Les but es mobiles 16a doivent tre fix es leur position int rieure pour effectuer les coupes pendulaires 90 Desserrez le...

Page 30: ...s but es mobiles 16a doivent se trouver leur position int rieure c t droit Avant d effectuer une coupe v rifiez qu il n y a pas de col lision possible entre la lame de scie 6 et la but e mobile 16a Re...

Page 31: ...ment et le r glage de la lame de scie 6 doit tre r alis dans les r gles de l art 8 11 Utilisation du laser Fig 18 Mise en marche Appuyez 1 x sur l interrupteur Marche Arr t du laser 33 Un faisceau las...

Page 32: ...s En cas de surcharge du moteur ce dernier s arr te de lui m me Apr s un temps de refroidissement d une dur e variable le moteur peut tre remis en marche C ble d alimentation lectrique d fectueux Des...

Page 33: ...pas Moteur c ble ou connecteur d fectueux fusibles grill s Faites v rifier la machine par un sp cialiste Ne jamais r parer le moteur vous m me Danger Contr lez les fusibles remplacez les au besoin Le...

Page 34: ...rieure comme par exemple les dommages dus une chute ainsi que l usure normale conforme l utilisation Ceci est particuli rement valable pour les accumulateurs pour lesquels nous offrons toutefois une...

Page 35: ...32 4 Utilizzo proprio 33 5 Avvertenze sulla sicurezza 33 6 Caratteristiche tecniche 37 7 Prima della messa in funzione 37 8 Montaggio ed azionamento 38 9 Trasporto 40 10 Manutenzione 40 11 Conservazio...

Page 36: ...leggete le istruzioni per l uso IT CH Indossate gli occhiali protettivi IT CH Portate cuffie antirumore IT CH Mettete una maschera antipolvere IT CH Attenzione Pericolo di lesioni Non mettete le mani...

Page 37: ...coli ad esso collegati L et minima richiesta per gli operatori deve essere assolutamente rispettata Oltre agli avvisi di sicurezza contenuti nelle presenti istruzioni per l uso e alle disposizioni spe...

Page 38: ...ostri apparecchi non sono stati costruiti per l impiego professionale artigianale o industriale Non ci assumiamo alcuna garanzia quando l apparecchio viene usa to in imprese commerciali artigianali o...

Page 39: ...ta familiarit Maneggiare l utensile senza fare attenzione pu causare gravi lesioni nel giro di pochi secondi Utilizzo e cura dell utensile elettrico a Non sottoporre l apparecchio a sollecitazioni ecc...

Page 40: ...postarsi e far s che la lama della sega rotante si incastri al momento del taglio Rimuovere qualsiasi chiodo o corpo estraneo nel pezzo in lavorazione h Utilizzare la sega solo se il tavolo libero da...

Page 41: ...mente nella confezione originale o in contenitori speciali Indossare guanti protettivi per migliorare la sicurezza di presa e ridurre il rischio di lesione 17 Prima dell utilizzo delle lame accertarsi...

Page 42: ...cuffie antirumore L effetto del rumore pu causare la perdita dell udito I valori di emissione dei rumori indicati sono stati misurati con una procedura di controllo standardizzata e possono essere uti...

Page 43: ...atura 90 e tavolo rotante 0 Fig 1 2 7 Fino a larghezze di taglio di ca 100 mm possibile fissare con la vite di bloccaggio 20 la funzione di trazione della sega in posizione posteriore In tale posizion...

Page 44: ...l indicatore 19 con un cacciavite a croce portarlo in posizione 45 della squadra graduata 18 e stringere nuovamente la vite di fermo 8 6 Taglio obliquo tra 0 e 45 e piano girevole a 0 Fig 1 2 11 Con l...

Page 45: ...so orario Dopo al massimo un giro il bloccaggio dell al bero della sega 30 scatta in posizione Ora con un po pi di forza allentate la vite flangiata 28 in senso orario Svitate del tutto la vite flangi...

Page 46: ...sfavorevoli l apparecchio pu causare delle variazioni temporanee di tensione Il prodotto concepito solo per l utilizzo collegato a prese che a non superino una massima impedenza di rete Z oppu re Zmax...

Page 47: ...o Possibile causa Rimedio Il motore non funziona Il motore il cavo o il connettore sono difettosi fusibili bruciati Far ispezionare la macchina da una persona compe tente ed esperta Non riparare mai i...

Page 48: ...rmale e dovuta all impiego Il diritti di garanzia decadono quando sono gi effettuati interventi sull apparecchio Il periodo di garanzia 3 anni e inizia alla data d acquisto dell apparecchio I diritti...

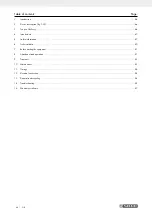
Page 49: ...delivery 46 4 Intended use 47 5 Safety information 47 6 Technical data 50 7 Before starting the equipment 51 8 Attachment and operation 51 9 Transport 53 10 Maintenance 53 11 Storage 54 12 Electrical...

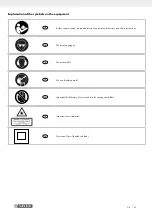
Page 50: ...ng read and observe the operating instructions and safety instructions GB Wear safety goggles GB Wear ear muffs GB Wear a breathing mask GB Important Risk of injury Never reach into the running saw bl...

Page 51: ...tore it in a plastic cover to protect it from dirt and moisture Read the instruction manual each time before operating the machine and carefully follow its information The machine can only be operated...

Page 52: ...r tool Failure to follow the warnings and in structions may result in electric shock fire and or serious injury Save all warnings and instructions for future refer ence The term power tool used in the...

Page 53: ...accidents are caused by poorly maintained power tools f Keep cutting tools sharp and clean Carefully maintained cutting tools with sharp edges are less likely to jam and can be guided more eas ily g U...

Page 54: ...lade and thrown violently o Always use a clamp or a fixture designed to properly support round material such as rods or tubing Rods have a tendency to roll while being cut causing the blade to bite an...

Page 55: ...ions having been met some non obvious residual risks may still remain Residual risks can be minimised if the safety instructions and the Proper use are observed along with the whole of the operating i...

Page 56: ...itre saw fig 1 2 4 5 In order to adjust the rotary table 14 loosen the handle 11 approximately 2 turns and pull up the latched position lever 35 with your index finger Turn the rotary table 14 and poi...

Page 57: ...of the stop for mitre cut 45 fig 1 2 5 9 10 No stop angle included Lower the machine head 4 and secure it using the locking bolt 23 Fix the rotary table 14 in the 0 position Attention For mitre cuts...

Page 58: ...guard 5 is above the flange screw 28 With one hand insert the Allen key C in the flange screw 29 Hold the Allen key C and slowly close the saw blade guard 5 until it touches the Allen key C Firmly pre...

Page 59: ...can cause the voltage to fluctuate temporarily The product is intended solely for use at connection points that a do not exceed a maximum permitted supply impedance Z Zmax 0 382 or b have a continuous...

Page 60: ...edy Motor does not work Motor cable or plug defective fuses burnt Arrange for inspection of the machine by a specialist Never repair the motor yourself Danger Check fuses and replace as necessary The...

Page 61: ...56 GB...

Page 62: ...is rendered null and void if any attempt is made to tamper with the device The guarantee is valid for a period of 3 years starting from the purchase date of the device Guarantee claims should be subm...

Page 63: ...58...

Page 64: ...a norem pro v robek SK prehlasuje nasleduj cu zhodu podla smernice EU a noriem pre v robok HR ovime izjavljuje da postoji sukladnost prema EU smjernica i normama za sljedece artikle RS potvr uje sled...

Page 65: ......

Page 66: ......

Page 67: ......

Page 68: ...EARBEITUNGSMASCHINEN GMBH G nzburger Str 69 D 89335 Ichenhausen IAN 312188 Stand der Informationen Version des informations Versione delle informazioni Last Information Update Update 09 2018 Ident No...
Reviews: