background image

11

12

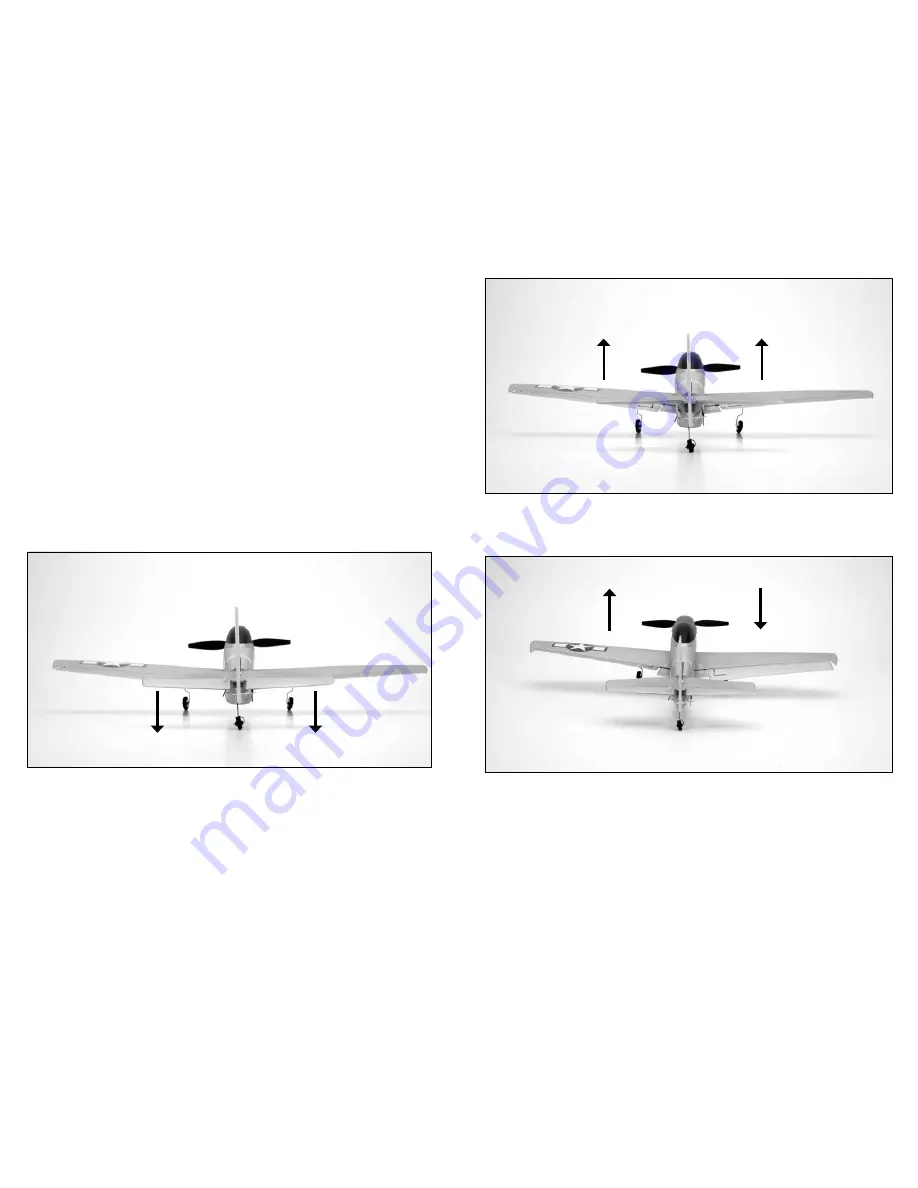
When the elevator stick is moved aft the elevator should move up.

Move the aileron stick left and right to check aileron roll control. When the

stick is pushed to the left, the left aileron should move up and the right aileron 

should move down.

You must test the controls prior to the first flight to ensure none of the  

servos, linkages or parts were damaged during shipping and handling and 

that the controls function in the correct directions.

Turn the transmitter on first and lower the throttle stick completely. Then,

plug the battery into the battery lead of the receiver unit. 

Note:  The connectors on the battery and battery lead are keyed to pre-

vent reverse polarity connection. However, if you force them to-

gether in the wrong orientation and with the wrong polarity it is still 

possible to damage the battery and/or receiver unit. To help further 

prevent a reverse polarity connection, one side of the end cap on 

the battery and the connector on the battery lead of the receiver 

unit will have a red dot. The connectors are oriented for a proper 

polarity connection when the red dots are on the same side.

Move the elevator stick on the transmitter forward and aft to check  

elevator pitch control. When the stick is pushed forward, the elevator should 

move down.

Control Test

Summary of Contents for PKZ3600

Page 1: ...and 1 5 g Linear Servo SPMAS2000 2009 Horizon Hobby Inc 4105 Fieldstone Road Champaign IL 61822 USA Horizon Hobby UK Units 1 4 Ployters Road Staple Tye Harlow Essex CM18 7NS United Kingdom Horizon Hobby Deutschland GmbH Hamburger Strasse 10 25335 Elmshorn Germany ParkZone products are distributed exclusively by Horizon Hobby Inc Multiple patents pending US patent 7 391 320 PRC patent number ZL 200...

Page 2: ...r EFLC1004 This charger safely charges four 3 7V packs independently Attempting to charge the battery using another Li Po battery charger or non Li Po compatible charger could result in serious damage P 51D Mustang RTF Introduction As the user of this product you are solely responsible for operating it in a manner that does not endanger yourself and others or result in damage to the product or the...

Page 3: ... following safety instructions and warnings before handling charging or using the Li Po battery Note Li Po batteries are significantly more volatile than the alkaline NiCd or NiMH batteries used in RC applications All instructions and warnings must be followed exactly Mishandling of Li Po batteries can result in fire By handling charging or using the included Li Po battery you assume all risks ass...

Page 4: ...y And while it is possible to power the model up and to fly again after the soft LVC occurs this is NOT recommended as continued discharging to the soft LVC will cause permanent damage to the Li Po battery that results in lost power and duration when using the battery for subsequent flights or failure of the battery entirely Continued attempts to further discharge the battery may also result in lo...

Page 5: ...ately 15 20 times before it will be necessary to replace the AA batteries in the charger Replacing the included batteries with alkaline batteries will result in more charge cycles than with the included batteries Note If LED remains on for longer than 40 minutes while charging and or 5 seconds after removing the Li Po flight battery please replace the AA batteries in the charger Installing the Fli...

Page 6: ...ansmitter is now bound to the airplane If you encounter any problems repeat the binding process again see the troubleshooting guide or call the Horizon Support Team at 1 877 504 0233 Note We strongly recommend setting the transmitter on low rate for the initial flights To set transmitter to low rate while the transmitter and airplane are powered on push the right stick inward until you hear it cli...

Page 7: ...y into the battery lead of the receiver unit Note The connectors on the battery and battery lead are keyed to pre vent reverse polarity connection However if you force them to gether in the wrong orientation and with the wrong polarity it is still possible to damage the battery and or receiver unit To help further prevent a reverse polarity connection one side of the end cap on the battery and the...

Page 8: ... Center the control surfaces using the trims If there is not enough electronic trim available it may be necessary to adjust the loops in the control linkages to center the surfaces Transmitter Dual Rate Function The 4 channel 2 4GHz DSM2 transmitter included with the P 51D features dual rate capability The default setting is high rate To access the low rate function simply press IN on the right gi...

Page 9: ...with a status indicator LED Please refer to the instruction manual of the AR6400 for more information on the unique features and programming options The following checklist contains the steps you must follow to ensure proper arming and operation of the receiver unit as well as proper motor response Each time before you fly you should ALWAYS turn the transmitter on before connecting the flight batt...

Page 10: ... surfaces Reversing the rudder elevator and aileron operation can be accomplished by following the steps below 1 Be certain that the battery is unplugged from the aircraft and the transmitter is turned off 2 Push down on the digital trim button for the surface you would like to reverse a Top elevator trim button elevator normal b Bottom elevator trim button elevator reverse c Left rudder trim butt...

Page 11: ...und a suitable flying area your P 51D Mustang is ready for flight Start first flight using the low rate set tings to become familiar with the flying characteristics before increasing the throw of the control surfaces Place the P 51D Mustang in position for takeoff facing into the wind if flying outdoors Gradually increase the throttle to to full and steer with the rudder Pull back gently with the ...

Page 12: ...eller is threaded onto the shaft of the gearbox 1 To remove propeller open the fuselage by cutting through the decal on one side of the fuselage 2 Hold the spur gear with your finger and spin the propeller off the shaft 3 Thread new 130mm x 70mm prop and spinner onto the gearbox shaft and tape the fuslage back together with clear tape You may find that you need to replace the prop shaft in the gea...

Page 13: ...This product is not intended for use by children without direct adult supervision Warranty Period Exclusive Warranty Horizon Hobby Inc Horizon warranties that the Products purchased the Product will be free from defects in materials and workmanship at the date of purchase by the Purchaser Limited Warranty a This warranty is limited to the original Purchaser Purchaser and is not transferable REPAIR...

Page 14: ...hstand the rigors of shipping without additional protection Ship via a carrier that provides tracking and insurance for lost or damaged parcels as Horizon is not responsible for merchandise until it arrives and is accepted at our facility A Service Repair Request is available at www horizonhobby com on the Support tab If you do not have internet access please include a letter with your complete na...

Page 15: ...air should be shipped to the following address Horizon Technischer Service Hamburger Strasse 10 25335 Elmshorn Germany Please call 49 4121 46199 66 or e mail us at service horizonhobby de with any questions or concerns regarding this product or warranty Product Registration Register your product online at www parkzone com register CE Compliance Information for the European Union Instructions for D...

Page 16: ...e re quirements of the specifications listed below following the provisions of the European R TTE directive 1999 5 EC EN 300 328 Technical requirements for Radio equipment EN 301 489 1 301 489 17 General EMC requirements for Radio equipment EN 60950 Safety Signed for and on behalf of Horizon Hobby Inc Champaign IL USA August 10 2009 Steven A Hall Vice President International Operations and Risk Ma...

Reviews: