Step 4
Attaching the Wing
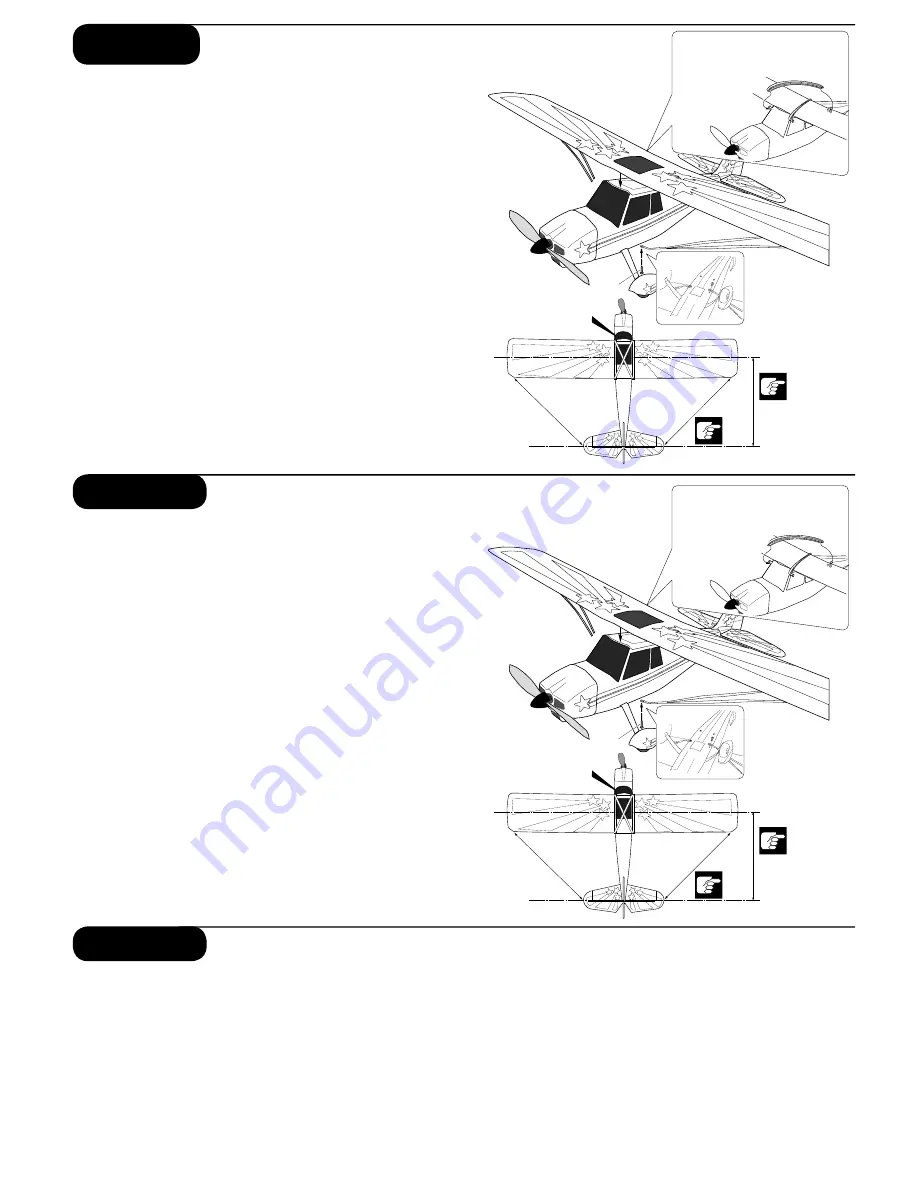
1. Locate wing.
2. Locate wing strut screws.
3. Place the wing on the top of the fuselage, making certain it is
centered properly. Attach the wing with four rubber bands that
are included. Stretch two of the rubber bands from the front to
the rear attach points. Stretch the last two diagonally across the
middle to the attach points.
4. Once this is done, it is time to attach the wing struts to the
fuselage. Locate the two washers and small Phillips screws and
attach strut to fuselage as shown. Once the screw is tightened
into the fuse, you can loosen it slightly to allow the slack of the
strut to be adjusted as needed.
5. Make sure that prior to each flight the wing is properly centered
on the fuselage. If the wing is not centered properly, it is
impossible to have correct flight.
1. Sortir l’aile.
2. Repérer les vis de fixation des haubans.
3. Placer l’aile sur le fuselage et la centrer correctement. Fixer l’aile
avec les bracelets en caoutchouc fournis. Croiser 2 bracelets
de l’avant vers l’arrière comme indiqué sur le dessin. Placer les 2
autres bracelets dans l’axe du fuselage.
4. Vous pouvez ensuite fixer les haubans sur le fuselage. Utiliser les
2 vis à l’avant du fuselage pour bloquer les extrémités des haubans
(voir dessin). Ne pas bloquer les vis pour pouvoir ajuster la position
de l’aile
5. Vérifier le centrage de l’aile avant chaque vol. Si l’aile n’est pas
centrée, il sera impossible de voler correctement.
Français
Stade 4. Fixation de l’aile
1. Nehmen Sie die Tragfläche aus der Verpackung
2. Nehmen Sie die Schrauben für die Tragflächenstreben zur Hand.
3. Legen Sie die Tragfläche, mittig ausgerichtet, auf den Rumpf. Befestigen Sie die
Tragfläche mit den vier mitgelieferten Tragflächengummis. Zwei werden von
hinten nach vorn gezogen und zwei diagonal über die Mitte.
4. Nun werden die Tragflächenstreben mit dem Rumpf verbunden. Nehmen Sie
die beiden Scheiben und die beiden Kreuzschlitzschrauben und montieren Sie
die Streben am Rumpf, wie gezeigt. Wenn die Schrauben fest im Rumpf sitzen,
können Sie wieder etwas gelockert werden, um das Spiel der Streben einzustellen.
5. Stellen Sie vor jedem Flug sicher, dass die Tragfläche korrekt in der Mitte sitzt. Ist
dies nicht der Fall, beeinträchtigt dies das Flugverhalten erheblich.
Deutsch
Schritt 4. Montage der Tragfläche
8
(2) 2.5 x 12mm
A’
A’=A”
A”
Align to
the center.
Parallel
Fix wing securely to fuselage.
Loss of wing will result in lack of
control and crash.
Use 4 rubber bands
to secure wing as
shown.
(2) 2.5 x 12mm
A’
A’=A”
A”
Aligné au centre.
Nach der Mitte ausrichten
Parallèle
Parallel
Sichere Fixierung der Tragfläche
Die Tragfläche muss sicher mit den 4
Tragflächengummis auf dem
Rumpf fixiert warden, weil
ansonsten der Verlust
des Modells oder ein
Absturz erfolgt.
Fixer consciencieusement l’aile.
La perte de l’aile peut entraîner un crash.
Utiliser les 4 bracelets pour fixer l’aile
comme indiqué.
Summary of Contents for Super Decathlon
Page 1: ...7587...
Page 43: ...42...


