background image

20 


PARMAIR EXIMUS JrS and JrV 

Maintenance monitor 
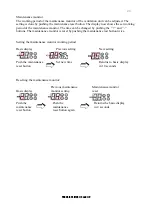
The working period of the maintenance monitor of the ventilation unit can be adjusted. The 
setting is done by pushing the maintenance reset button. The display now shows the set working 
period of the maintenance monitor. The time can be changed by pushing the ’’+’’ and ’’-’’ 
buttons. The maintenance monitor is reset by pushing the maintenance rest button twice. 
 
 
Setting the maintenance monitor working period. 
 
Basic display 

Previous setting 

New setting 


Push the maintenance 

Set new time 

Returns to basic display 

reset button 


in 10 seconds 


Resetting the maintenance monitor: 
 

Previous maintenance 

Maintenance monitor 

Basic display 

monitor setting 

reset 


Push the   

Push the 

Returns the basic display 

maintenance 

maintenance 

in 2 seconds 

reset button 

reset button again 

Summary of Contents for JrS

Page 1: ...JrS and JrV TECHNICAL SPECIFICATIONS AND IMPLEMENTATION GUIDE ...

Page 2: ... that the total air extracted is normally equal to half the volume of air in a dwelling half of the air in the house needs replacing every hour 40 by ventilation and 10 by leakage Fresh air is blown into bedrooms and living areas and into the sauna and adjoining room with fireplace Ventilation consumes approximately 30 of a dwelling s energy The Eximus Jr Unit allows the heat from extracted air to...

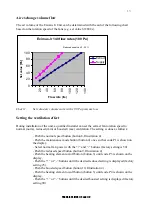
Page 3: ... Eximus JrV Preheating 0 700W electronic regulation as necessary Condensation water connector CU pipe external 15 mm in rear corner Maximum air volume 140l s 50Pa Temperature efficiency ratio Approx 60 qV 60dm3 s 3 UNIT AIR EXHANGE VOLUME FLOW Eximus Jr air exchange volume flow rate 0 50 100 150 200 250 300 350 400 0 20 40 60 80 100 120 140 160 Air volume flow rate l s Static pressure Pa Extract S...

Page 4: ...er which it passes through incoming air ducts into the various rooms in the house When temperatures fall below zero moisture condensing from extracted air collects on the surface of the heat exchanger Because of this the heat transfer parts of Parmair Eximus Jr Units are equipped with an electronically controlled antifreeze system that prevents the heat exchanger from freezing under any circumstan...

Page 5: ... JrS Unit and Diagram 3 for the JrV Unit Parmair Eximus JrS Extra 4 3 1 3 2 1 J1 J2 J3 230V Remote control Remote control 1 2 3 4 1 2 3 4 J13 J11 J12 J14 Master switch T50 T50 C 2 1 C 2 1 Thermal shield Thermal shield Reheating 2x600 W 115V Preheating 700 W 230V 2 4 4 x 0 5 4 x 0 5 Diagram 2 Electrical connection diagram the JrS Unit ...

Page 6: ...ir Eximus JrV Extra 4 3 1 3 2 1 J1 J2 J3 230V Remote control Remote control 1 2 3 4 1 2 3 4 J13 J11 J12 J14 Master switch T50 C 2 1 Thermal shield Preheating 700W 230V M Reheating 2 4 Diagram 3 Electrical connection diagram the JrV Unit ...

Page 7: ...s to basic mode The ventilation unit should always at least be switched on to the lowest setting min This will ensure that indoor air stays healthy and that the disadvantages of humidity and damage from freezing are avoided 6 INSTALLING THE UNIT Parmair Eximus Jr Units are intended for installation in warm indoor areas above 5 C The unit is attached to the wall by fixing points along the upper and...

Page 8: ... four duct connections 160 mm on the top of the unit see Illustration 1 and 2 1 Waste air 4 Extracted air 2 Fresh air 5 Water flow Model JrV 3 Incoming air 6 Water return Model JrV RIGHT R Illustration 1 Duct outlets Right LEFT L Illustration 2 Duct outlets Left ...

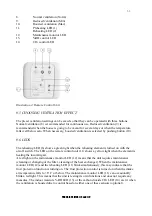
Page 9: ...NG TEMPERATURE CONTROL AND TEMPERATURE GAGE The reheating element Model JrS or the water radiator control vent Model JrV will not be switched on unless the temperature of the incoming air drops below the set temperature The temperature of incoming air can be controlled to the desired level 10 C 25 C with the and buttons 2 next to the LED display The reheating on off button 3 allows the reheating r...

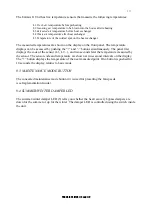
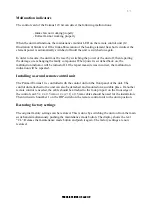
Page 10: ...the and buttons simultaneously The panel first displays the code of the sensor L1 L2 and two seconds later the temperature measured by the sensor The sensor code and temperature are shown at two second intervals on the display The button displays the temperature of the next measured point If no button is pushed for 10 seconds the display returns to basic mode 9 3 MAINTENANCE MODE BUTTON The concea...

Page 11: ...hen the reheating element is turned on with the on off switch The LED on the remote control unit 11 shows a yellow light when the element is heating the incoming air A red light on the maintenance monitor LED 12 means that the unit requires maintenance cleaning or changing of the filter cleaning of the heat exchanger When the maintenance monitor LED 12 and the reheating LED 11 blink simultaneously...

Page 12: ...clarified 10 MAINTENANCE In order to ensure the faultless performance of the Eximus Jr Unit under all conditions it is important to service the unit at regular intervals Maintenance is limited in practice to cleaning the air filters heat exchanger fans and internal parts It is recommended that maintenance operations be performed in the following order NB Be sure there is no current in the unit bef...

Page 13: ... side on which the dust collects Filters should be replaced each year in order to maintain efficiency The cleaning and replacing should be confirmed by pushing the green reset button on top of the fans twice In order for the unit to register the push of the reset button power must be turned on If the fans have become very dirty or almost not dirty at all during the four months the setting of the m...

Page 14: ...f extract fan min max Reduced speed of extract fan 20 norm Boosted speed of extract fan norm 100 Difference extract and intake fan effect 30 0 The speed settings are configured in the maintenance mode display which is accessed by pushing the maintenance mode button 4 on the front edge of the unit once using e g the tip of a pen The settings in the maintenance mode display can be browsed with the h...

Page 15: ...ormal norm reduced min or boosted max ventilation The setting is done as follows Push the normal speed button button 8 Illustration 4 Push the maintenance mode button button 4 once so that code P1 is shown on the display Select normal fan power with the and buttons factory setting is 50 Push the reduced speed button button 9 Illustration 4 Push the heating element on off button button 3 until code...

Page 16: ...l the desired fan rotation ratio is between 30 and 0 the factory setting is 20 Setting and resetting the maintenance monitor time The time of the maintenance monitor can be changed when the unit is being installed by pushing the filter reset button once The display now shows the set time The desired time can be set with the and buttons The maintenance monitor time can be set to 2 12 months with on...

Page 17: ...r measure was incorrect the malfunction indication will be repeated Installing a second remote control unit The Parmair Eximus Jr is controlled with the control unit on the front panel of the unit The control unit attached to the unit can also be detached and mounted on a suitable place If another remote control is needed the cable should be attached to the four pin port on the front edge of the c...

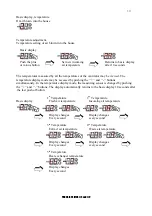
Page 18: ...ccessed by pushing the and buttons simultaneously In the temperature display mode the measuring sensor is changed by pushing the and buttons The display automatically returns to the basic display 10 seconds after the last push of button 1st Temperature 2nd Temperature Basic display Fresh air temperature Incoming air temperature Display changes Display changes Every second every second 3rd Temperat...

Page 19: ...Extract air normal speed Push the The value is displayed maintenance in 2 seconds mode button P2 Adjustment P2 Adjustment Intake extract air ratio Intake extract air ratio The value is displayed in 2 seconds P3 Adjustment P4 Adjustment Extract air reduced speed min Extract air boosted speed max The value is displayed The value is displayed in 2seconds in 2 seconds Restoring the factory settings If...

Page 20: ...shing the and buttons The maintenance monitor is reset by pushing the maintenance rest button twice Setting the maintenance monitor working period Basic display Previous setting New setting Push the maintenance Set new time Returns to basic display reset button in 10 seconds Resetting the maintenance monitor Previous maintenance Maintenance monitor Basic display monitor setting reset Push the Push...

Page 21: ...21 PARMAIR EXIMUS JrS and JrV Air Wise Oy Lehmilaidantie 8 35300 Orivesi Puh 03 359 6600 Fax 03 359 6623 www airwise fi ...

Reviews: