background image


13


are in breach of the regulations in force or from failure to comply with these installation 
instructions. 


Electrical Connection


It is necessary that all installation and connections are carried out by qualified personnel and that 
the connections meet all New Zealand Regulatory Requirements. 
 
Before connecting to the mains, make sure that; 


The electrical counter, the safety valve, feed cable and socket are suitable to withstand the 
maximum load requirements as detailed on the rating label. 


The supply system is regularly grounded as per New Zealand Regulations. 


If a permanent connection is used, the appliance’s power supply line must be fitted with an 
omnipolar breaking device with contact gap of at least 3mm, located in an easily accessible 
position close to the appliance. 


If a socket and plug connection is used, check they are of the same type and are compatible 
with each other. 


After connection of the appliance to the mains, ensure the cord does not come into contact 
with any parts of the appliance subject to heating. 


Never use reductions, shunts, or adapters which can cause overheating or burning. 

 
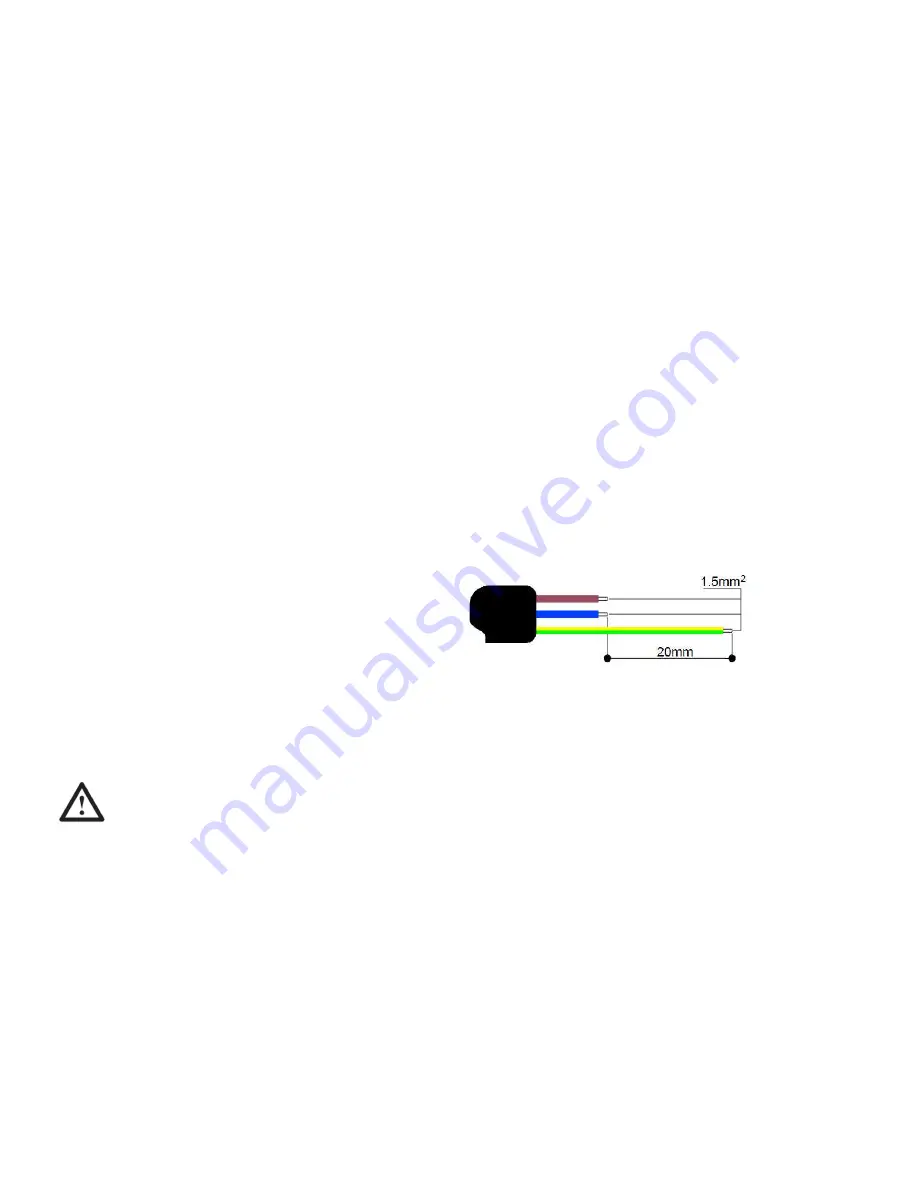
Operation at 220-240 V~: use a type H05RR-F 
three wire cable (cable of 3 x 1.5mm

2

). 


The earth wire (yellow-green) must be at least 20mm longer than the other wires for connection to 
the appliance. 


When handling this oven it is essential that you always use the purpose provided handles 
recessed into the sides of the oven. This will ensure that the oven carcass and door is not 
stressed by lifting. DO NOT use the door handle when lifting this appliance into position. This 
could result in damage to the hinges. 


Installation into Cabinetry 

 
The power supply to the appliance must be cut off before any adjustment or maintenance work is 
performed. In addition, special care must be paid to the ventilation requirements, as correct 
ventilation is required for this oven to perform correctly. The oven must be installed as per the 
installation instructions below. 
 
The figure below gives the dimensions for cut-out installation under the counter or an in wall 
cabinet unit. 
 

Summary of Contents for OV-1-6S-GAS

Page 1: ...art of Parmco Appliances commitment to improving and updating product ranges we reserve the right to alter change and update technical specifications and appearance attributes of all Parmco Appliances products E OE Models OV 1 6S GAS OV 1 6W GAS ...

Page 2: ......

Page 3: ...y authorized persons The installation must comply with all the appropriate New Zealand Standards and Regulatory Requirements with particular reference to the New Zealand Electrical and Gas Installation Standards Any attempt to install this or any other Parmco product without an authorised person could result in damage to the product and a possible health hazard Not having an authorized person inst...

Page 4: ...y call your gas supplier from a neighbour s phone Follow the gas supplier s instructions If you cannot reach your gas supplier call the fire department This appliance is designed for non commercial household use only and must not be altered in any way Appliance must be properly installed and grounded by a qualified installer Have the installer show you the location of the gas shut off valve and ho...

Page 5: ...are or other glaze utensils are suitable for cooking range use without breaking due to the sudden change in temperature Accessible parts may become hot during use To avoid burns young children should be kept away Surface oven gas burners may be hot even though they have no flame and areas near the surface may become hot enough to cause burns Make sure hot areas have had sufficient time to cool bef...

Page 6: ...ed periods of time to avoid a drop in the oven temperature which may impair cooking results FRONT PANEL CONTROLS All the cooker s control and monitoring devices are placed together on the front panel The table below provides the key to the symbols used Thermostat Knob This knob lights the gas burner inside the oven The cooking temperature is set by turning the knob anti clockwise to the value requ...

Page 7: ... trying again Lighting the Burner by Hand If for any reason the power is off or fails you can light the burner by hand Completely open the oven door and turn the thermostat knob anti clockwise Place a lit match close to the end of the flame pipe A positioned bottom centred of the oven and press the thermostat knob Once the burner has ignited keep the knob pressed down for a few seconds to allow th...

Page 8: ...t air circulation inside the oven Positioning the Oven Trays and Shelves The baking tray grill tray and wire shelves can be located in any of five height positions When positioning tray heights it is important to remember that this oven may perform differently to the way your previous appliance worked To obtain the best cooking results please experiment with temperature rack height and cooking tim...

Page 9: ...8 10 Kebabs 1 4 5 MAX 6 8 Vegetables 1 3 4 5 MAX 10 15 Veal 1 4 5 MAX 15 20 Cutlets 1 4 5 MAX 15 20 Hamburgers 1 4 5 MAX 7 10 Toasted sandwiches 4 4 MAX 2 3 Please note the above is a guide only and you will need to vary temperatures times and rack height combinations to achieve the results you want CLEANING AND MAINTENANCE CLEANING Before cleaning your appliance or performing maintenance make sur...

Page 10: ...foil and oven trays on the bottom of the oven when it is in operation as this may result in damage to the enamel MAINTENANCE Before carrying out any operation involving access to live parts disconnect the appliance from the electricity supply Replacing the Oven Lamp Disconnect the oven from the power supply and unplug the appliance if the plug is accessible Remove the glass cover of the lamp holde...

Page 11: ...recovery and recycling of this product please contact your local City Council office SERVICE AND PARTS Before leaving the factory this appliance was tested and adjusted by specialist skilled staff to give the best operating results Any subsequent necessary repairs or adjustments must be carried out with the greatest of care and attention by an authorized personnel For this reason we strongly advis...

Page 12: ...el is located at the rear of the appliance A duplicate data label is supplied to adhere to a suitable accessible area next to the appliance The data label on the appliance must NEVER be removed Before any procedure it is important to check that the appliance is DISCONNECTED from the electrical mains Parmco declines all responsibility for any damage derived from installations that IMPORTANT NOTE It...

Page 13: ...ns ensure the cord does not come into contact with any parts of the appliance subject to heating Never use reductions shunts or adapters which can cause overheating or burning Operation at 220 240 V use a type H05RR F three wire cable cable of 3 x 1 5mm2 The earth wire yellow green must be at least 20mm longer than the other wires for connection to the appliance When handling this oven it is essen...

Page 14: ...t has heat resistant qualities In particular cabinets with veneer finishes must be assembled with glues that can withstand temperatures of up to 100ºC In compliance with current safety standards contact with the electrical parts of the oven must not be possible once it has been installed To fasten the oven to the cabinet open the door of the oven and attach it by inserting the 4 wooden screws into...

Page 15: ...er pipe The connection to the gas supply mains must be made so that no stresses or strains of any kind are applied to the appliance The connection can be made using the adapter unit D with two conical elements always fitting the gasket C supplied Connection with steel hose Use only continuous wall stainless steel hoses compliant with the relevant regulations and always fit the gasket C supplied be...

Page 16: ...ing the flame always remains stable and uniform Close the oven door and check that the burner remains on at the minimum setting Changing the Nozzle Undo the oven burner fixing screws A Move the burner B outwards until the nozzle is accessible Use a 7 socket wrench to change the nozzle fitting the relevant nozzle for the type of gas to be used by referring to the Burner and Nozzle Data Table on pag...

Page 17: ...ated Heat Capacity Natural Gas G20 20 mbar kW MJ h Nozzle diameter 1 100mm Reduced heat capacity W Oven 2 6 9 36 118 700 Top Burner Burner Rated Heat Capacity Bottled Gas LPG G30 G31 28 37 mbar kW MJ h Nozzle diameter 1 100mm Oven 1 7 6 12 65 Burner Rated Heat capacity Natural Gas G20 20 mbar kW MJ h Nozzle diameter 1 100mm Oven 1 5 6 48 93 The regulator sleeve should be adjusted such that there i...

Page 18: ...xcept at the sole discretion of Parmco Sales Proof of purchase can be for the product itself or if installed with a kitchen or house then proof of purchase can be from a Parmco reseller of products supplied by Parmco Liability under this warranty will not be accepted for Wear and tear from normal domestic use Damage in transport Damage caused to the product by neglect abuse negligence wilful act o...

Reviews: