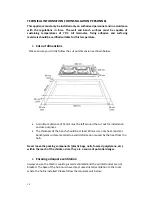
background image

Use 

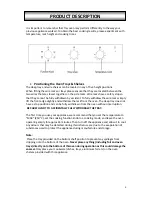
Operation of the electric plates 

The electric plates can be standard or rapid type. The rapid type plates are 
distinguished by a red mark at the centre. According to your needs, the heat of the 
plates can be adjusted by turning the knobs either clockwise or anti-clockwise. 


Rapid type elements (marked by a red dot) 

o


This hob has one rapid heat element that is high wattage, thermostatically 

controlled and contains built in thermal cut out protection.   

o


This element is designed specifically to rapidly heat food/liquid before transferring 

to other elements or for use with cooking applications that require short term high 
heat.  

o


The element will not operate at full power continuously and will automatically drop 

to half the rapid heat power once full heat has been achieved. 

o


For cooking applications that require prolonged cooking/boiling/simmering, please 

use the other elements.   
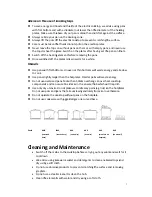


To start cooking:   

 
1. Place a suitable pan on the cooking zone you want to use.   

 
2. Adjust the power setting using the control knob of the 
corresponding cooking area to the desired temperature 
(1 indicates the lowest heat setting and 6 is the highest 
temperature setting) 
 
3. When you have finished cooking, turn the control knob to the 
"0" position to turn off the cooktop. 


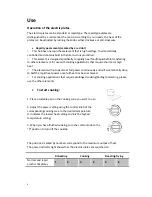
The positions marked by numbers correspond to the maximum output of heat.   
The power indicator light shows that the electric plates are switched on. 


 Reheating 

Cooking 

Roasting-frying 

Normal and rapid 
electric hot plates 


Summary of Contents for VERSO 4E HOB

Page 1: ...ment to improving and updating product ranges we reserve the right to alter change and update technical specifications and appearance attributes of all Parmco Appliances products E OE Model VERSO 4E H...

Page 2: ...te of all detailed technical information and installation instructions It is essential that you only allow a qualified technician to install this appliance to ensure the safety and reliability of this...

Page 3: ...f any unnecessary service faults THIS APPLIANCE MUST BE INSTALLED ONLY BY QUALIFIED PERSONNEL IN COMPLIANCE WITH THE INSTRUCTIONS PROVIDED THE MANUFACTURER DECLINES ALL RESPONSIBILITY FOR IMPROPER INS...

Page 4: ...liability claims This product is designed for domestic and non professional use purposes It should not be used for any other purpose After using the appliance make sure that all controls are in the 0...

Page 5: ...technician only Always request the use of original spare parts Do not use your electric hob by the means of an external timer or as an remote control system Appliances which are no longer used or usab...

Page 6: ...lement will not operate at full power continuously and will automatically drop to half the rapid heat power once full heat has been achieved o For cooking applications that require prolonged cooking b...

Page 7: ...wa oth ve products m cleaner to ts with wate ops e life of the meter not le ur pan is sm ooking zone ric cooktop o not spill o pans on th h on the pla before remo main warm ven or thin hotplates S e t...

Page 8: ...elements may result in rusting and pitting of the elements Damage to the elements caused by incorrect maintenance is not covered under warranty Troubleshooting Issue Possible cause Action The cooktop...

Page 9: ...be connected separately to make it easier to take the appliances out and for electrical safety The supply cable must be positioned so that no point can reach a temperature of 50 C higher than the ambi...

Page 10: ...tance of 55mm must be left around the cut out for installation and use purposes The thickness of the bench should be at least 20mm Use only heat resistant bench work surface material to avoid deformat...

Page 11: ...cooktop upside down and place it on a soft surface Fasten the brackets to the appropriate holes DO NOT tighten the screws at this stage 2 Apply the sealing strips around the edge of the cooktop 3 Ins...

Page 12: ...dryers All surfaces around the hob should be able to withstand the heat generated by the hob Do not use a silicon sealant to seal the appliance against the aperture This will make it difficult to rem...

Page 13: ...be for the product itself or if installed with a kitchen or house then proof of purchase can be from a Parmco reseller of products supplied by Parmco Liability under this warranty will not be accepted...

Page 14: ...ent to improving and updating product ranges we reserve the right to alter change and update technical specifications and appearance attributes of all Parmco Appliances products E OE Model VERSO 5F OV...

Page 15: ...te of all detailed technical information and installation instructions It is essential that you only allow a qualified technician to install this appliance to ensure the safety and reliability of this...

Page 16: ...stalled by authorised persons The installation must comply with all the appropriate New Zealand Standards and Regulatory Requirements with particular reference to the New Zealand Electrical Standards...

Page 17: ...when it is correctly connected to an efficient earthing system in compliance with New Zealand Electrical Standards requirements Before maintenance or cleaning always ensure that the appliance is disc...

Page 18: ...ANCE OR NEAR THIS APPLIANCE Steam and Condensation Often owners of new ovens will see a higher level of steam and condensation than they are used to in their previous appliance This is normal and cont...

Page 19: ...e fully withdrawn from the oven without interruption BE CAREFUL NOT TO ACCIDENTALLY FULLY WITHDRAW THE TRAY The first time you use your appliance we recommend that you set the temperature to MAX 250 C...

Page 20: ...ill with the door closed Fan forced cooking An element around the circulation fan provides heat for convection style of cooking In the fan forced mode the fan automatically comes on to circulate heat...

Page 21: ...oven has stopped operating Selector knob setting Food Type Weight in KG Rack height From bottom PreHeat Time mins Temp Deg C Cook Time mins Grill Fish 1 4 5 MAX 8 10 Kebabs 1 4 5 MAX 6 8 Vegetables 1...

Page 22: ...perature There is a rubber seal surrounding the oven Check the condition of the seal on a regular basis If necessary clean it but avoid using abrasive products or objects to do so Should it becomes da...

Page 23: ...ppropriate collection point for recycling of electrical electronic and steel components Disposal should always be carried out in an environmentally appropriate manner For more detailed information abo...

Page 24: ...a suitable accessible area next to the appliance The data label on the appliance must NEVER be removed Before any procedure it is important to check that the appliance is DISCONNECTED from the electri...

Page 25: ...s recessed into the sides of the oven This will ensure that the oven carcass and door is not stressed by lifting DO NOT use the door handle when lifting this appliance into position This could result...

Page 26: ...cular cabinets with veneer finishes must be assembled with glues that can withstand temperatures of up to 120 C Special attention must be paid to the edge banding finish on the cabinetry Special care...

Page 27: ...s Drip pan To be used for grilling and to collect fat spillage of meat juices Note Correct placement of the shelves between the side rails is imperative for safety operation This will ensure that duri...

Page 28: ...be for the product itself or if installed with a kitchen or house then proof of purchase can be from a Parmco reseller of products supplied by Parmco Liability under this warranty will not be accepted...

Reviews: