


F4701
Installation & Operating Instructions for the
Owner’s Installation ,Manual
WARNING: SHUT POWER OFF AT FUSE OR CIRCUIT BREAKER
Parrotuncle Lighting, 218 Black Tie Lane, Chapel Hill, NC
www.parrotuncle.com
Parrot Uncle YOU CAN BE SURE OF are trademarks of Eileen Grays LLC.
Used under license by Eileen Grays LLC.
All rights reserved.
Made in China
Safety Cable Installation
For Canadian installation and for USA fan and light kit combinations over 35 lbs(15.9kgs), the safety cable must be installed into the house structure beams. Make sure that when the safety
cable is fully extended the lead wires are longer than the cable and no stress is placed on the lead wires. Note: If Installing The Secondary Support Safety Cable in the U.S., Do Not Remove
Knockouts In The Outlet Box.
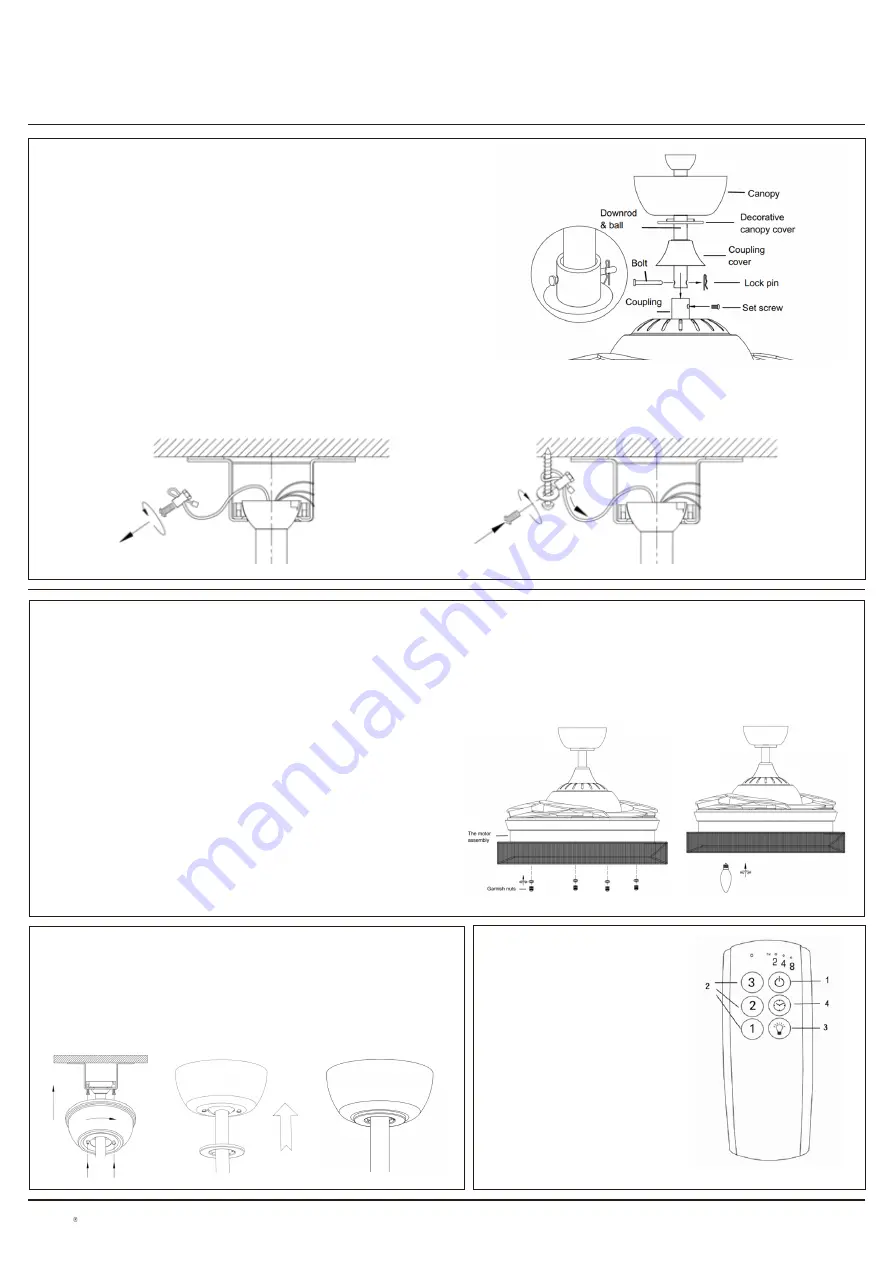
INSTALL THE DOWNROD
When hanging the Fan REMEMBER to turn off the power. Follow the steps below to hang your fan properly:
1)
Remove the bolt, lock pin and set screws from the top of the housing assembly
2)
Route wires exiting from the top of the fan motor through the coupling cover, decorative canopy cover,
canopy and then through the ball / downrod.
3)
Align the holes at the bottom of the downrod with the holes in the coupling on top of the top housing .
4)
Carefully insert the Bolt through the holes in the Coupling and downrod. Be careful not to jam the Bolt
against the wiring inside the downrod. Insert the locking pin through the hole near the end of the Bolt until
it snaps into its locked position.
5)
Tighten two set screws on top of the fan housing firmly
INSTALLING THE LIGHT KIT
1.
Remove the 4 garnish nuts preassembled from the garnish screws on the motor assembly
2.
Make wiring connections. Please refer to the section ‘MAKE THE ELECTRIC CONNECTION’ for the electric connection between fan motor and light kit.
3.
Attach the light pan onto the motor assembly. Aligning the 4 holes on the light pan with the 4 preassembled garnish bolts on the motor assembly. Reinstall the 4 garnish nuts that removed in
step
And tighten all nuts and screws securely
INSTALLING THE FAN TO MOUNTING BRACKET ON CEILING
1.
Install the hanger ball end of downrod into mounting bracket opening. Align (engage) slot on
ball with tab on mounting bracket. Warning: Failure to align slot on ball with tab may result in
serious injury.
2.
Slide the canopy up to ceiling and align the keyhole slots on the canopy with the preassembled
screws on the hanger bracket. Twist clockwise untill it locks. Tighten the two screws securely.
3.
Attach the decorative canopy cover to the bottom of the canopy by pressing it until it locks.
USING YOUR CEILING FAN
REMOTE CONTROL
Turn on the power and check the
operation of the fan
1 –Fan Shutdown
2 – Speed Controlle
3 – Lamp Switch
4 - Timer (2H,4H,8H)
4. Install 6 X Max.25 watt B type bulbs (bulb not included)
WARNING: Over lamping the fan will result in the fan lights shutting down until the proper wattage
of bulbs are installed.
Replace bulbs with the correct wattage bulbs, turn the power on.
WARNING: Do not replace bulb until it cools down.


