background image

Step 1.

Step 2.

Step 3.

Step 4.

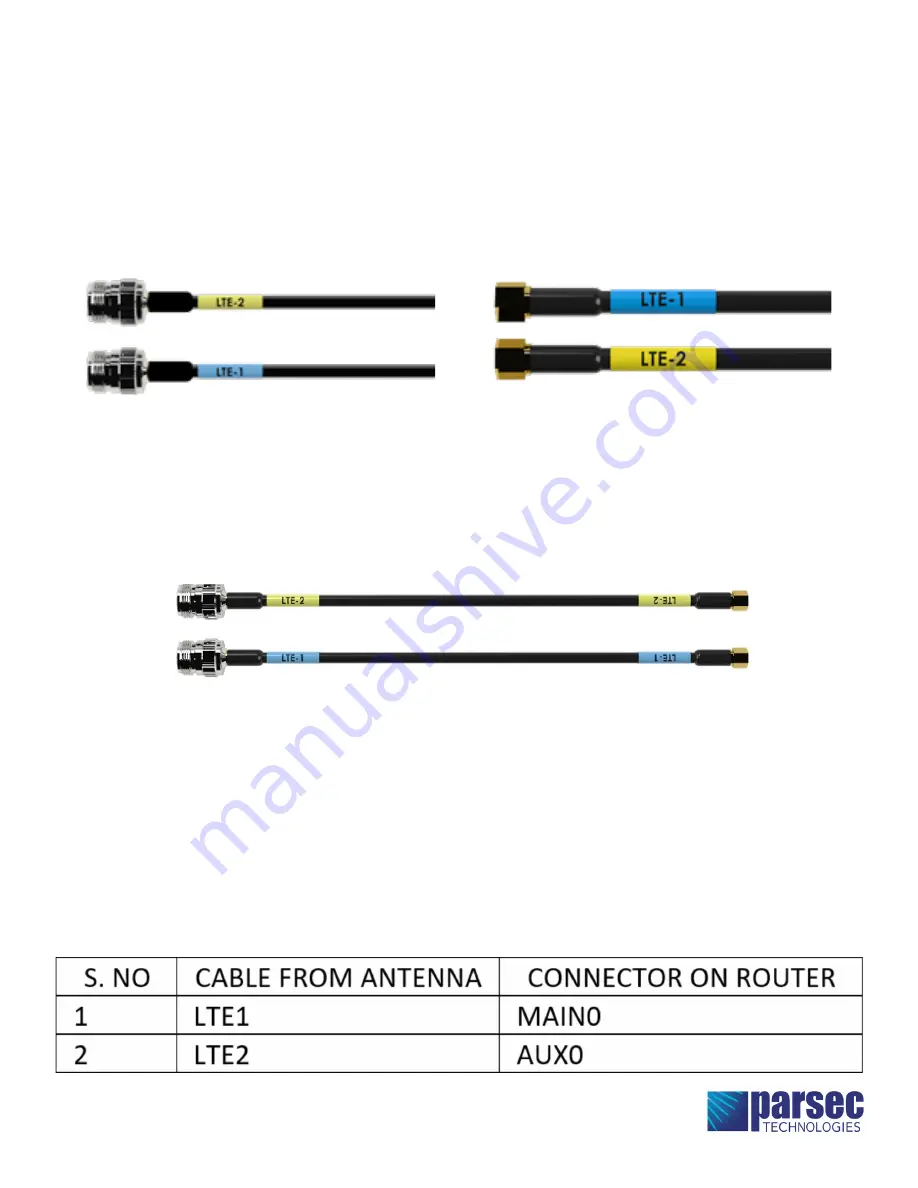
Cables on the antenna are labeled as follows, LTE-1 & LTE-2

Clean the connectors such that there is no dust in the terminals.

Connect the cables from the antenna to the similar labeled cables of “Cable Kit” (Figure 9)

Carefully screw the N male connectors of the coaxial cable onto the N female connectors on the 

antenna.  If the connectors do not screw on easily using fingers, stop.  The connector may be cross 

threaded.  Unscrew the connector and try again. Tighten the N connector firmly to compress the 

water-tight gasket inside the connector and to keep the connector from working loose.  Channellock 

412 small V-Jaw pliers may be useful for getting a grip on the connector.  The required torque is only 15 

inch-pounds so be careful when using this or other tools to tighten the RF connectors.

Connect the cables from the antenna to the designated connector on the router using a SMA torque 

wrench with a torque limit of 3 to 5 inch-pounds is recommended.  If a torque wrench is not available, 

it is possible to carefully tighten SMA connectors a 5/16 in. wrench if you use one finger no farther than 

2 inches up the wrench to limit torque.

Cable Connection Instructions

FIGURE 9

N-Type

SMA Type

Note: SMA connectors have a 

maximum

 torque of 3-5 inch lbs. 

Summary of Contents for LABRADOR

Page 1: ...ection rating and may also be mounted outdoors Labrador Pole Mounted Labrador Wall Mounted CHOOSING THE BEST METHOD AND LOCATION FOR INSTALLATION CAUTION To get the best signal your antenna must be mo...

Page 2: ...REQUIRED TOOLS Hammer Rubber Mallet Phillips Screwdriver Drill Assemble the mounting bracket on the antenna using the four plastic thread forming screws Figure 1 FIGURE 1 Assembling the Antenna...

Page 3: ...el during installation Select a mounting location away from air conditioning units and other large metal objects Mark the position of the screw holes on the wall to mount the antenna on the wall Figur...

Page 4: ...holes and fasten it to the wall using two screws provided in the kit Figure 4 Pole Mounting Instructions Step 1 Step 2 The mast pole should be a diameter of between 1 and 2 5 to mount the antenna Figu...

Page 5: ...low the RF connectors to provide strain relief Vinyl electrical tape works well for this without risk of deforming the RF cables Black UV resistant zip ties can also be used if used carefully but tan...

Page 6: ...gasket inside the connector and to keep the connector from working loose Channellock 412 small V Jaw pliers may be useful for getting a grip on the connector The required torque is only 15 inch pound...

Page 7: ...asily unscrewed with two fingers Visually inspect coaxial cable run for proper mechanical support Confirm the connection to a cellular network Use a cellular device s built in diagnostics to confirm R...

Reviews: