background image

PS-3220

 Assembling the Titration Setup (See figure on next page)

7

013-16026A

Calibrating the Drop Counter

The Drop Dispenser has two stopcocks. The bottom stopcock is used to regulate flow rate and the top stopcock is 
used to turn the flow on and off. The top stopcock should either be in the completely open (handle vertical) or 
completely closed (handle horizontal) position.

The following two methods illustrate the calibration procedure.

Calibration (Generic Process using PASCO Capstone)

1.

Attach the Drop Dispenser (syringe, two stopcocks and drop tip) to a support rod.

2.

Fill the syringe with titrant. Put a beaker under the Drop Dispenser to catch the titrant.

3.

Open both stopcock valves and adjust the valve on the bottom stopcock so that the drops fall at a rate of about 
1 drop per second. Close the top valve after the rate is achieved. Discard the titrant in the beaker as directed by 
the instructor.

4.

Align the drop tip with the rectangular window in the Wireless Drop Counter. Put a graduated 10 mL cylinder 
under the Drop Counter window so it can catch drops from the drop tip and give you a measure of the volume.

5.

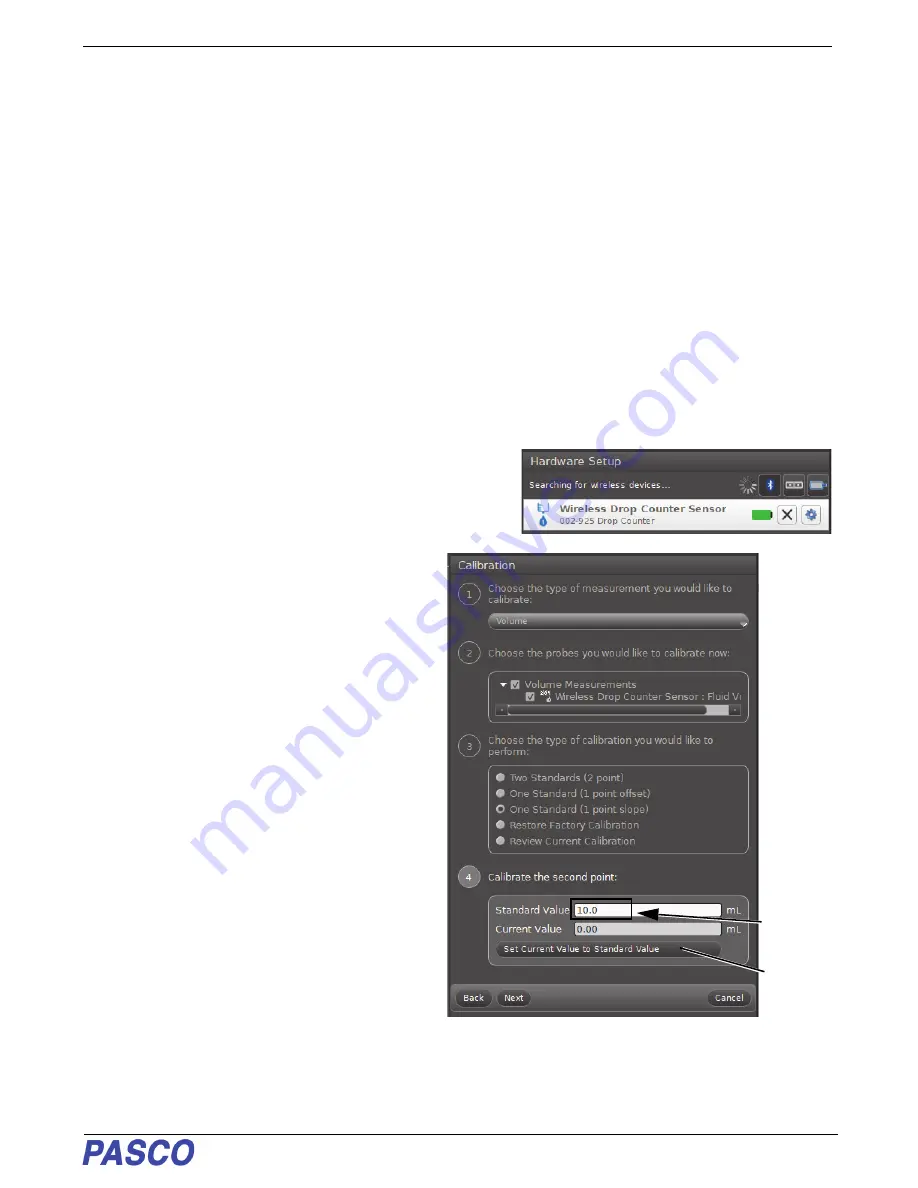
Start Capstone. “Pair” the Wireless Drop Counter wirelessly 
to the computing device (e.g., computer). In Capstone, 
open the “Hardware Setup” window and click the Drop 
Counter with the Device ID that matches the number on 
your sensor.

6.

In Capstone, click the “Calibration” icon in the 
“Tools” panel to open the Calibration window. In 
Step 1, select the Volume measurement and 
click “Next”. In Step 2 the “Wireless Drop 
Counter Sensor” is picked by default. In Step 3, 
the default choice for type of calibration is “One 
Standard (1 point slope)”, Click “Next” to open 
Step 4.

7.

Open the top stopcock valve to let the titrant 
begin dripping into the cylinder. NOTE: 
Capstone will automatically record the number of 
drops. (You do not need to click “Record”.)

8.

After about 5 mL of titrant is collected in the 
graduated cylinder, close the top 
stopcock.Carefully measure the exact volume of 
titrant in the graduated cylinder.

9.

In Capstone, highlight the number in the 
“Standard Value” text box in Step 4. Enter the 
exact volume of titrant that you collected in the 
graduated cylinder (5 mL in this example). Next, 
click the button “Set Current Value to Standard 
Value”.

Highlight the 

number and 

then enter 

the exact 

volume here.

Next, click 

here.

Summary of Contents for PS-3214

Page 1: ...Reference Guide 013 16026A Wireless Drop Counter PS 3214 a b d c e f Power Rechargeable Battery or USB Cable Connection...

Page 2: ...t or smart phone when the sensor is connected PASCO Capstone will work on a PC or Mac The Wireless Drop Counter can be mounted on a support rod The counter is equipped with two integrated probe holder...

Page 3: ...blocking the drop window To turn the sensor on press and hold the ON button When the battery status LED shines red for a moment release the ON button Then the Bluetooth status LED will blink This ind...

Page 4: ...elp from the Help menu or press F1 LED Information The drop LED operates as follows The drop LED blinks when a drop is detected passing through the drop window If the lens in the drop window becomes o...

Page 5: ...in the liquid in the beaker Assemble the Drop Dispenser 1 Remove the plunger from the syringe Remove the protective white plastic caps from the stopcock valves 2 Connect the two stopcocks together Con...

Page 6: ...e figure on next 6 013 16026A Syringe with 50 mL of 0 1 M NaOH Wireless pH Sensor Direct Connect pH Probe Wireless Drop Counter Drop Tip Stopcock Stopcock Syringe Holder Support Rod Micro Stir Bar Mag...

Page 7: ...drops from the drop tip and give you a measure of the volume 5 Start Capstone Pair the Wireless Drop Counter wirelessly to the computing device e g computer In Capstone open the Hardware Setup window...

Page 8: ...om stopcock so that the drops fall at a rate of about 1 drop per second Close the top valve after the rate is achieved Discard the titrant as directed by your instructor 4 Align the drop tip with the...

Page 9: ...me is the measurement selected as default The Templates window also opens with Graph Table and Graph and Digits as the choices 8 In the Templates window touch or click the Graph template to open a Gra...

Page 10: ...e that the Fluid Volume measurement also has a Calibrate measurement icon 10 Click or touch the Calibrate measurement icon to open the Calibrate Sensor Select Measurement window 11 In the Calibrate Se...

Page 11: ...the number of drops as they are counted 13 After about 5 mL of titrant has collected in the graduated cylinder close the bottom stopcock Carefully measure the exact volume of titrant in the graduated...

Page 12: ...ibrate Acid Base Titration Calibration Method 1 Setup the equipment and consumables as shown 2 Start the data acquisition software 3 In the software pair connect the Wireless Drop Counter and a Wirele...

Page 13: ...d then back on Retry If the Wireless Drop Counter will not turn on use the micro USB cable to connect it to a USB port or charger See the PASCO web site at www pasco com for more information Probe Car...

Page 14: ...e that it will be recycled in a manner that protects human health and the environment To find out where you can drop off your waste equipment for recycling please contact your local waste recycle disp...

Page 15: ...he System Report button Select Bluetooth from the sidebar on the left underneath Hardware Scan down the list of information until you find LMP Version If your Mac is equipped with Bluetooth SMART the...

Page 16: ...Wireless Drop Counter Appendix A Bluetooth Compatibility 16 013 16026A...

Reviews: