X p l o r e r G L X U s e r s ’ G u i d e
77
6.
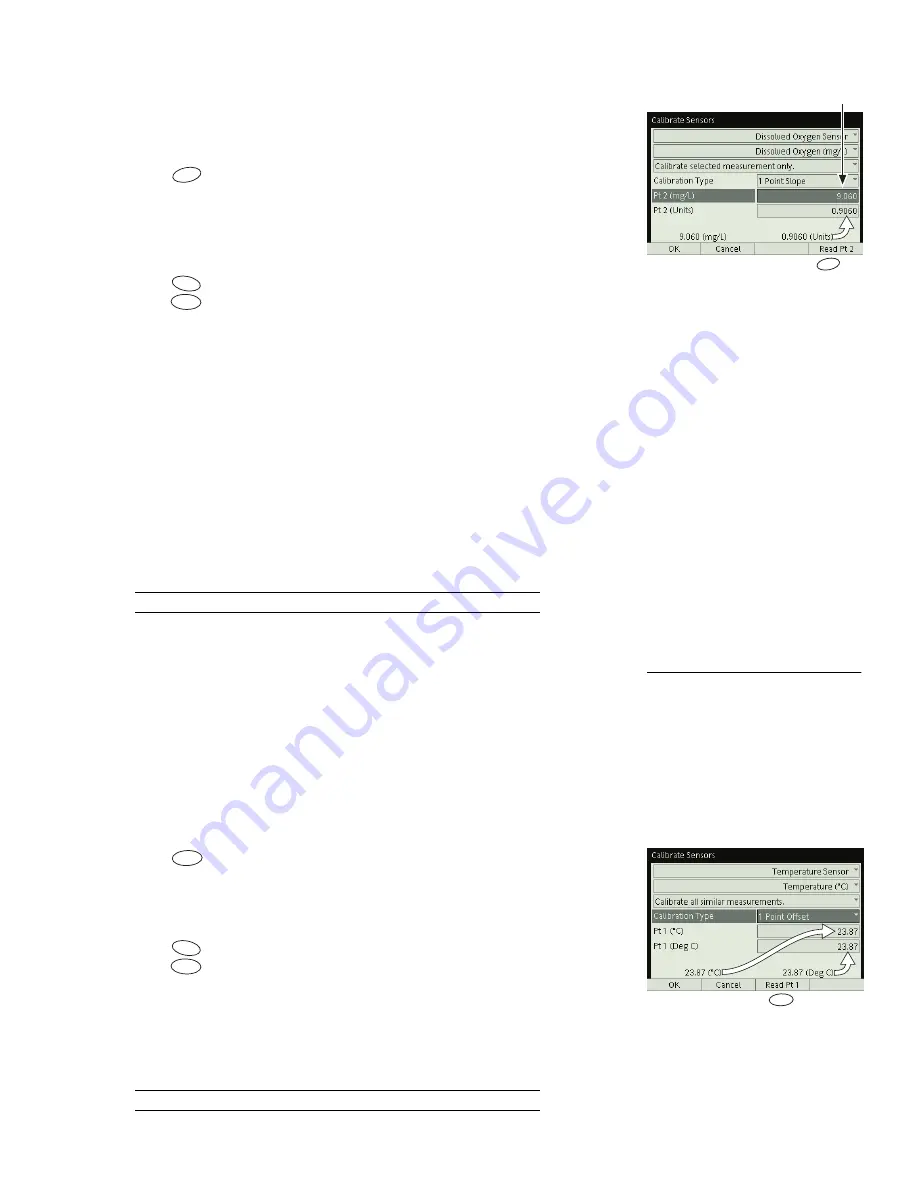
Enter the value of the standard in the Standard Value field for Pt 2.
7.
Observe the Raw Input Measurement displayed near the bottom right corner
of the screen and wait until it has stabilized.
8.
Press
to read the sensor input value.
Note that the Raw Input Measurement has been automatically entered into
the Pt 2 Sensor Input Value field, and the standard value is now displayed as
the Calibrated Output Measurement.
9.
Press
to accept the new calibration and return to the Sensors screen, or
press
to cancel the new calibration and revert to the previous or default
calibration.
One-Point Offset Calibration or Multiple-Measurement Align-
ment Procedure
If you are making two or more simultaneous measurements of the same type, it is
sometimes desirable to slightly adjust the calibrations so that all of the measure-
ments agree. For instance, if you are using several temperature probes, you may
find that they have slightly different readings when immersed in the same con-
tainer of liquid; a multiple-measurement alignment will make all of the probes
read the same temperature.
This procedure is a one-point offset calibration performed on two or more similar
measurements simultaneously.
The fields of the Calibration dialog box are identified on page 74.
1.
From the Sensor field, select the desired sensor.
2.
From the Measurement field, select the desired measurement.
3.
Set the Single/All field to “Calibrate all similar measurements.”
4.
From the Calibration Type menu, select 1 Point Offset.
5.
Place all the probes so that they are all measuring the same thing. It is not
necessary to know the value of what they are measuring at this point. (For
instance, place all the temperature probes into the same container of water.)
6.
Press
. Note that the Calibrated Output Measurement has been auto-
matically entered into the Pt 1 Standard Value field, and the Raw Input Mea-
surement has been automatically entered into the Pt 1 Sensor Input Value
field.
7.
Press
to accept the new calibration and return to the Sensors screen, or
press
to cancel the new calibration and revert to the previous or default
calibration.
To confirm that the measurements are aligned, open the Digits display and view
two or more of the measurements simultaneously while recording data. They
should be identical or very close.
For information on the Digits display, see page 37.
Press to
copy Raw Input
Measurement
to Pt 2 Sensor
Input Value
Enter standard
value here
F4
F4
F1
F2
31
In this case, the calibration of the
selected measurement will
not
change.
Rather, the calibrations of all other simi-
lar measurements will be changed to
match the selected measurement.
F3
Press to copy
Calibrated Output
Measurement to Pt 1
Standard value;
and
Raw Input
Measurement to Pt 1
Sensor Input Value
F3
F1
F2
Summary of Contents for Xplorer GLX
Page 4: ......
Page 6: ......
Page 7: ...Part 1 Users Guide...
Page 8: ......
Page 18: ...12 O v e r v i e w o f t h e G L X...
Page 94: ...88 S e t t i n g s S c r e e n...
Page 98: ...92 P r i n t i n g...
Page 104: ...98 O p e r a t i n g T e m p e r a t u r e...
Page 112: ......
Page 116: ...110 C a l o r i m e t r y...
Page 132: ...126 V o l t a g e v e r s u s R e s i s t a n c e...
Page 136: ...130 I n d u c e d E l e c t r o m o t i v e F o r c e...
Page 146: ...140 B e a t F r e q u e n c y...
Page 150: ......
Page 152: ......


