X p l o r e r G L X U s e r s ’ G u i d e
89
C h a p te r 4 : N a v i g a t i o n a n d I n p u t
D a ta S o u rc e M e n u s
The axes of the Graph, the columns of the Table, the sections of the Digits dis-
play, and the Meter each have a data source field, which you access to choose
what data to display. Selecting any of these data source fields opens a data source
menu containing a list of all available data sources.
Identifying a Data Source
•
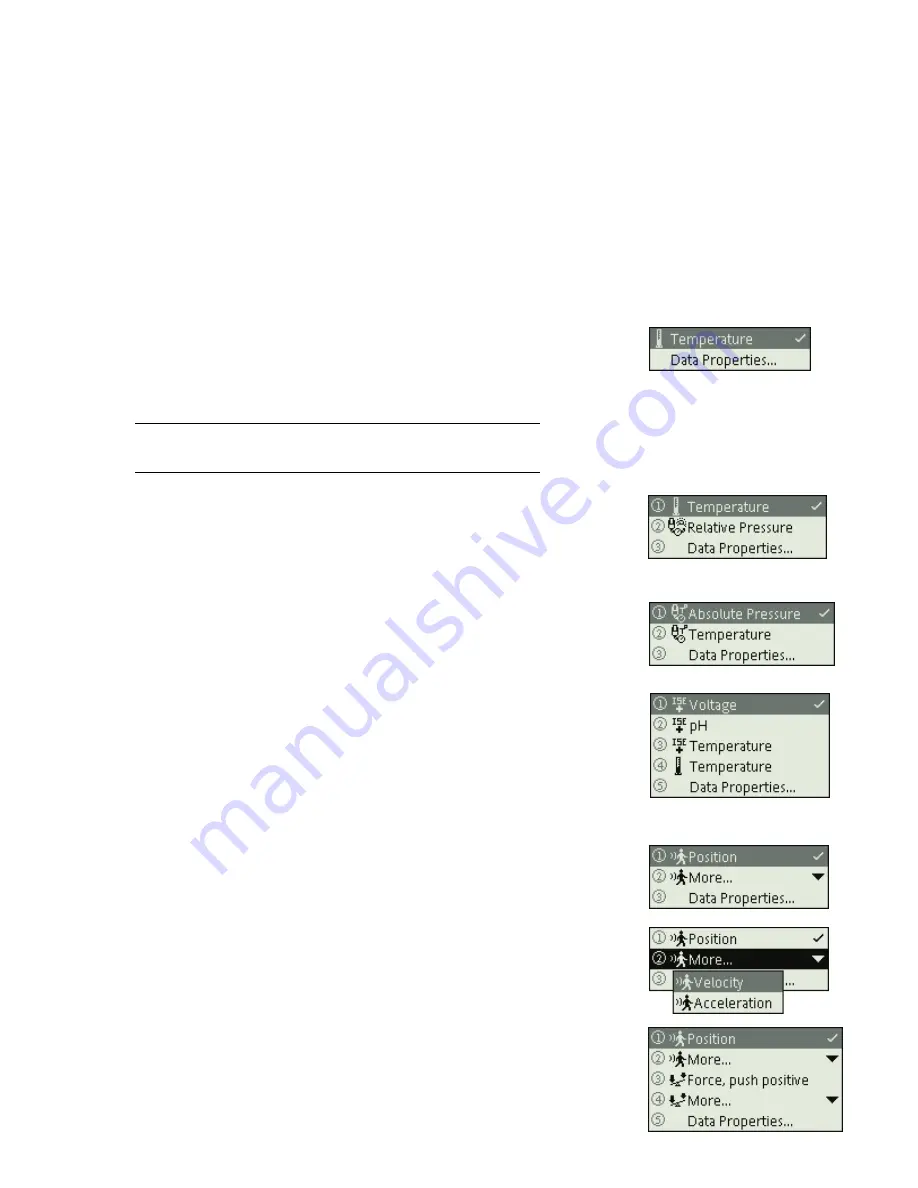
In one of the simplest cases—a GLX with one single-measurement sensor
connected, and no calculations or manually entered data—the data source
menu contains two items, as illustrated to the right.
In this example, there is
only one data source option, so it is selected automatically.
Selecting the other option in the menu, Data Properties, opens the Data
Properties dialog box for the selected measurement. See “Accessing Data
Properties” on page 90.
•
In this example, the GLX is connected to two single-measurement sensors: a
Temperature Sensor and a Relative Pressure Sensor. There are two data
sources to choose from. The selected data source has a check mark next to it.
The two data sources are from two different sensors, so each has a different
icon.
•
Certain sensors make more than one measurement. The data source menu
pictured here is from a GLX connected to a Pressure/Temperature Sensor.
Note that the two data sources have the same icon, indicating that they both
come from the same sensor.
•
The menu pictured to the right is from a GLX connected to two sensors: a
Temperature Sensor and pH/ORP/ISE/Temperature Sensor. The pH/ORP/
ISE/Temperature Sensor makes several measurements, one of which is Tem-
perature. There are two data sources named “Temperature,” one from the
pH/ORP/ISE/Temperature Sensor and one from the Temperature Sensor.
You can tell which sensor each temperature measurement is from by looking
at the icons next to the measurement names.
Expanding the Data Source Menu
•
The menu pictured to the right is from a GLX connected to a Motion Sensor.
The Motion Sensor makes three measurements: Position, Velocity, and
Acceleration. Only one measurement, Position, is visible. The “More”
option that appears with a Motion Sensor icon indicates that other measure-
ments are available from that sensor, but are not shown. Select “More” to see
the other available measurements.
•
In the menu pictured to the right, two sensors are present that each have hid-
den measurements. There are two “More” options, one for each sensor. They
can be distinguished by their different icons.
Summary of Contents for Xplorer GLX
Page 4: ......
Page 6: ......
Page 7: ...Part 1 Users Guide...
Page 8: ......
Page 18: ...12 O v e r v i e w o f t h e G L X...
Page 94: ...88 S e t t i n g s S c r e e n...
Page 98: ...92 P r i n t i n g...
Page 104: ...98 O p e r a t i n g T e m p e r a t u r e...
Page 112: ......
Page 116: ...110 C a l o r i m e t r y...
Page 132: ...126 V o l t a g e v e r s u s R e s i s t a n c e...
Page 136: ...130 I n d u c e d E l e c t r o m o t i v e F o r c e...
Page 146: ...140 B e a t F r e q u e n c y...
Page 150: ......
Page 152: ......


