96 R e s e t t i n g
When the battery’s capacity begins to decrease, it will continue to function, but it
will require more frequent recharging, and the maximum unpowered time for the
GLX to store data in RAM will decrease.
If this happens, try to recondition the battery by running it through three com-
plete, uninterrupted charge-discharge cycles: Disconnect the AC adapter. Plug in
a sensor. Start data collection and wait until the GLX shuts down due to low bat-
tery. Plug in the AC adapter and let the GLX charge uninterrupted until the bat-
tery gauge indicates full (about 14 hours). Repeat this cycle at least two more
times.
If the battery can not be reconditioned, replace it with a new battery
7
(PASCO
part PS-2527): Use a Phillips screwdriver to remove the screws securing the bat-
tery door on the back of the GLX. Remove the door, unplug the old battery, and
install the new battery in its place. Replace the door.
To calibrate the GLX’s battery gauge for the new battery, run it through one full
charge-discharge cycle: Connect the AC adapter and allow the battery to fully
charge. Then disconnect the AC adapter, plug in a sensor, start data collection,
and allow the battery to discharge until the GLX automatically shuts down.
Re s e t t i n g
To Start a New Experiment
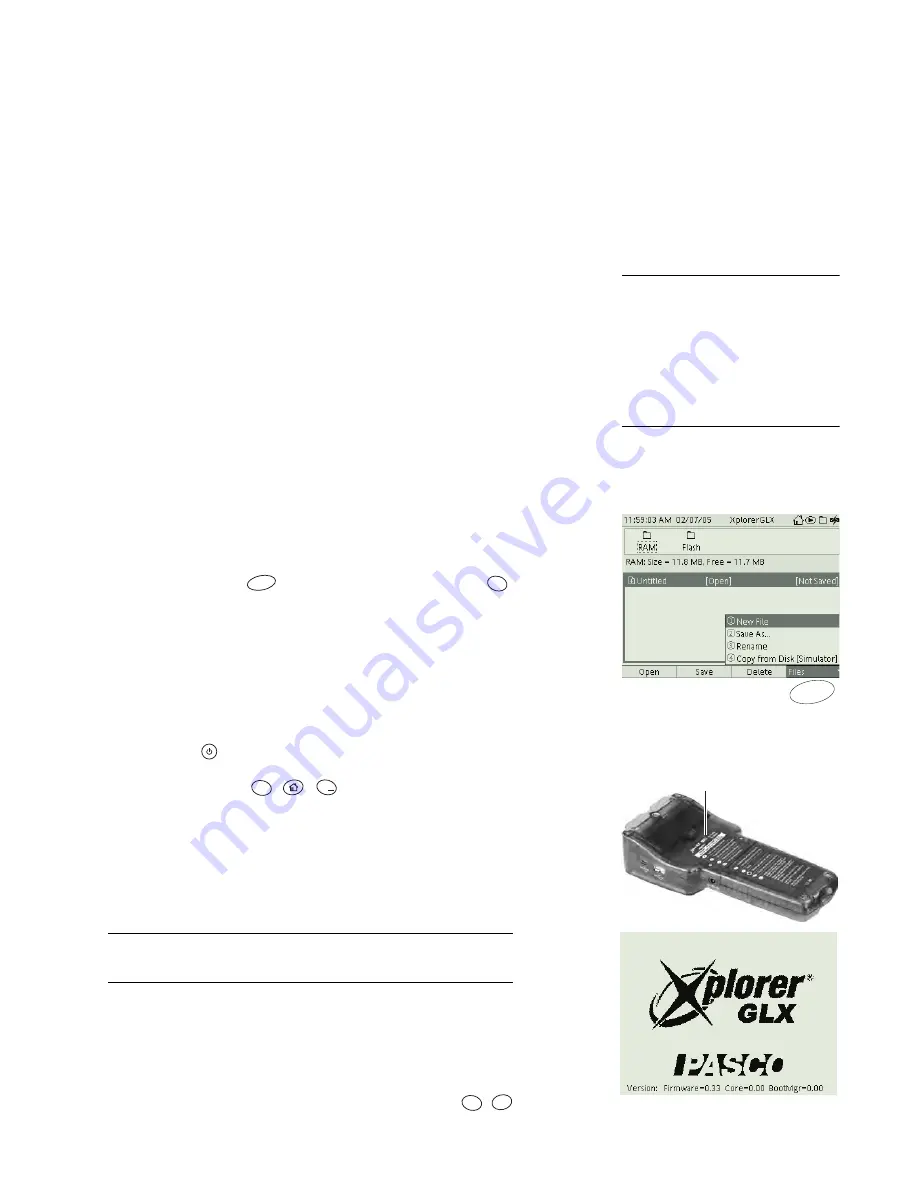
To start a new experiment without turning off the GLX, go to the Data Files
screen (see page 78), press
to open the Files menu, and press
to select
New File. Previous data, displays, and sensor settings will be unloaded from the
GLX and returned to their default configurations.
To Force the GLX to Restart
The following procedures are not necessary in normal GLX operation. They will
force the GLX to restart and may also result in the loss of data saved in RAM.
•
Press and hold
for 5 seconds. The GLX will power off.
•
Press the key sequence
,
,
. The GLX will restart.
•
Use a paperclip to press the recessed Reset button on the back of the GLX
(see picture). The GLX will power off or restart depending on the state of its
battery and the presence of AC power.
To Restore the GLX to Factory Configuration
These procedures are not recommended during normal GLX operation.
All
data files and system settings will be deleted. The normal method for delet-
ing files stored in RAM or Flash is described on page 80.
Follow these steps to reset system settings to factory defaults and delete saved
data in RAM.
1.
Turn the GLX off then on again.
2.
When the Splash Screen is visible, press the key sequence
-
.
7
To avoid damage to the GLX, remove
the AC adapter before disconnecting the
battery.
To preserve data files in the GLX’s RAM
folder, transfer them to the Flash folder, a
USB storage device, another GLX, or a
computer. See “Data Files Screen” on
page 78 and “Using the Xplorer GLX with
a Computer” on page 99 for instructions.
F4
Start a new experiment
F4
1
pqrs
Esc
0
Reset
Button
Splash screen
Esc
Õ
Summary of Contents for Xplorer GLX
Page 4: ......
Page 6: ......
Page 7: ...Part 1 Users Guide...
Page 8: ......
Page 18: ...12 O v e r v i e w o f t h e G L X...
Page 94: ...88 S e t t i n g s S c r e e n...
Page 98: ...92 P r i n t i n g...
Page 104: ...98 O p e r a t i n g T e m p e r a t u r e...
Page 112: ......
Page 116: ...110 C a l o r i m e t r y...
Page 132: ...126 V o l t a g e v e r s u s R e s i s t a n c e...
Page 136: ...130 I n d u c e d E l e c t r o m o t i v e F o r c e...
Page 146: ...140 B e a t F r e q u e n c y...
Page 150: ......
Page 152: ......


