background image

Guidance & VRT Guide

Installation


1

2

3

4

5

6

7


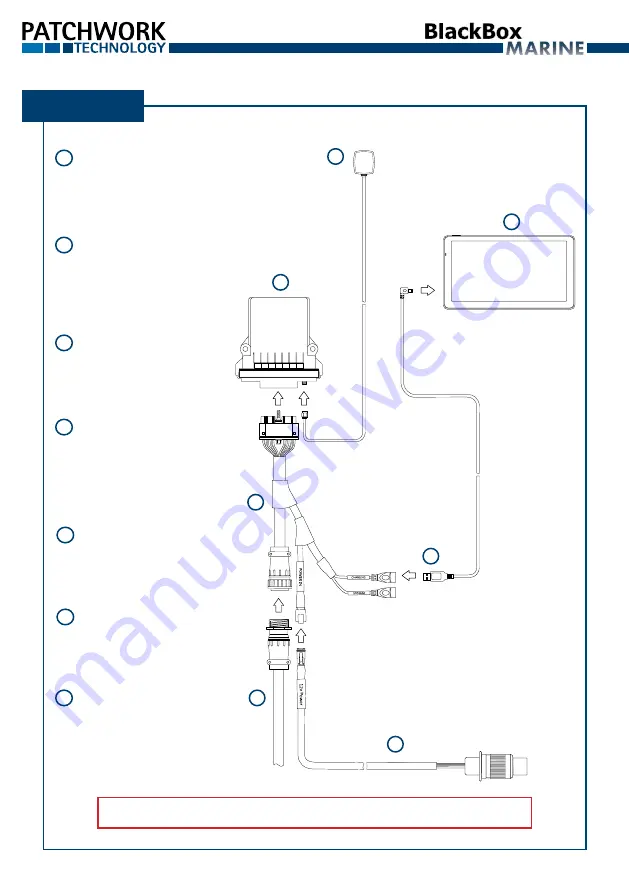
Antenna 

Fit centrally on the roof. 

Cable completely uncoiled.


Marine Unit 

See ‘Mounting Positions’ 

diagram on next page.


Android Tablet*


Mount to the windscreen 

using supplied suction 

mount.*


Interface Harness

Insert into connector and 

fasten bolt with a ¼ inch 

socket (Be sure not to over 

tighten).


USB Charge cable

Connect to ‘CHARGING’. 

Always keep connected.


Supplied Cable for 

Controller

Connect to 16 way socket. 


Power cable

To power supply. 

Do not connect until all 

connections are made!

1

3

2

4

5

6

7

*Important! 

Remove from windscreen when not in use. 

PWdoc0084 v1.1

Summary of Contents for BlackBox Marine

Page 1: ...en using supplied suction mount Interface Harness Insert into connector and fasten bolt with a inch socket Be sure not to over tighten USB Charge cable Connect to CHARGING Always keep connected Supplied Cable for Controller Connect to 16 way socket Power cable To power supply Do not connect until all connections are made 1 3 2 4 5 6 7 Important Remove from windscreen when not in use PWdoc0084 v1 1...

Page 2: ...ilt Job Recording Setup Position Setup Tilt Setup Setup Recording Setup Press Tilt and Enable Press Recording and Enable Enter Vehicle name Set Orientation as per Mounting Positions diagram Enter Operator name Position on level ground Press Zero Tilt 1 1 2 3 3 4 Set the Antenna Height 2 ...

Page 3: ...d select Master Switch Mode 1 1 3 5 4 Master Switch Mode Switch External Feed On Screen Press screen ON OFF button Always Record Continuous recording Switch Reverse External Feed polarity reversed Controller On Off message from controller some do not give feedback Enter name and OK Select Edit Delete 7 2 Profile List Press Autoshutoff and Enable enter Settings 6 Select VRT and Autoshutoff 2 ...

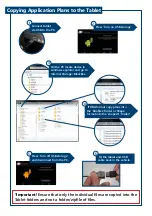
Page 4: ...Press Turn off USB storage and disconnect from the PC 1 2 5 On the PC locate device in windows explorer and go to Internal Storage BlackBox If BBA format copy plans into the bbafiles folder or Shape format into the shapevrt folder 3 4 Important Ensure that only the individual files are copied into the Tablet folders and not a folder zipfile of files ...

Page 5: ...efore starting Press VRT Job Confirm Guidance Options 2 4 Tip To start a job without a variable rate plan select New Job in step 2 1 Start Pause Boundary 2 Close Boundary 3 Guidance Options 4 Master Switch Status 5 Mini Map Toggle 2D mode 6 AutoShutoff Override 5s 7 Configuration 8 Menu 9 AutoShutoff Indicator Bar Green On White Off 10 Information Panel ...

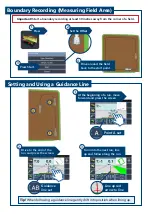
Page 6: ...ndary Recording Measuring Field Area Setting and Using a Guidance Line Tip When following a guidance line gently drift into position when lining up 1 2 3 At the beginning of a run move forward and press the screen Drive to the end of the run and press the screen 1 Turn onto the next run line up and follow along the run Point A set Guidance line set Line up red arrow to line 2 3 ...

Page 7: ...ip Press AutoShutoff Override to allow over application in tight areas and short work Drive around the headland applying product When the starting point is driven through the application will automatically stop Stop the implement and line up for the first run Turn on the implement and apply product to the inner area of the field working in and out of the Headland 2 3 4 5 Ensure the Master Switch S...

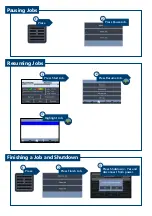
Page 8: ...ss Pause Job 2 Pausing Jobs Press Start Job 1 Resuming Jobs Finishing a Job and Shutdown Press Press Press Finish Job Press Shutdown Yes and disconnect from power 1 1 2 3 Press Resume Job Highlight Job 2 3 ...

Reviews: