background image

Use optional polarizing filter to eliminate reflection of LCD computer screens. 
Attach filter to camera arm using the filter adapter, and rotate filter until reflection is 
minimized.

Page 2

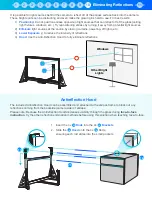
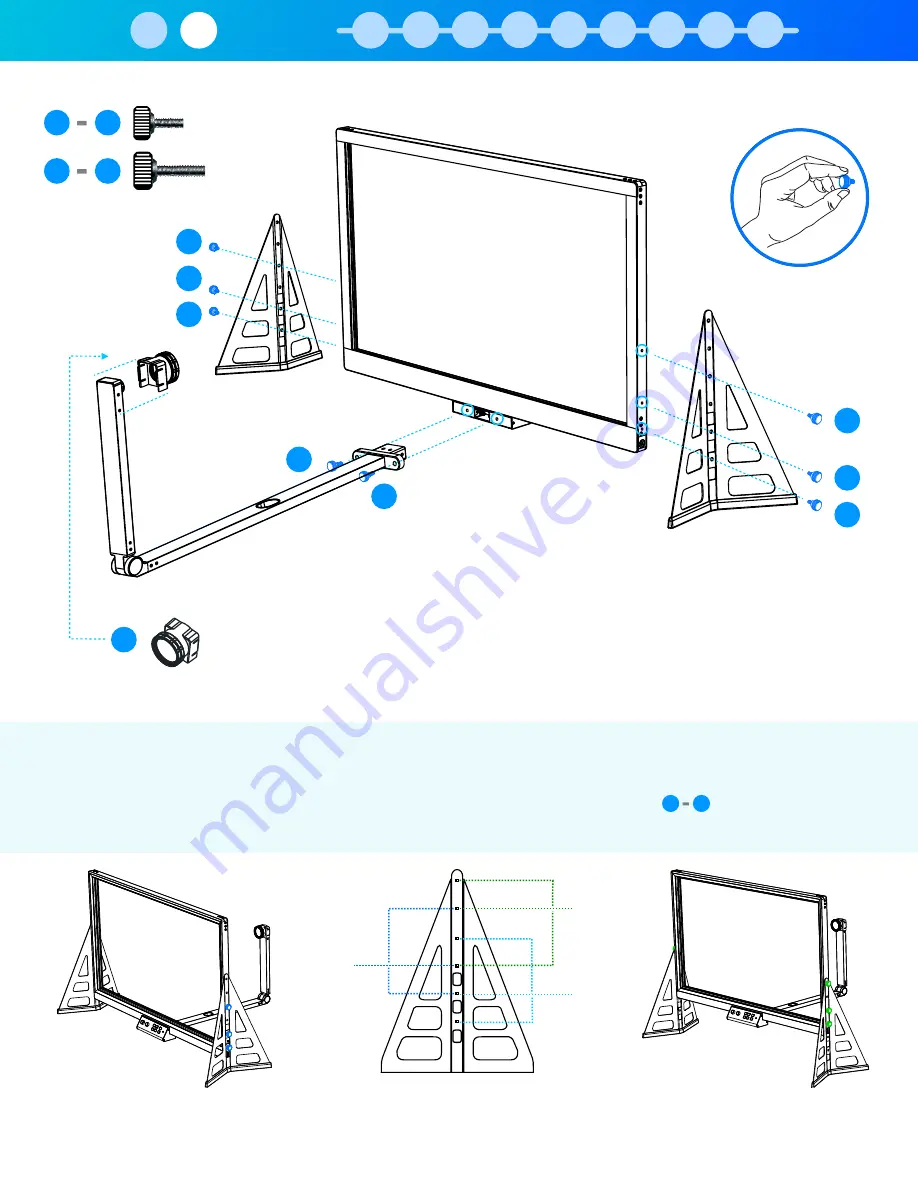
1. Hand-tighten 6x 

M6 Thumb Screws

 to secure both 

Adjustable Support Legs


to the 

Main eGlass Frame

. Ensure proper alignment so that both the AC power 

port and USB port on the sides of the 

Main eGlass Frame

 are both accessible 

with the 

Adjustable Support Legs

 installed. 

2. Fasten the 

Camera Arm Assembly 

to the 

Main eGlass Frame

 with two 

M6 

thumb screws

. Hand tighten.

3. Install the lens filter by clipping it over the camera found on the 

Camera Arm 

Assembly

.

Assembly

Medium 

(24”)

Low 

(22”)

High 
(26”)

High 
(26”)

Low 

(22”)

15

10

17

16

10

11

12

13

14

15

16

17

7

The support legs can be mounted in three height configurations. Install thumb screws 


in the color-coded 

holes below depending on the desired height:  

15

10

Choosing Height Setting

Assembly

2

1

3

4

5

6

7

8

9

10

11

Summary of Contents for eGlass

Page 1: ...best to follow the below steps in order For example you ll need to see the camera image before Calibrating Lighting which is why Installing Software is a few steps ahead of Calibrating Lighting Unboxi...

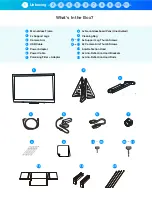
Page 2: ...Screws USB Cable 2x Camera Arm Thumb Screws Power Adapter Anti Re fl ection Hood Power Cable 2x Anti Re fl ection Hood Brackets Polarizing Filter Adapter 4x Anti Re fl ection Hood Rods 1 2 3 4 5 6 7...

Page 3: ...of the Main eGlass Frame are both accessible with the Adjustable Support Legs installed 2 Fasten the Camera Arm Assembly to the Main eGlass Frame with two M6 thumb screws Hand tighten 3 Install the l...

Page 4: ...ght side of the eGlass frame Connect Power A Connect the Power Adapter to the Power Cable B Then plug one end of the Power Cable into a protected AC power outlet C and the other end of the Power Adapt...

Page 5: ...lace computer screen on the other side of glass as close to eGlass camera as possible This will simulate eye contact when looking towards the computer screen Because computer will on the other side of...

Page 6: ...nally but are not necessary for every day use The special properties of neon dry erase ink causes erased ink fl akes to clump more than standard dry erase markers sometimes dirtying one s workspace Ho...

Page 7: ...For a strikingly dramatic look use a dark backdrop such as a black sheet pinned to the wall with thumbtacks This will make the ink glow vividly against the black background Ink Writing I n k W r i t i...

Page 8: ...ng settings will make the ink glow vividly eGlass features exposure controls that allow it to be used in bright rooms Even a white wall can be made darker by lowering the exposure eGlass exposure Note...

Page 9: ...s are adjusted from the Control Panel at the base of eGlass frame Exposure and Exposure adjust how much light is let into the camera e ff ectively raising or lowering the the entire image brightness E...

Page 10: ...the intensity of re fl ections 4 Hood Use the Anti Re fl ection Hood to fully eliminate re fl ections Other Bright Lights Windows Eliminating Re fl ections 2 1 3 10 4 5 6 7 8 9 11 Antire fl ection Ho...

Page 11: ...archive Then adjust transparency or remove background Go to Archive Archive Bar Snapshots and Recordings are stored here Camera Controls Toolbar Chameleon Bar Allows user to drag and drop rich media...

Page 12: ...ambient lights or other light sources If you cannot avoid certain re fl ections try to eliminate them using curtains or other light blockers or turn o ff lights that are causing excessive re fl ection...

Page 13: ...w you to utilize eGlassFusion software features without Screen Sharing which often presents issues with video lag and delay If you have eGlassFusion open make sure eGlass isn t being used as the prima...

Reviews: