background image

F1 X4

F2 X2

STEP 37

STEP 36

32

F2

F1

F1

DRA

DRA

DRB

DRB

DLB

DLA

DLA

20

20

20

20

DLB

DLA

DRB

DRA

DRA

DRB

DLB

DLA

x2

x2

DLB

Summary of Contents for T-PS22-0095-GY

Page 1: ...GARDEN SHED ASSEMBLY INSTRUCTIONS SKU T PS22 0095 GY https patiowell com pages video t ps22 0095 gy Metal Garden House Installation Tutorial saleservice patiowell com www patiowell com BE YOUR LIFE BU...

Page 2: ...SITE PREPARATION Level the ground surface Recommendation Construct a wooden or concrete base as a foundation The external dimensions of the product c e m e n t 02 120 8 102 5 80 2...

Page 3: ...lation please check the type and quantity of parts first It is recommended to use a clean work surface to spread the parts out and for pre assembly steps Review all instructions before you begin conti...

Page 4: ...04 FOUNDATION 1 X2 2 X2 BS1 X1 BS1L X1 WS2A X4 P1 X2 P2 X2 P3A X2 W1A X20 BS2L X1 BS2 X1 PLATES P3 X8 21R X2 21L X2...

Page 5: ...DLB X1 05 DRB X1 DRA X1 DLA X1 PLATES STRIPS UR1 X1 7 X1 9 X4 DX2 X4 UL1 X1 8 X1 10L X1 10R X1...

Page 6: ...06 STRIPS 16 X2 19 X2 14 X4 13 X4 15 X2 17 X4 20 X4 B3 X2 GS X2 B1 X4 B2 X2...

Page 7: ...X2 DH X4 GE X2 GC X4 S1 X104 V2 X418 SCREW 1 2 3 4 cm 0 5 1 1 5 inch F2 X54 1 2 3 4 cm 0 5 1 1 5 inch F5 X4 For GC 1 2 3 4 cm 0 5 1 1 5 inch F1 X459 M4 10 M5 12 M4 16 M4 10 M6 10 1 2 3 4 cm 0 5 1 1 5...

Page 8: ...P1 16 16 15 15 17 17 17 17 GE GE GC GC GC GC 14 14 14 14 GF GF GF GF B3 B1 B1 B2 B3 B1 B1 B2 GR GR GS DG DF DC DC DH DH DH DH 20 20 20 20 2 2 1 1 BS2 BS1L P3A P3A 21L 21L 21R 21R 10L 10R W1A UL1 UR1 D...

Page 9: ...Bottom frame 10 12 page Wall 12 20 page Roof 21 30 page Door 31 36 page CONTENTS 09...

Page 10: ...tep only To ensure a better understanding and installation experience please Scan The QR Code next to it to watch a video tutorial that will assist you in completing the installation ATTENTION https w...

Page 11: ...STEP 3 F1 X12 11 A A A A A A 2 BS2L F1 2 BS2L BS1L BS1 BS2L BS2 2 1 1 2 1 F1 2 STEP 2 F1 X2 BS2L BS2 BS2L F1 BS2 BS2L BS2...

Page 12: ...STEP 5 V2 F1 Tips Align the gasket with the hole and then use the electric drill to drill the V2 into the hole STEP 4 F1 X4 12 x4 F1...

Page 13: ...STEP 7 STEP 6 13 F1 V2 WS2A WS2A WS2A WS2A WS2A BS1L BS1 x4 V2 X16 F1 X16 V2 X16 F1 X16 W1A W1A W1A W1A BS1L BS1 x4 F1 V2 W1A...

Page 14: ...step only To ensure a better understanding and installation experience please Scan The QR Code next to it to watch a video tutorial that will assist you in completing the installation ATTENTION https...

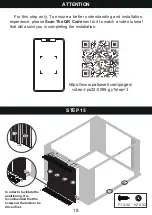
Page 15: ...F1 V2 9 V2 X20 F1 X20 x4 9 9 9 9 BS1L BS1 STEP 9 STEP 10 15 Note Connector must fit The hole position on No 9 pole is replaced by slot...

Page 16: ...F1 X4 x2 F1 V2 10L W1A 2 GS 10R 10R 10L 10L 10R 10L STEP 11 F1 V2 X6 F1 X6 STEP 12 16 10L 10R BS1L BS1 Insertintotwosquaretubes C2 10L 9 1...

Page 17: ...F1 V2 W1A F1 X4 V2 X6 F1 X6 STEP 13 STEP 14 17 7 8 GS the other side F1 7 8 8 7 x2 F1 V2 Insertintotwosquaretubes 7 8 BS1L BS1 7 1 2 9 C2 7 outer side...

Page 18: ...g it is recommended that the screws at the bottom be driven first For this step only To ensure a better understanding and installation experience please Scan The QR Code next to it to watch a video tu...

Page 19: ...19 V2 X48 F1 X48 STEP 17 F1 V2 W1A W1A W1A W1A W1A W1A BS1 V2 X32 F1 X32 STEP 16 F1 V2 W1A W1A W1A W1A F1 F1 V2 V2 W1A W1A W1A W1A W1A W1A BS1L BS1...

Page 20: ...W1A W1A BS1L BS1 V2 X8 F1 X8 A B F1 V2 UL1 W1A F1 V2 F1 F1 V2 UL1 UR1 V2 Installation tip tilt in B B A A UL1 UR1 BS1L BS1 UR1 BS1L BS1 Tips Insert UL1 and UR1 between the top beam and bottom frame r...

Page 21: ...For this step only To ensure a better understanding and installation experience please Scan The QR Code next to it to watch a video tutorial that will assist you in completing the installation ATTENTI...

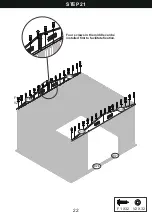
Page 22: ...V2 X32 F1 X32 STEP 21 22 F1 V2 21R 21R 21L 21L BS1L BS1 14 21R 21L 21L BS1L Four screws in the middle can be installed first to facilitate fixation...

Page 23: ...step only To ensure a better understanding and installation experience please Scan The QR Code next to it to watch a video tutorial that will assist you in completing the installation ATTENTION https...

Page 24: ...STEP 23 STEP 24 24 M2L M2 M2 13 14 F2 75 70 14 14 13 13 Don t tighten these two screws too tightly Don t tighten these two screws too tightly F2 X12 F2 14 13 F2 X4 14 14 13 13...

Page 25: ...F2 X8 F2 14 B2 F2 B3 13 Tighten all screws 14 14 13 13 STEP 26 25 F2 X8 F2 x2 F2 14 14 13 13 STEP 25...

Page 26: ...uter side of P1 P2 P2 Short distance from the edge at the top small For this step only To ensure a better understanding and installation experience please Scan The QR Code next to it to watch a video...

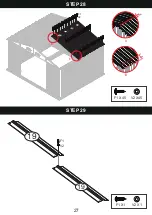
Page 27: ...P2 F1 V2 V2 X45 F1 X45 V2 X1 F1 X1 STEP 28 27 STEP 29 F1 V2 19 19 P1 P3 P3 P3A A B B A Big P4 A small...

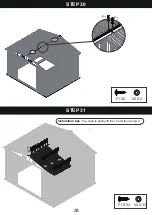
Page 28: ...V2 X33 F1 X33 F1 F1 V2 X2 F1 X2 STEP 30 28 STEP 31 19 19 P2 P3 P3 Installation tips You need to gently lift the 19 and then screw it F1 V2 V2...

Page 29: ...er side of P1 P2 15 15 16 16 For this step only To ensure a better understanding and installation experience please Scan The QR Code next to it to watch a video tutorial that will assist you in comple...

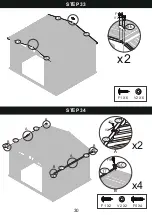
Page 30: ...V2 X6 F1 X6 STEP 33 STEP 34 30 x2 15 16 15 16 GE F1 V2 F5 GC 17 GC GC GC 17 17 17 17 x4 x2 V2 F1 17 17 A A B B B B B A V2 X2 F1 X2 F5 X4...

Page 31: ...For this step only To ensure a better understanding and installation experience please Scan The QR Code next to it to watch a video tutorial that will assist you in completing the installation ATTENTI...

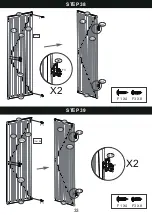
Page 32: ...F1 X4 F2 X2 STEP 37 STEP 36 32 F2 F1 F1 DRA DRA DRB DRB DLB DLA DLA 20 20 20 20 DLB DLA DRB DRA DRA DRB DLB DLA x2 x2 DLB...

Page 33: ...STEP 38 F1 F1 F3 F1 DH DH X2 DH inside 20 20 20 20 DLA DLB DLA DX2 DLB DX2 F1 X4 F3 X8 33 STEP 39 F1 X4 F3 X8 F1 F1 F3 F1 DH X2 DH inside 20 DRB DRA DX2 20 20 20 DRB DRA DX2 DH...

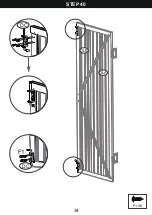
Page 34: ...F1 X8 STEP 40 34 F1 DC DC DLB DLA...

Page 35: ...STEP 41 STEP 42 35 outside F1 V2 F4 DF DLB DLA F1 DG V2 outside DRA DRB V2 X8 F1 X8 F4 X2 V2 X8 F1 X8 F4 X3 ou F4 DG...

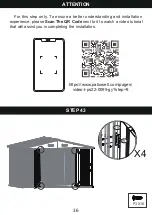
Page 36: ...tep only To ensure a better understanding and installation experience please Scan The QR Code next to it to watch a video tutorial that will assist you in completing the installation ATTENTION https w...

Page 37: ...STEP 44 37 F1 S1 S1 X104...

Page 38: ...size 1 9 3 screws are not included Wear safety goggles and always follow the manufacturer s instructions when using power tools Wash shed with garden hose or a mild detergent solution Using a stiff br...

Reviews: