background image

- 10 -


Ź

The Remote Control


»

Connect the remote control to the photo light

In order to be able to use the remote control, it is necessary for the channel, group and ID to be set the 
same on the remote control and the photo light. You can control multiple photo lights with one remote 
control. Use the selected group to select the respective photo light.

Activate:
Turn on the photo light and press the button with the WiFi icon.

Set channel:
Press the DIM/FN1 button to select the parameter for CH.
Then use the SET knob to set the channel (CH 1-40).

Set group:
Press the Fn2 button to select the parameter for GR.
Then use the SET knob to set the group (GR 0-9, GR A-F).

Set ID:
Press the Fn3 button to select the parameter for ID.
Then use the SET knob to set the ID (ID 1-99)


»

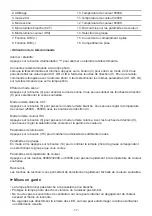
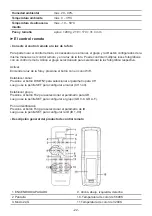
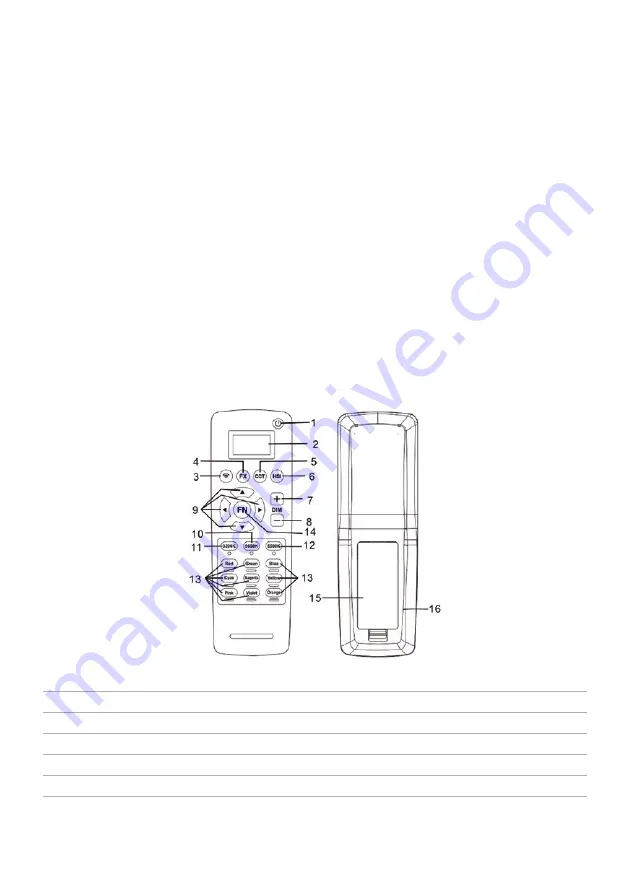
Product Overview Of Remote Control

1.ON/OFF

9. Up, down, left, right

2. Display

10. 5600K color temperature

3. 2.4G mode

11. 3200K color temperature

4. Scene mode

12. 6500K color temperature

5. White Light Mode (CCT)

13. Shortcuts for color settings

6. Color Light Mode (HSI)

14. Group selection

7. DIM function (+)

15. Battery compartment cover

8. DIM function (-)

16. Battery compartment

Summary of Contents for RGB-216ARC

Page 1: ......

Page 2: ...en Inklusive Fernbedienung Produkt bersicht 1 Diffusor 8 Akku Entriegelung 2 LED Paneel 9 Funktionstaste 3 Abschirmklappen 10 Bildschirm 4 Winkeljustierung 11 Funktionswahl 5 Befestigung 12 DC Eingang...

Page 3: ...des Szenenmodus SCENE FX 3 DIM Fn1 Dr cken Sie diese Taste um f r den ausgew hlten Modus den gew nschten Parameter auszuw hlen 4 Fn2 Dr cken Sie diese Taste um f r den ausgew hlten Modus den gew nsch...

Page 4: ...Farbton HUE TONE COLOR auszuw hlen Verwenden Sie dann den Regler SET um den Farbton einzustellen Szenenlicht FX Aktivieren Wechseln Sie mit der Taste MODE in den Modus SCENE FX Helligkeit einstellen D...

Page 5: ...ren Schalten Sie das Fotolicht ein und dr cken Sie die Taste mit dem WLAN Symbol Kanal einstellen Dr cken Sie die Taste DIM FN1 um den Parameter f r CH auszuw hlen Verwenden Sie dann den Regler SET um...

Page 6: ...n nen Sie dei Farbtemperatur 2500K 8500K einstellen Farblichtmodus HSI Dr cken Sie die Taste 6 um in den Farblichtmodus zu wechseln Mit den Richtungstasten 9 k n nen Sie die Farbs ttigung und den Farb...

Page 7: ...quelle bzw entfernen Sie die Akkus Lassen Sie das Fotolicht nach dem Gebrauch abk hlen bevor Sie es verpacken oder abbauen HUOHJHQ XQG RGHU PRGL LHUHQ 6LH GDV RWROLFKW QLFKW Achten Sie auf die korrek...

Page 8: ...ontrol Product Overview 1 Diffuser 8 Battery release 2 LED panel 9 Function button 3 Barn doors 10 Display 4 Angle adjustment 11 Function selection 5 Fastening 12 DC input 6 Bracket 13 Power switch 7...

Page 9: ...arameter for the selected mode 4 Fn2 Press this button to select the desired parameter for the selected mode 5 Fn3 Press this button to select the desired parameter for the selected mode 6 SET Use thi...

Page 10: ...button to select the BRIGHTNESS parameter Then use the SET knob to adjust the brightness Select scene Press the Fn2 button to select the parameter for the scene SCENE Then use the SET knob to set the...

Page 11: ...select the parameter for CH Then use the SET knob to set the channel CH 1 40 Set group Press the Fn2 button to select the parameter for GR Then use the SET knob to set the group GR 0 9 GR A F Set ID...

Page 12: ...14 to control the photo light of the corresponding group or select the group you want Color temperature settings Press the 5600K 3200K or 6500K keys to quickly switch to the desired color temperature...

Page 13: ...12...

Page 14: ...commande Pr sentation du produit 1 Diffuseur 8 Lib ration de la batterie 2 Panneau LED 9 Bouton de fonction 3 Volets l gers I FKDJH 4 R glage de l angle 11 S lection de fonction 5 Fixation 12 Entr e...

Page 15: ...E LIGHT CCT la s lec tion du mode COLOR LIGHT HSI et la s lection du mode SCENE FX 3 DIM Fn1 Appuyez sur ce bouton pour s lectionner le param tre souhait pour le mode s lectionn 4 Fn2 Appuyez sur ce b...

Page 16: ...nsuite le bouton SET pour r gler la saturation p QLU OD WHLQWH Appuyez sur la touche Fn3 pour s lectionner le param tre HUE TONE COLOR Utilisez ensuite le bouton SET pour r gler la teinte Lumi re de s...

Page 17: ...ntr ler plusieurs clairages photo avec une seule t l commande Utilisez le groupe s lectionn pour s lectionner la lumi re photo respective Activer Allumez la lampe photo et appuyez sur le bouton avec l...

Page 18: ...sur le bouton 5 pour passer en mode lumi re blanche Vous pouvez r gler la temp rature de couleur 2500K 8500K avec les boutons de direction 9 Mode lumi re couleur HSI Appuyez sur le bouton 6 pour pass...

Page 19: ...D branchez de la source d alimentation ou retirez les piles Apr s utilisation laissez la lampe photo refroidir avant de l emballer ou de la d monter 1H GpPRQWH SDV HW RX QH PRGL H SDV OD ODPSH SKRWR...

Page 20: ...luye control remoto Descripci n del producto 1 Difusor 8 Liberaci n de la bater a 2 Panel LED 9 Bot n de funci n 3 Aletas ligeras 10 Pantalla 4 Ajuste de ngulo 11 Selecci n de funciones 5 Fijaci n 12...

Page 21: ...OLOR LIGHT HSI y la selecci n del modo SCENE FX 3 DIM Fn1 Presione este bot n para seleccionar el par metro deseado para el modo selec cionado 4 Fn2 Presione este bot n para seleccionar el par metro d...

Page 22: ...ET para ajustar el tono Luz de escena FX Activar Cambie al modo SCENE FX con el bot n MODE Ajustar brillo Presione el bot n DIM Fn1 para seleccionar el par metro BRILLO Luego use la perilla SET para a...

Page 23: ...DU OD OX IRWRJUi FD UHVSHFWLYD Activar Enciende la luz de la foto y presiona el bot n con el cono WiFi Establecer canal Presione el bot n DIM FN1 para seleccionar el par metro para CH XHJR XVH OD SHUL...

Page 24: ...OX EODQFD 3XHGH FRQ JXUDU OD WHPSHUDWXUD GH FRORU 2500K 8500K con los botones de direcci n 9 Modo de luz de color HSI Presione el bot n 6 para cambiar al modo de luz de color Con las teclas de direcc...

Page 25: ...etire las bater as Despu s de su uso deje que la luz de la foto se enfr e antes de empaquetarla o desmontarla 1R GHVPRQWH QL PRGL TXH OD OX GH OD IRWR Preste atenci n a los valores de voltaje correcto...

Page 26: ...o Panoramica del Prodotto 1 Diffusore 8 Rilascio della batteria 2 Pannello LED 9 Pulsante funzione 3 Lembi leggeri 10 Mostra 4 Regolazione dell angolo 11 Selezione della funzione 5 Chiusura 12 Ingress...

Page 27: ...la modalit SCENE FX 3 DIM Fn1 Premere questo pulsante per selezionare il parametro desiderato per la modalit selezionata 4 Fn2 Premere questo pulsante per selezionare il parametro desiderato per la mo...

Page 28: ...re la manopola SET per regolare la tonalit Luce di scena FX Attivare Passa alla modalit SCENE FX con il pulsante MODE Regola la luminosit Premere il pulsante DIM Fn1 per selezionare il parametro BRIGH...

Page 29: ...uce foto e premi il pulsante con l icona Wi Fi Imposta canale Premere il pulsante DIM FN1 per selezionare il parametro per CH Quindi utilizzare la manopola SET per impostare il canale CH 1 40 Imposta...

Page 30: ...are alla modalit luce colorata Con i tasti direzionali 9 possibile impostare la saturazione del colore e la gamma cromatica Impostazioni di luminosit 3UHPHUH LO SXOVDQWH SHU PRGL FDUH OD OXPLQRVLWj GH...

Page 31: ...OODUOD R VPRQWDUOD 1RQ VPRQWDUH H R PRGL FDUH OD OXFH IRWRJUD FD Prestare attenzione ai valori di tensione corretti quando si utilizza un alimentatore Prestare attenzione alla compatibilit quando si u...

Page 32: ...clusief afstandsbediening Productoverzicht 1 Diffusor 8 Batterijontgrendeling 2 LED paneel 9 Functieknop 3 Barndoors 10 Scherm 4 Hoekaanpassing 11 Functieselectie 5 Bevestiging 12 DC ingang 6 Beugel 1...

Page 33: ...lecteren 3 DIM Fn1 Druk op deze knop om de gewenste parameter voor de geselecteerde modus te selecteren 4 Fn2 Druk op deze knop om de gewenste parameter voor de geselecteerde modus te selecteren 5 Fn3...

Page 34: ...lgens de SET knop om de tint aan te passen Sc nelicht FX Activeren Schakel over naar de SCENE FX modus met de MODE knop Helderheid aanpassen Druk op de DIM Fn1 knop om de BRIGHTNESS parameter te selec...

Page 35: ...HW GH IRWRODPS DDQ HQ GUXN RS GH NQRS PHW KHW ZL LFRRQ Kanaal instellen Druk op de DIM FN1 knop om de parameter voor CH te selecteren Gebruik vervolgens de SET knop om het kanaal CH 1 40 in te stelle...

Page 36: ...de modus gekleurd licht Met de richtingtoetsen 9 kunt u de kleurverzadiging en het kleurbereik instellen Helderheid instellingen Druk op de knop 7 8 om de helderheid van de verschillende modi te wijz...

Page 37: ...wijzig de fotolamp niet Let bij het gebruik van een voeding op de juiste spanningswaarden Let bij het gebruik van oplaadbare batterijen op de compatibiliteit Gebruik alleen oplaadbare batteri jen van...

Page 38: ...llningar f r kreativa scener Inklusive fj rrkontroll Produkt versikt 1 Diffusor 8 Batteriutl sning 2 LED panel 9 Funktionsknapp 3 G ngj rnsd rrar 10 Annonsen 4 Vinkeljustering 11 Funktionsval 5 Fasts...

Page 39: ...na knapp f r att v lja nskad parameter f r det valda l get 4 Fn2 Tryck p denna knapp f r att v lja nskad parameter f r det valda l get 5 Fn3 Tryck p denna knapp f r att v lja nskad parameter f r det v...

Page 40: ...ODE knappen Justera ljusstyrkan Tryck p knappen DIM Fn1 f r att v lja parametern LJUSSTYRKA Anv nd sedan SET knappen f r att justera ljusstyrkan V lj scen Tryck p Fn2 knappen f r att v lja parameter f...

Page 41: ...nappen DIM FN1 f r att v lja parameter f r CH Anv nd sedan SET ratten f r att st lla in kanalen CH 1 40 St ll in grupp Tryck p Fn2 knappen f r att v lja parametern f r GR Anv nd sedan SET ratten f r a...

Page 42: ...ena Gruppinst llningar I 2 4G l ge tryck p knappen 14 f r att styra fotoljuset f r motsvarande grupp eller v lj den grupp du vill ha F rgtemperaturinst llningar Tryck p knapparna 5600K 3200K eller 650...

Page 43: ...42...

Page 44: ...LYQtFK VFpQ 9 HWQ GiONRYpKR RYOiGiQt 3 HKOHG SURGXNWX 1 Difuzor 8YROQ Qt EDWHULH 2 LED panel XQN Qt WOD tWNR 6Y WHOQp NODSN 10 Displej 4 Nastaven hlu 11 Volba funkce 5 Zap n n 12 DC vstup 6 Z vorka 9...

Page 45: ...DIM Fn1 6WLVNQXWtP WRKRWR WOD tWND Y EHUHWH SR DGRYDQ SDUDPHWU SUR Y EUDQ UH LP 4 Fn2 6WLVNQXWtP WRKRWR WOD tWND Y EHUHWH SR DGRYDQ SDUDPHWU SUR Y EUDQ UH LP 5 Fn3 6WLVNQXWtP WRKRWR WOD tWND Y EHUHWH...

Page 46: ...UH LPX 6 1 SRPRFt WOD tWND 02 Upravit jas 6WLVNQXWtP WOD tWND 0 Q Y EHUWH SDUDPHWU 5 71 66 3RWp SRPRFt RYODGD H 6 7 XSUDYWH MDV Vyberte sc nu 6WLVNQXWtP WOD tWND Q Y EHUWH SDUDPHWU SUR VFpQX 6 1 3RWp...

Page 47: ...Y EHUWH SDUDPHWU SUR 5 3RWp SRPRFt RYODGD H 6 7 QDVWDYWH VNXSLQX 5 5 ID sady 6WLVNQXWtP WOD tWND Q Y EHUWH SDUDPHWU SUR 3RWp SRPRFt RYODGD H 6 7 QDVWDYWH 3 HKOHG SURGXNWX GiONRYpKR RYOiGiQt 1 ON OFF 1...

Page 48: ...NQ WH WOD tWNR SUR RYOiGiQt IRWRJUD FNpKR VY WOD RGSRYtGDMtFt VNXSLQ QHER Y EHUWH SR DGRYDQRX VNXSLQX Nastaven teploty barev 6WLVNQXWtP NOiYHV QHER U FKOH S HSQHWH QD SR DGRYDQRX EDUHYQRX WHSORWX zkra...

Page 49: ...48...

Page 50: ...cen W tym pilot zdalnego sterowania 3U HJO G SURGXNWyZ 1 Dyfuzor 8 Zwolnienie baterii 2 Panel LED 9 Przycisk funkcyjny ODS ZLHWOQH ZLHWODF 5HJXODFMD N WD 11 Wyb r funkcji 5 Mocowanie HM FLH SU GX VWD...

Page 51: ...SU FLVN DE Z EUD GDQ SDUDPHWU GOD Z EUDQHJR WU EX 4 Fn2 1DFL QLM WHQ SU FLVN DE Z EUD GDQ SDUDPHWU GOD Z EUDQHJR WU EX 5 Fn3 1DFL QLM WHQ SU FLVN DE Z EUD GDQ SDUDPHWU GOD Z EUDQHJR WU EX 6 SET 8 M WH...

Page 52: ...VWRVXM MDVQR 1DFL QLM SU FLVN 0 Q DE Z EUD SDUDPHWU 612 1DVW SQLH X M SRNU W D 6 7 DE Z UHJXORZD MDVQR ELHU VFHQ 1DFL QLM SU FLVN Q DE Z EUD SDUDPHWU VFHQ 6 1 1DVW SQLH X M SRNU W D 6 7 DE XVWDZL VFHQ...

Page 53: ...NDQD 1DFL QLM SU FLVN 0 1 DE Z EUD SDUDPHWU GOD 1DVW SQLH X M SRNU W D 6 7 DE XVWDZL NDQD Grupa zestaw w 1DFL QLM SU FLVN Q DE Z EUD SDUDPHWU GOD 5 1DVW SQLH X M SRNU W D 6 7 DE XVWDZL JUXS 5 5 Ustaw...

Page 54: ...PLHQL MDVQR Uy Q FK WU EyZ Ustawienia grupy WU ELH QDFL QLM SU FLVN DE VWHURZD R ZLHWOHQLHP RGSRZLHGQLHM JUXS OXE Z ELHU GDQ JUXS Ustawienia temperatury barwowej 1DFL QLM NODZLV H OXE DE V ENR SU H F...

Page 55: ...54 ZUy XZDJ QD NRPSDW ELOQR SRGF DV NRU VWDQLD DNXPXODWRUyZ 8 ZDM Z F QLH DNXPXOD tor w typu SON NP F...

Page 56: ...stavke scene 8NOMX XMX L GDOMLQVNL XSUDYOMD Pregled proizvoda 1 Difuzor 2WSX WDQMH EDWHULMH 2 LED panel 9 Funkcijska tipka 3 Lagani zalisci 10 Prikaz 3RGH DYDQMH NXWD 11 Odabir funkcije 3UL YU LYDQMH...

Page 57: ...WUD D RGDEUDQL QD LQ UDGD 4 Fn2 3ULWLVQLWH RYX WLSNX D RGDELU HOMHQRJ SDUDPHWUD D RGDEUDQL QD LQ UDGD 5 Fn3 3ULWLVQLWH RYX WLSNX D RGDELU HOMHQRJ SDUDPHWUD D RGDEUDQL QD LQ UDGD 6 SET RULVWLWH RYDM JX...

Page 58: ...tipku DIM Fn1 za odabir parametra SVJETLINA DWLP XSRWULMHELWH JXPE 6 7 D SRGH DYDQMH VYMHWOLQH Odaberite scenu Pritisnite tipku Fn2 za odabir parametra za scenu SCENE Zatim upotrijebite tipku SET za p...

Page 59: ...MH L SULWLVQLWH JXPE V LNRQRP L L Postavi kanal Pritisnite tipku DIM FN1 za odabir parametra za CH DWLP SRPR X WLSNH 6 7 SRVWDYLWH NDQDO Postavi grupu Pritisnite tipku Fn2 za odabir parametra za GR D...

Page 60: ...VYMHWOLQH UD OL LWLK QD LQD UDGD Postavke grupe 8 QD LQX UDGD SULWLVQLWH WLSNX D XSUDYOMDQMH VYMHWORP IRWRJUD MH RGJRYDUDMX H JUXSH LOL RGDEHULWH JUXSX NRMX HOLWH Postavke temperature boje 3ULWLVQLWH...

Page 61: ...60...

Page 62: ...61 SR Photo Video LED 216ARC RGB...

Page 63: ...62 1 2 3 4 5 6 7 8 7 7 COLOR LIGHT SCENE...

Page 64: ...63 95 0 100 120...

Page 65: ...64...

Page 66: ...65...

Page 67: ...66 V...

Page 68: ...PATONA International S L U Untere Giesswiesen 17 78247 Hilzingen Germany Made in China Version 28042022...

Reviews: