background image

Summary of Contents for p-collar 356

Page 1: ...eT Oe Cay Qo PATPST User Manual 0 3 0 02 356XX0 14 02 ...

Page 2: ...Package Contents Hand Remote Wrist Strap 2999 Contact Points Py Receiver Collar Charging Cable eMC Reg User Manual User Manual Test Light Tool g Contact Spring Sheet Ooodgag Silicone Caps ...

Page 3: ...Overview Hand Remote Display Screen Locked Unlock Switch Beep PavPet 3 iDa Ow F Vibration ea Channel Select Static Stimulation i USB C Charging Port Static Level Static Level ...

Page 4: ...Overview Static Level Dog 1 Lock Dog 2 Battery Status Beep Static Stimulation Vibration Receiver Collar Adjustable Collar Power Button Contact Spring Sheet ...

Page 5: ... but short enough for him not to reach a road or other unsafe area You must also be physically strong enough to restrain your dog when he tries to chase Risk of skin damage A collar worn for too long or made too tight on the pet s neck may cause skin damage ranging from redness to pressure ulcers This condition is commonly known as bed sores Avoid leaving the collar on the dog for more than 8 hour...

Page 6: ...r Collar USB C Charging Port When charging is completed When charging is completed display the fully charged battery steady green light LO compartment eo Turn on the Remote Flick down to unlock the remote Flick up to lock the remote ...

Page 7: ...n for 2 secs to turn off the receiver collar the _ eeiver collar vibrates twice and red LED flashes twice S oO Assemble the Receiver For dog with thin coats For dog with thicker coats Note Please install the conductive silicone caps onto the contact poinrs to make it softer it s better for your dog s skin ee dog with thicker coats please install contact spring sheet as well J 6 ...

Page 8: ...act points must have direct contact with the dog s neck skin Check the tightness of the collar by inserting one finger snugly _ Pamesn the collar and neck e Beep Delivers a beep tone with non adjustable volume to the receiver collar J 7 ...

Page 9: ...J Static Stimulation Delivers currently selected level static stimulation to the receiver collar Note Please use with caution static stimulation some dogs may not respond to lower levels See the How To Find The Best Static Level For Your Dog O means none 16 means the highest level NS ...

Page 10: ...evels until your pet reliably responds to the stimulation 3 If your dog continues showing no response at Level 6 check the fit of the receiver collar If your dog has long or thick hair install contact spring sheet or dog s hair will need to be trimmed around the contact points If the Contact Points is no contact with the dog s skin there will be no static stimulation Note If all of these steps hav...

Page 11: ...ode Battery status display for the remote Remote range is up to 1000 feet Long life Lithium Polymer battery 0 16 adjustable static level Receiver collar is IPX7 waterproof Remote non waterproof Support maximum 2 receiver collars with 1 remote USB C charging port 10 ...

Page 12: ...t light tool vertically on the 2 contact points making sure the metal wire has direct contact with the top of the 2 points 3 Press the static button on the remote The test light will be lighted The higher the static level is the redder the light will be AS Test Light XX As Wrench Vs Ke el hog XS 11 ...

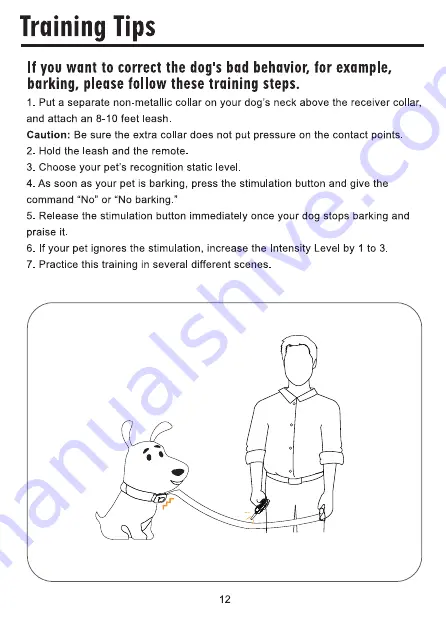
Page 13: ...tra collar does not put pressure on the contact points 2 Hold the leash and the remote 3 Choose your pet s recognition static level 4 As soon as your pet is barking press the stimulation button and give the command No or No barking 5 Release the stimulation button immediately once your dog stops barking and praise it 6 If your pet ignores the stimulation increase the Intensity Level by 1 to 3 7 Pr...

Page 14: ...nnel switch of remote is on Dog 1 2 Press and hold the power button of receiver collar for 3 secs until the red and green lights flash alternately 3 Press and hold the Beep and Vibration buttons of remote at the same time to paring the receiver collar 4 Pairing successful the receiver collar beeps 3 time and the green light flashes Parper ww 3 time 13 ...

Page 15: ... and hold the power button of receiver collar for 3 secs until the red and green lights flash alternately 3 Press and hold the Beep and Vibration buttons of remote at the same time to paring the receiver collar 4 Pairing successful the receiver collar beeps 3 time and the green light flashes 3 time Part Il Receiver Switching Able to train 2 dogs separately Regulator channel switch select the dog t...

Page 16: ...commands will he have to continue to wear the receiver collar A It is recommended to wear it until you completely correct the dog s bad behavior Q Is the receiver collar waterproof A Yes the receiver collar is IPX7 waterproof But the remote is not waterproof Please keep the remote away from water Q Will get exactly 1000 feet of range with the electronic training collar A The effective wireless com...

Page 17: ...ver collar again Refer to Paring Page 13 for more information 3 Check the battery may be low in either the remote or the receiver collar 4 Make sure the receiver collar s contact points are placed snugly against your pet s skin Refer to Fit The Receiver Collar Page 7 for more information 5 Terrain weather vegetation transmission from other radio devices and many other factors can impact the amount...

Reviews: