background image

For model:

MEC56MBK5LR,
#355-0721

Installation Guide

PRINTED IN CHINA

page 1

READ THESE INSTRUCTIONS AND

SAVE THEM FOR FUTURE USE

4009654

net weight of fan: 21.6 lb. (9.8 kg) 

net weight of fan: 21.6 lb. (9.8 kg) 

Table of Contents:

Safety Tips. pg. 2
Unpacking Your Fan. pg. 3
Parts Inventory. pg. 3
Installation Preparation. pg. 4
Hanging Bracket Installation. pg. 4
Fan Assembly. pgs. 5 - 6 
Wiring. pg. 7
Canopy Assembly. pg. 7
Blade Assembly. pg. 8
Light Kit Assembly. pg. 9
Remote Control Operation. pgs. 9 - 10
Testing Your Fan. pg. 10
Troubleshooting. pg. 11
Parts Replacement. pg. 11
Warranty. pg. 11

Summary of Contents for MEC56MBK5LR

Page 1: ...f fan 21 6 lb 9 8 kg Table of Contents Safety Tips pg 2 Unpacking Your Fan pg 3 Parts Inventory pg 3 Installation Preparation pg 4 Hanging Bracket Installation pg 4 Fan Assembly pgs 5 6 Wiring pg 7 Ca...

Page 2: ...re and to prevent humming noise do not use this fan with any solid state speed control device or control fan speed with a full range dimmer switch Using a full range dimmer switch to control fan speed...

Page 3: ...rned for repairs Check against parts inventory that all parts have been included IMPORTANT REMINDER You must use the parts provided with this fan for proper installation and safety w remote e f a b c...

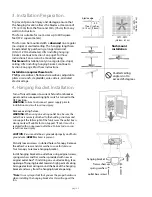
Page 4: ...h point of ceiling Arrange electrical wiring around the back of the hanging bracket and away from the hanging bracket opening Note It is very important that you use the proper hardware when installing...

Page 5: ...through downrod and pull extra wire slack from the upper end of the downrod Refer to diagram 2 Insert downrod in the motor housing yoke until holes for pin and clip in downrod align with holes in yok...

Page 6: ...curely tighten these screws To prepare the fan for wiring hang fan onto hanging bracket by sliding the canopy over the hanging bracket tab Use one of the non slotted holes on the rim of the canopy to...

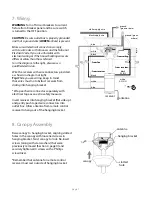
Page 7: ...hanging bracket Wrap each wire connector separately with electrical tape as an extra safety measure Insert receiver into hanging bracket flat side up and gently push taped wire connectors into outlet...

Page 8: ...rely with a Phillips screwdriver Repeat for the remaining blades Remove blade arm screws and washers from underside of motor If plastic motor locks are installed with blade arm screws discard plastic...

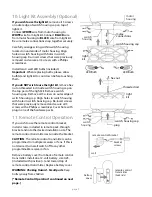
Page 9: ...sing with holes in switch housing cap Re insert screws that were previously removed and secure all 3 screws with a Phillips screwdriver Cover hole with plug in one of the hardware packs battery cover...

Page 10: ...ton for fan LOW speed 0 button to turn fan OFF button to turn light ON or OFF Tap button quickly to turn lights off or on Hold button down to increase or decrease lights If you press button in excess...

Page 11: ...this fan to the original purchaser for indoor use under the following provisions 1 YEAR WARRANTY The manufacturer will replace or repair any fan which has faulty performance due to a defect in materia...

Reviews: