background image

EN Translation of the Original Instructions


EN – 

TABLE OF CONTENTS


Introduction

 ................................................................................................................................ 24 

Proper use

 .................................................................................................................................. 24 

Controls and accessories

 ............................................................................................................ 25 

Safety symbols used

 ................................................................................................................... 25 

Safety instructions

 ...................................................................................................................... 26 

S

etting up

 ................................................................................................................................... 28 

Operation

 ................................................................................................................................... 29 

Care, maintenance and storage

 ................................................................................................. 30 

Troubleshooting

 ......................................................................................................................... 30 

Technical data

............................................................................................................................. 31 

Disposal

 ...................................................................................................................................... 31 

Warranty

..................................................................................................................................... 32 

EU 

declaration of conformity

 ..................................................................................................... 32 


INTRODUCTION


Thank you for choosing this demolition


hammer

We believe it will serve you well


as this is an 

indispensable assistant. This tool meets demanding requirements for power tools.


This instruction manual is used to gain knowledge of the power tool and its properties, 

and describes the intended use and the dangers associated with its use. User manual 

contains important information on how to technically and effectively utilize


the tool and 

thereby avoid injuries, avoid repairs and increase the reliability and service life of the tool.


The user manual must always be available at the site with tools. Keep this manual always together with 

the demolition


hammer. Lend the hammer


only to those who are familiar with its use, and pass this 

instruction manual


together with the hammer

Instructions


for use must be read and followed by every 

person working with this tool.


Note:


Illustrations and specifications in this manual are not binding and may differ from the delivered product. 

Accessories shown or described may not necessarily be part of the tool delivery. The manufacturer 

reserves the right to make changes in the course of future development without prior notice.


PROPER USE


The machine is designed for


light demolition work and


chiseling in concrete, stone

masonry


and


similar 

construction materials.


Observe the information on chiseling tool


types

The machine is equipped with

 SDS-

max


chuck


The machine is exclusively intended for private use in dry locations

Any other use or modification of the 

machine is considered improper usage and carries the risk of injury

The manufacturer accepts no 

responsibility for


damage resulting from usage contrary to the


instructions specified below.


24 

Summary of Contents for BK1005

Page 1: ...ERS MANUAL Pozor P ed pou it m n ad si pozorn p e t te tento n vod k pou it Pozor Pred pou it m tohto n radia si pozorne pre tajte tento n vod na pou itie Warning Read carefully operating instructions...

Page 2: ...2...

Page 3: ...3...

Page 4: ...v dy k dispozici v m st pou it n ad Uchov vejte tento n vod k pou it v dy spolu s bourac m kladivem Kladivo p j ujte pouze osob m kter jsou sezn meny s jeho pou it m a sou asn s kladivem p edejte tak...

Page 5: ...Vkl d n n stroje a1 SDS max ploch sek a2 SDS max pi at sek Obr zek B V m na uhl k b1 roub b2 Pru ina b3 Uhl k Obr zek C P davn rukoje c1 Obj mka c2 Matice c3 Dr k c4 P davn rukoje Pozn mka Sou st bal...

Page 6: ...t edn ho topen spor ky a chladni ky V p pad e je t lo uzemn no je riziko razu elektrick m proudem vy c Elektrick n ad nevystavujte de ti nebo mokr mu prost ed Vniknut vody do elektrick ho n ad zvy uje...

Page 7: ...t m ne budete prov d t nastaven elektrick ho n ad vym ovat p slu enstv nebo n ad odlo te Toto bezpe nostn opat en zabra uje ne mysln mu spu t n n ad d Nepou van elektrick n ad uchov vejte mimo dosah d...

Page 8: ...nebo razu elektrick m proudem P stroje ani obrobku se nedot kejte bezprost edn po proveden prac Sou sti mohou b t je t hork a m e proto doj t k pop lenin m Elektrick p stroj ihned vypn te jakmile dojd...

Page 9: ...v van ho materi lu Pozor Nebezpe zran n P i v m n n stroje pou vejte rukavice N stroj a skl idlo se mohou siln zah t zejm na p i d letrvaj c pr ci Vlo en a vyjmut SDS n stroje P stroj je vybaven skl i...

Page 10: ...l ho chodu Stiskn te sp na 8 nadoraz zatla te areta n tla tko 7 a sp na uvoln te T m se sp na zablokuje v zapnut poloze Vypnut st l ho chodu Op tovn stiskn te sp na 8 a uvoln te jej P stroj se zastav...

Page 11: ...provozn ch hodin ch zkontrolujte stav uhl k motoru b3 Sejm te v trac kryt motoru 11 od roubujte rouby b1 na obou stran ch a tahem za pru inky b2 vyt hn te star uhl ky Pokud jsou opot eben krat ne 5 m...

Page 12: ...z d vodu ur en bezpe nostn ch opat en podle na zen 2002 44 ES k ochran osob pravideln pou vaj c ch elektrick n ad v zam stn n odhad expozice vibrac m by se m ly zv it skute n podm nky pou it a zp sob...

Page 13: ...robku p padn baterie p i jej m selh n EU PROHL EN O SHOD My Mountfield a s Miro ovick 697 CZ 251 64 Mnichovice t mto prohla ujeme na svou v lu nou odpov dnosti e produkt ru n bourac kladivo Patriot B...

Page 14: ...dy k dispoz cii v mieste pou itia n radia Uchov vajte tento n vod na pou itie v dy spolu s b rac m kladivom Kladivo po i iavajte iba osob m ktor s obozn men s jeho pou it m a s asne s kladivom odovzd...

Page 15: ...adanie n stroja a1 SDS max ploch sek a2 SDS max picat sek Obr zok B V mena uhl kov b1 Skrutka b2 Pru ina b3 Uhl k Obr zok C Pr davn rukov c1 Obj mka c2 Matica c3 Dr iak c4 Pr davn rukov Pozn mka S as...

Page 16: ...ajte sa telesn mu kontaktu s uzemnen mi povrchmi ako napr potrubie teles stredn ho k renia spor ky a chladni ky V pr pade e je telo uzemnen je riziko razu elektrick m pr dom vy ie c Elektrick n radie...

Page 17: ...a bezpe nej ie vykon va pr cu na ktor bolo skon truovan b Nepou vajte elektrick n radie ktor sa ned zapn alebo vypn sp na om Elektrick n radie ktor sa ned ovl da sp na om je nebezpe n a treba ho nech...

Page 18: ...formujte v miestnej rozvodnej spolo nosti Kontakt s vedeniami elektrick ho pr du m e sp sobi raz a ohe kontakt s plynov m veden m m e sp sobi v buch Po koden vodovodn potrubia m u sp sobi po kodenie m...

Page 19: ...i lu Pozor Nebezpe enstvo zranenia Pri v mene n stroja pou vajte rukavice N stroj a sk u ovadlo sa m u silne zahria najm pri dlhotrvaj cej pr ci Vlo enie a vybratie SDS n stroja Zariadenie je vybaven...

Page 20: ...st leho chodu Stla te sp na 8 na doraz zatla te areta n tla idlo 7 a sp na uvo nite T m sa sp na zablokuje v zapnutej polohe Vypnutie st leho chodu Op tovne stla te sp na 8 a uvo nite ho Zariadenie s...

Page 21: ...si 100 prev dzkov ch hodin ch skontrolujte stav uhl kov motora b3 Zlo te vetrac kryt motora 11 odskrutkujte skrutky b1 na oboch stran ch a ahom za pru inky b2 vytiahnite star uhl ky Ak s opotrebovan k...

Page 22: ...odu ur enia bezpe nostn ch opatren pod a nariadenia 2002 44 ES na ochranu os b pravidelne pou vaj cich elektrick n radie v zamestnan odhad expoz cie vibr ci m by sa mali zv i skuto n podmienky pou iti...

Page 23: ...ena cel ho v robku pr padne bat rie pri jej zlyhan EU VYHL SENIE O ZHODE My Mountfield a s Miro ovick 697 CZ 251 64 Mnichovice t mto vyhlasujeme na svoju v lu n zodpovednos e produkt ru n b racie klad...

Page 24: ...he site with tools Keep this manual always together with the demolition hammer Lend the hammer only to those who are familiar with its use and pass this instruction manual together with the hammer Ins...

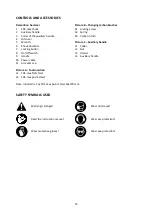
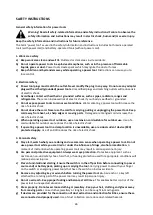
Page 25: ...p Picture A Tool insertion a1 SDS max flat chisel a2 SDS max point chisel Picture B Changing carbon brushes b1 Locking screw b2 Spring b3 Carbon brush Picture C Auxiliary handle c1 Collar c2 Nut c3 Ho...

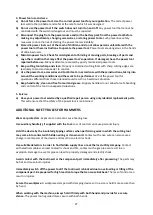
Page 26: ...ic shock e When operating a power tool outdoors use an extension cord suitable for outdoor use Use of a cord suitable for outdoor use reduces the risk of electric shock f If operating a power tool in...

Page 27: ...us situation h Keep handle dry clean and free from oil and grease Slippery handles do not allow for safe handling and control of the tool in unexpected situations 5 Service a Have your power tool serv...

Page 28: ...ble for the material being worked Warning Risk of injury When replacing the tool wear protective gloves The tool and chuck may become hot during use SDS tool inserting and removing The power tool is e...

Page 29: ...nd release the switch This will lock the switch and keep the machine running Switching permanent run off Press the switch 8 again and release it The machine will stop Warning Risk of injury Should the...

Page 30: ...very approximately 100 running hours Remove the air vents cap 11 release screws b1 on each side and extract the old brushes by pulling the springs b2 When worn out shorter than 5 mm replace the brushe...

Page 31: ...ation 2002 44 EC to protect persons regularly using power tools in employment exposure to vibration should consider the actual conditions of use and the way the tool is used including taking into acco...

Page 32: ...of the motor Warranty replacement does only include complete product or failed battery EU DECLARATION OF CONFORMITY We Mountfield a s Miro ovick 697 CZ 251 64 Mnichovice hereby declare under our sole...

Reviews: