background image

9

Operating Instructions 

Operating the Charbroiler 

Prior to operating your new charbroiler, thoroughly wash the exterior with a mild detergent 

or soap solution. Do not use abrasive cleaners, since this might damage the cabinet finish. 

If the stainless steel surfaces become discolored, scrub by rubbing only in the direction of 

the finished grain.   

Turn the burners on about 15-20 minutes before cooking for preheating. Set the knobs to the desired flame 

height or temperature. Each valve will control the gas flow to the burner to bring that area of the unit up to 

the set   

temperature. If different temperature settings are to be used, adjoining areas should be set at progressively 

higher temperatures using the lowest temperatures on the outside burners. A uniform and systematic 

approach to the loading of the unit will produce the most consistent product results.   

NOTE: When the charbroiler is first heated, it will smoke until oil used in manufacturing, preservation and 

dust from storage and shipping are burned off. An hour at “max.” on all burners is usually sufficient.   

Radiant Charbroiler 

1.

Place the angled radiants in their position as shown in 8-1

2.

Make sure that the radiants are setting properly into the slots on the front and rear supports. Radiants

should be centered over straight section of the burners.

COOKING GRATES 

Place the top cooking grates with the grid bars angled toward the front as shown in Fig. 8-2. Or, place the 

grid bars flat, not angled for cooking.   

NOTE: When cooking grates are placed angled toward the front, the grooves on top will guide the excess fat 

drippings into the grease trough.   

The cooking grates are heavy duty cast iron which will oxidize if emerged in water. Lightly oil grates if not 

being used regularly. 

Fig. 8-1 

Fig. 8-2 

Summary of Contents for PT-CB12-M

Page 1: ......

Page 2: ...2 This manual contains important safety instructions which must be strictly followed when using this equipment Please retain this manual for future reference...

Page 3: ...3 Index ATTENTION OWNERS AND OPERATORS 3 UNPACKING INSTALLATION 4 6 WARNINGS SAFEGUARDS FOR OPERATION 7 OPERATING INSTRUCTIONS 8 9 CLEANING INSTRUCTIONS 10 11 TROUBLESHOOTING 12 LIMITED WARRANTY 16...

Page 4: ...any cannot anticipate every circumstance or environment in which its equipment will be operated It is the responsibility of the owner and the operator to remain alert to any hazards posed by the funct...

Page 5: ...system at test pressures in excess of psi 3 45 kPa These models are designed built and sold for commercial use only Instructions must be posted in a prominent location All safety precautions must be t...

Page 6: ...ith legs mounted lift if necessary to move unit 7 The supplied gas pressure regulator is factory set at 4 Natural gas W C or 10 for L P 8 THESE UNITS ARE SUITABLE FOR INSTALLATION ON NON COMBUSTIBLE S...

Page 7: ...ways turn off the unit when not in use servicing or adjusting any parts or attachments and before cleaning Never leave the charbroiler on overnight Do not operate any equipment with a damaged or leaki...

Page 8: ...antee reliable ignition of the burners when the knobs are turned to ON The holes located in the front panel are pilot valve adjustments Use a screwdriver to turn the valve to adjust the flame height t...

Page 9: ...pproach to the loading of the unit will produce the most consistent product results NOTE When the charbroiler is first heated it will smoke until oil used in manufacturing preservation and dust from s...

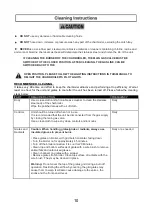
Page 10: ...follow the cleaning steps below PART REQUIRED ACTION FREQUENCY Body Use a clean cloth and a non abrasive cleaner to clean the stainless steel body of the charbroiler Wipe the polished areas with a sof...

Page 11: ...ted to fill too high grease debris is likely to accumulate under the unit The catch tray drawer is removed by pulling forward USE CAUTION WHEN REMOVING per Use or at least Daily Burner Air Shutter Ope...

Page 12: ...as line leak Turn off main gas valve DO NOT LIGHT FLAME ignite anything or turn switch on anything electrical Call fire department if needed and call for service Cooking surface is heating up slowly C...

Page 13: ...version from Natural Gas to Propane L P on all models The conversion should be done before connecting the unit to the gas supply Units are shipped from the factory equipped for use on natural gas Part...

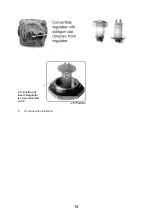
Page 14: ...14 6 Continue with installation L P Position of insert Regulator is now converted to L P...

Page 15: ...e We all recognize however that replacement parts and occasional professional service may be necessary to extend the useful life of this unit When service is needed contact an Authorized Service Agenc...

Page 16: ...n subject to misuse neglect abuse accident alteration negligence damage during transit delivery or installation fire flood riot or act of God Equipment that has the model number or serial number remov...

Reviews: