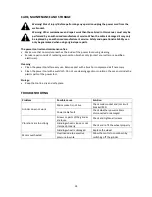

SETTING UP
Warning! Risk of injury!
Before performing any operation unplug the power cord
from
the wall socket.
Information on the grinding wheels
The machine is designed for using grinding wheels with
150
mm
diameter, 20 mm thickness
and
12,7
mm center
-
bore, suitable for material being worked on
.
Only use wheels which have a marked rotation
speed equal to or greater than 2850 /min.
Protect the wheels from blows, crushes, as well as oil.
Mounting the grinder on a workbench
It is highly recommended
that you bolt this bench grinder securely to a
workbench to gain maximum
stability for your machine.
•
Using the base of the grinder as a template, mark the
bench through the holes
(
16
)
in the
casting.
•
Drill the holes and bolt the bench grinder to the
bench with bolts, washers and nuts
(not supplied).
•
To reduce vibration, mount the
bench grinder
on a vibration
absorbing mat.
Installing the tool rests
•
Fix the tool rest
(
12
)
to the grinder with washer and
thumb screw (
13
).
Repeat for the other side.
•
Adjust each tool rest frequently to compensate for wear of the grinding wheel. Keep the distance not
more than 2 mm.
•
Ensure that the tool rest is firmly
fixed and horizontal.
•
One of the tool rests
has an angled grove to allow you to sharpen the drill bits.
Installing the spark deflectors
•
Fit both spark deflectors
(
2, 10
)
to the
grinder
using washers and screws
(
9
)
.
•
Adjust each spark deflector
frequently to compensate for
wear of the grinding wheel
.
Keep the
distance not more than 2 mm.
Installing the eye shields
•
Attach right
eye shield arm
(
8
)
to
the bench grinder using bracket
(
7
), flat washer
and screw (
6
)
.
•
Fit the lens
with holder
(
11
)
to the arm
(
8
).
•
Repeat for
the
left
side eye shield.
•
Adjust the eye shields to an
appropriate distance from the
tool rests to avoid
interference during
operation.
•
One of the eye shields has a magnifier lens.
Dressing the grinding wheel
When the grinding wheels start to become clogged with debris, use the dresser tool
(
5
) to clean and
renew (dress) their working surface.
•
Start the machine and let the wheels reach their full rotation speed.
•
Place the dresser tool (
5
) on the tool rest with the dresser wheels facing the
grinding wheel.
•
Slide the dresser tool forward until contact is made with the grinding wheel
and maintain a light
pressure to clean the debris from the grinding
wheel.
•
After dressing, adjust the tool rests and spark deflectors to keep the clearance at no more than 2
mm
from the wheel face.
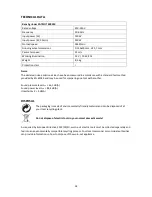
Replacing the grinding wheel (Fig.
B)
Replace the grinding wheel as soon as its residual material
thickness
does not allow keeping
a safe
clearance (maximum of 2
mm) between the wheel face and the spark deflector or the tool rest
.
•
Loosen the screws (
18
) and
rotate and remove the wheel cover
(
17
)
.
30
Summary of Contents for SB0250
Page 2: ...2...