60
CHANGING CUTTING BLADE FOR THE STRING CUTTING HEAD
(only for TBC series)
Removing metal cutting blade
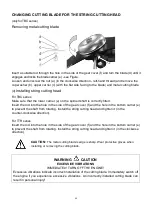
Insert a suitable rod through the hole in the side of the gear cover (f) and turn the blade (d) until it
engages and locks the blade carrier (e) - see Figure.
Loosen and unscrew the nut (a) (in the clockwise direction - left-hand thread) and remove the
cup washer (b), upper carrier (c) (with the flat side facing to the blade) and metal cutting blade
(d).
Installing string cutting head
For TBC series
Make sure that the lower carrier (e) on the splined shaft is correctly fitted.
Insert the rod into the hole in the side of the gear cover (f) and the hole in the bottom carrier (e)
to prevent the shaft from rotating. Install the string cutting head and tighten it (in the
counter-clockwise direction).
For TTR series
Insert the rod into the hole in the side of the gear cover (f) and the hole in the bottom carrier (e)
to prevent the shaft from rotating. Install the string cutting head and tighten it (in the clockwise
direction).
CAUTION:
The metal cutting blade's edge is sharp. Wear protective gloves when
installing or removing the cutting blade.
WARNING
CAUTION
EXCESSIVE VIBRATIONS
IMMEDIATELY TURN OFF THE ENGINE!
Excessive vibrations indicate incorrect installation of the cutting blade. Immediately switch off
the engine if you experience excessive vibrations. An incorrectly installed cutting blade can
result in personal injury!


