11
4.
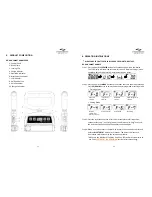
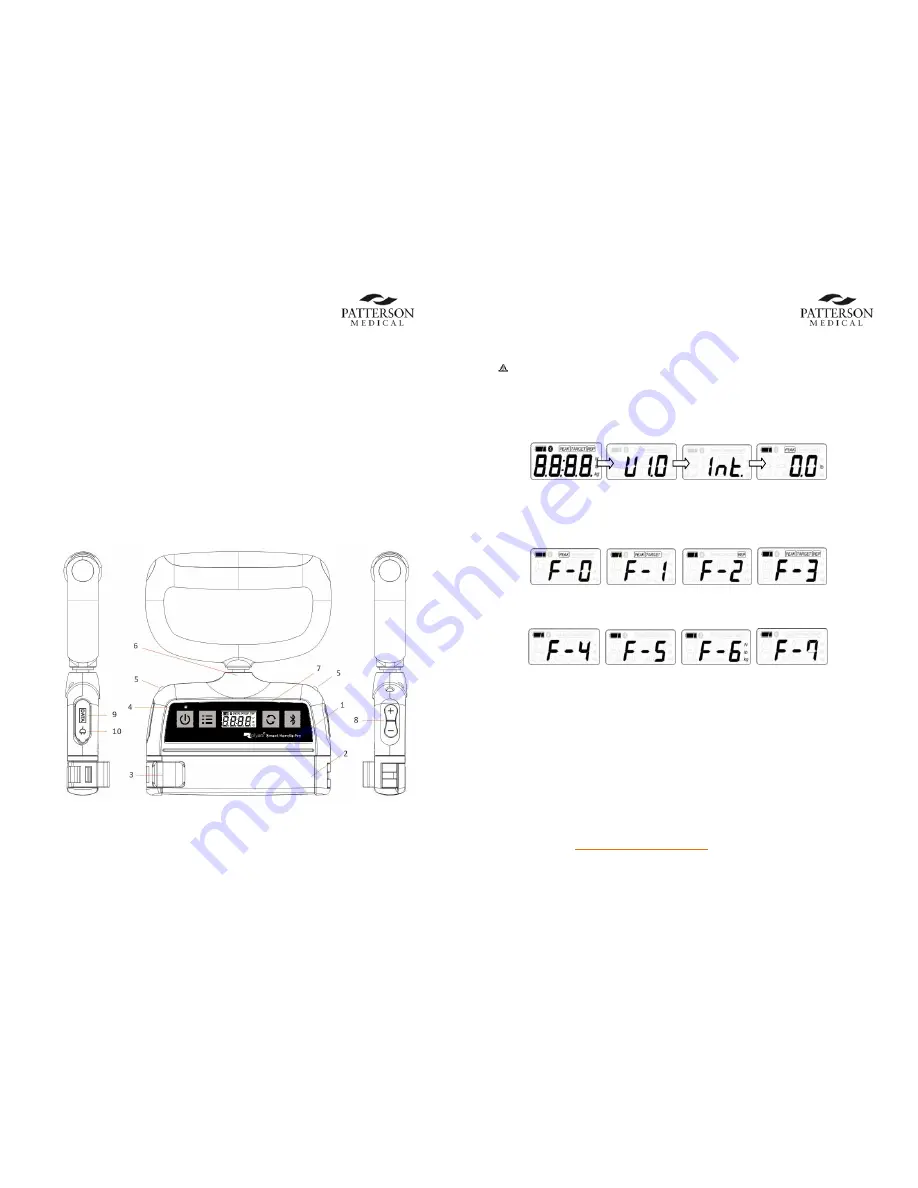
PRODUCT
COMPOSITION
ROLYAN
SMART
HANDLE
PRO
1
‐
Control
Panel
2
‐
Band
Clamp
3
‐
Locking
Clip
4
‐
Charge
Indicator
5
‐
Operation
Indicator
6
‐
Attachment
Connector
7
‐
LCD
Indicator
8
‐
Up/Down
Button
9
‐
Data
Connector
10
‐
Charge
Connector
20
6.
OPERATION
INSTRUCTIONS
MAKE
SURE
THE
BATTERY
IS
FULLY
CHARGED
PRIOR
TO
FIRST
USE.
ROLYAN
SMART
HANDLE
Step
1:
Press
and
hold
the
POWER
button
for
2
seconds
to
power
on
the
device.
The
LCD
display
will
show
the
software
version
and
initialize
settings,
when
complete,
default
then
turn
to
measurement
display
status.
Step
2:
Press
and
hold
the
MENU
button
for
2
seconds
to
access
the
mode
selection.
Press
UP/DOWN
button
to
select
the
desired
training
mode
or
setting
mode.
o
Training
Mode
Peak
Force
Training
Target
Force
Training
Repetition
Training
Rep
&
Target
Force
Training
o
Setting
Mode
Wireless
Transmission
(factory
use
only)
Volume
Control
Unit
Setting
ID
Setting
Step
3:
Start
the
resistance
exercise.
After
the
user
completes
a
full
repetition,
concentric
force
e.g.
“pull
(>1kg)
‐
and
eccentric
release
(<0.5kg)”
as
a
cycle,
the
device
will
beep
and
keep
the
peak
force
on
the
display.
Step
4:
When
a
set
of
exercises
is
complete,
to
transmit
the
exercise
data
press
and
hold
the
BLUETOOTH®
button
for
2
seconds.
The
data
of
the
last
set
is
transmitted
via
Bluetooth®
to
the
smart
phone/tablet.
*Make
sure
the
Bluetooth®
function
is
open
on
iOS/Android
system
prior
to
use.
See
BLUETOOTH®
TRANSMISSION
section
for
further
settings.
Summary of Contents for Rolyan Smart Handle Pro
Page 17: ...32...
Page 18: ...33 34...

