19
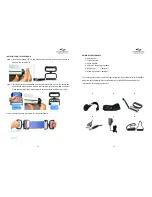
INSTALLATION
OF
ELASTIC
BAND
Step
1:
Locate
the
locking
clip
on
the
Rolyan
smart
handle
and
use
your
thumb
to
open
up
the
Locking
Clip.
Step
2:
Place
the
resistant
band
between
the
clamp
and
locking
clip.
For
safety,
the
band
should
always
extend
beyond
the
clamp
by
at
least
the
width
of
a
palm.
Close
the
Locking
Clip
by
index
finger
to
lock
the
clamp
until
hearing
it
click.
Step
3:
Repeat
the
same
procedure
for
the
dumb
handle.
Open
Click
12
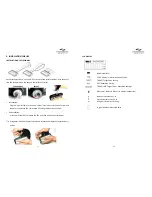
PRIMARY
COMPONENTS
1
‐
Door
Anchor
2
‐
Extremity
Strap
3
‐
Dumb
Handle
4
‐
USB
to
DC
Jack
charging
cable
5
‐
DC
Charger
…
(*optional)
6
‐
Webbing
handles
(*optional)
*For
safety,
please
select
the
DC
charger
recognized
in
compliances
with
IEC60601
‐
1
Requirements
of
Medical
Electrical
Equipment
or
IEC60950
‐
1
Requirements
of
Information
Technology
equipment.
1
2
3
4
5
6
Summary of Contents for Rolyan Smart Handle Pro
Page 17: ...32...
Page 18: ...33 34...

