
Caution before use
Caution
Caution
Caution
Caution
Warning
Speed/Rotation Direction Control Ring
Water/Chip Air Outlet
Backend
Sleeve
PATTERSON
EX-103
MADE IN JAPAN
F
R
Positioning Mark
Speed/Rotation Direction
Control Ring
Spray Outlet
Motor Stop Position
1. Specifications
Note: The maximum speed may vary slightly depending on a rotating direction of the airmotor and
the type of the tubing connected to the airmotor.
2. Part Descriptions
Operation Manual
OM-MK029E
043-2328 EX-103
043-2302 EX-203
E-type Low-speed Airmotor
• The Patterson airmotor is intended for use by dental professionals only.
• Read this operation manual carefully before using the airmotor.
• Be sure to follow all the operating instructions, including all cautions and warnings.
• Keep this Operation Manual for future reference.
• Keep in mind the safety of the patient and the operator when using the airmotor.
- Set the air pressure gauge below 42 PSI.
- Before use, make a trial run, making sure that:
• The drive air is not leaking from between the connecting part of the airmotor’s backend and tubing
connector.
• Changes in the rotating direction and the rotating speed can be
affected with the control ring as shown.
• When the ring is turned in an “F” direction, the attachment
installed onto the airmotor rotates clockwise.
• When the ring is turned in an “R” direction, the attachment
installed onto the airmotor rotates counterclockwise.
• The rotation is stopped at the center position between “F” and
“R”.
• Select the rotating direction and the speed by manipulating the
ring.
External Spray System:
7.8” spray tubing with a clamp for the Patterson attachments is supplied
separately. If spray, water or chip air is needed, the tubing can be connected to the airmotor.
5. Operation
Cleaning and Drying the Exterior
The use of automated cleaning devices is not recommended for the cleaning of the E-Type Low-speed
Airmotor.
- Remove the airmotor from the tubing connector. Remove attachment from the airmotor.
- Wash the airmotor under running water following the procedures below. (Water condition: ≤100°F, ≥
3.5L/min; water should be of the same quality as drinking water)
- Clean the external surfaces of the airmotor with a soft
bristled toothbrush for 15 seconds or more.
Under appropriate lighting (natural office lighting, 500 lx or
higher), inspect the airmotor for blood or other debris. If any
visible debris remains, repeat the process until the airmotor is
visually clean.
After cleaning, if the residual moisture is present, wipe off
with dry cloth or blow it off with compressed air (≤50.75psi) until there is no moisture in the interior
and exterior.
When blowing off with compressed air, cover the airmotor with cloth to prevent scattering of water.
Proceed to 7: Cleaning and Lubrication.
6. Cleaning and Drying
An Autoclave is recommended for sterilization.
- Before sterilization, clean the surface of the airmotor and lubricate the attachment. Refer to the
instructions in 5: Cleaning and Drying and 6: Cleaning and Lubrication.
- Put the airmotor into a sterilization pouch by itself.
- Place the airmotor in the center or upper shelf of the autoclave chamber.
- Autoclave the airmotor at
275˚F
or
135˚C
for 15 minutes.
8. Sterilization
Patterson guarantees the Patterson airmotor for 10 months subject to the observance of maintenance
instructions, cautions, warnings and normal use.
Note
- Patterson reserves the right to analyze and determine the cause of any failure.
- Guarantee is void if the breakage, accident or any other issues are caused by neglecting the daily
maintenance, cautions, warnings and common sense in use.
- Dismantling or reassembling by any third parties other than the Patterson Service Center voids
guarantee.
9. Guarantee
10. Symbol
• Never use the airmotor, if the airmotor cannot be smoothly installed onto or removed from the
tubing connector.
In this case, consult the Patterson Service Center.
• Never use the airmotor, if the attachment cannot be smoothly installed onto or removed from
the airmotor.
In this, consult the Patterson Service Center.
• Do not use sprays other than PANA SPRAY Plus. Using sprays other than PANA SPRAY Plus
may cause the airmotor to overheat.
• Hold the spray can upright.
• Firmly hold the airmotor to prevent it slipping when spray pressure is applied.
• Spray lubricant until it expels from the drive air port of the motor.
• Never use dry heat sterilization, cold sterilization, etc.
• Never autoclave the airmotor with other instruments in the sterilization pouch.
• Never place the airmotor at the bottom of the autoclave chamber, as the temperature at the
bottom may rise above the actual temperature setting.
- Make sure that tubing connector is ISO standard 4-hole or 2-hole.
- Align the pipes at the backend of the airmotor with the corresponding holes of the tubing connector,
and then tighten the nut situated on the tubing connector by turning it clockwise.
3. Installation of Airmotor onto Tubing Connector
Installation
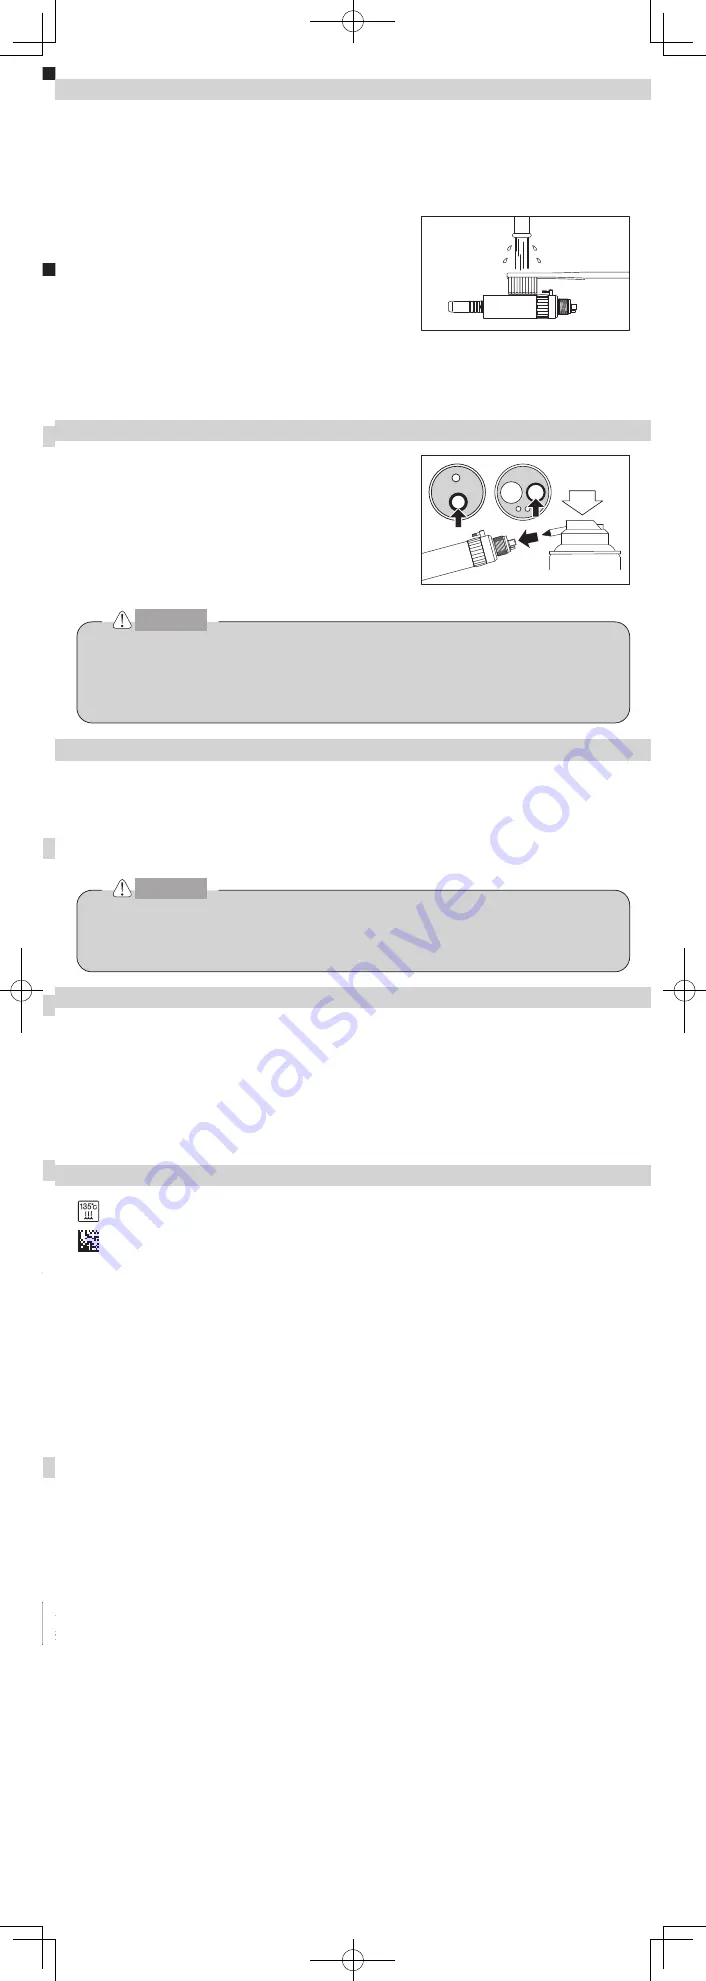
- The Patterson airmotor accepts external water system E-type attachments. Insert the sleeve of the
airmotor into the backend of the E-type attachment until it
is securely locked with a snap.
- Make sure that the attachment is securely installed onto
the airmotor, pulling it gently with fingers before use.
Removal
- Hold the airmotor with one hand and the attachment with
the other hand as illustrated.
- Pull the attachment out from the airmotor. Then, do not
separate the overlapped hands until the lock is released.
4. Installation/Removal of Attachment onto/from Airmotor
002
Product number
Backend configuration
Nose configuration
043-2328 EX-103
043-2302 EX-203
ISO standard 4-hole
(ISO standard 2-hole is available.)
ISO E-type
043-2328 EX-103
Speed ratio
Maximum speed
Weight
4:1 speed reduction
Speed
(rpm)
5,500
6,250
3.7oz
Air pressure
(psi)
36
42
Air consumption
(NL/Min)
42
51
043-2302 EX-203
Speed ratio
Maximum speed
Weight
1:1 drive
Speed
(rpm)
22,000
25,000
3.17oz
Air pressure
(psi)
36
42
Air consumption
(NL/Min)
42
51
PATTERSON
EX-103
MADE IN JAPAN
• When abnormal vibration, noise, overheating, etc. occurs while the airmotor is in the test run or
in use, stop using the airmotor immediately.
In this case, consult the Patterson Service
Center.
• Never dismantle or alter the airmotor in any way.
• Never remove the airmotor from the tubing connector when the motor is rotating.
• Never install/remove the attachment onto/from the airmotor when the motor is rotating.
• Never apply air pressure above 42 PSI to the airmotor.
PAT_EX-103.203
140x440mm
size:505 (140x55mm)
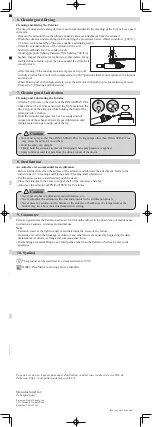
Cleaning and Lubricating the Interior
- Attach a Tip Nozzle to the nozzle of the PANA SPRAY Plus.
- Shake the can 3 or 4 times and insert the Tip Nozzle into the
drive air port of the airmotor while holding the head of the
airmotor with a cloth etc.
- Hold the airmotor and spray for 2 or 3 seconds until oil
comes out of the exhaust air part. Repeat lubrication until
foreign material stops coming out of the tip.
7. Cleaning and Lubrication
2022-11-21 CACCXXXX XXN
: AUTOCLAVABLE
This product can be sterilized in a steam sterilizer at 135°C.
HIBCC DataMatrix for Unique Device Identifier.
Pour une version en français du manuel d'utilisation, veuillez vous rendre sur le site Web de
Patterson: https://www.pattersondental.com/fr-CA
Manufactured for:
Fabriqué pour :
Patterson Dental Supply, Inc.
1031 Mendota Heights Road
Saint Paul, MN 55120
Caution before use
Caution
Caution
Caution
Caution
Warning
Speed/Rotation Direction Control Ring
Water/Chip Air Outlet
Backend
Sleeve
PATTERSON
EX-103
MADE IN JAPAN
F
R
Positioning Mark
Speed/Rotation Direction
Control Ring
Spray Outlet
Motor Stop Position
1. Specifications
Note: The maximum speed may vary slightly depending on a rotating direction of the airmotor and
the type of the tubing connected to the airmotor.
2. Part Descriptions
Operation Manual
OM-MK029E
043-2328 EX-103
043-2302 EX-203
E-type Low-speed Airmotor
• The Patterson airmotor is intended for use by dental professionals only.
• Read this operation manual carefully before using the airmotor.
• Be sure to follow all the operating instructions, including all cautions and warnings.
• Keep this Operation Manual for future reference.
• Keep in mind the safety of the patient and the operator when using the airmotor.
- Set the air pressure gauge below 42 PSI.
- Before use, make a trial run, making sure that:
• The drive air is not leaking from between the connecting part of the airmotor’s backend and tubing
connector.
• Changes in the rotating direction and the rotating speed can be
affected with the control ring as shown.
• When the ring is turned in an “F” direction, the attachment
installed onto the airmotor rotates clockwise.
• When the ring is turned in an “R” direction, the attachment
installed onto the airmotor rotates counterclockwise.
• The rotation is stopped at the center position between “F” and
“R”.
• Select the rotating direction and the speed by manipulating the
ring.
External Spray System:
7.8” spray tubing with a clamp for the Patterson attachments is supplied
separately. If spray, water or chip air is needed, the tubing can be connected to the airmotor.
5. Operation
Cleaning and Drying the Exterior
The use of automated cleaning devices is not recommended for the cleaning of the E-Type Low-speed
Airmotor.
- Remove the airmotor from the tubing connector. Remove attachment from the airmotor.
- Wash the airmotor under running water following the procedures below. (Water condition: ≤100°F, ≥
3.5L/min; water should be of the same quality as drinking water)
- Clean the external surfaces of the airmotor with a soft
bristled toothbrush for 15 seconds or more.
Under appropriate lighting (natural office lighting, 500 lx or
higher), inspect the airmotor for blood or other debris. If any
visible debris remains, repeat the process until the airmotor is
visually clean.
After cleaning, if the residual moisture is present, wipe off
with dry cloth or blow it off with compressed air (≤50.75psi) until there is no moisture in the interior
and exterior.
When blowing off with compressed air, cover the airmotor with cloth to prevent scattering of water.
Proceed to 7: Cleaning and Lubrication.
6. Cleaning and Drying
An Autoclave is recommended for sterilization.
- Before sterilization, clean the surface of the airmotor and lubricate the attachment. Refer to the
instructions in 5: Cleaning and Drying and 6: Cleaning and Lubrication.
- Put the airmotor into a sterilization pouch by itself.
- Place the airmotor in the center or upper shelf of the autoclave chamber.
- Autoclave the airmotor at
275˚F
or
135˚C
for 15 minutes.
8. Sterilization
Patterson guarantees the Patterson airmotor for 10 months subject to the observance of maintenance
instructions, cautions, warnings and normal use.
Note
- Patterson reserves the right to analyze and determine the cause of any failure.
- Guarantee is void if the breakage, accident or any other issues are caused by neglecting the daily
maintenance, cautions, warnings and common sense in use.
- Dismantling or reassembling by any third parties other than the Patterson Service Center voids
guarantee.
9. Guarantee
10. Symbol
• Never use the airmotor, if the airmotor cannot be smoothly installed onto or removed from the
tubing connector.
In this case, consult the Patterson Service Center.
• Never use the airmotor, if the attachment cannot be smoothly installed onto or removed from
the airmotor.
In this, consult the Patterson Service Center.
• Do not use sprays other than PANA SPRAY Plus. Using sprays other than PANA SPRAY Plus
may cause the airmotor to overheat.
• Hold the spray can upright.
• Firmly hold the airmotor to prevent it slipping when spray pressure is applied.
• Spray lubricant until it expels from the drive air port of the motor.
• Never use dry heat sterilization, cold sterilization, etc.
• Never autoclave the airmotor with other instruments in the sterilization pouch.
• Never place the airmotor at the bottom of the autoclave chamber, as the temperature at the
bottom may rise above the actual temperature setting.
- Make sure that tubing connector is ISO standard 4-hole or 2-hole.
- Align the pipes at the backend of the airmotor with the corresponding holes of the tubing connector,
and then tighten the nut situated on the tubing connector by turning it clockwise.
3. Installation of Airmotor onto Tubing Connector
Installation
- The Patterson airmotor accepts external water system E-type attachments. Insert the sleeve of the
airmotor into the backend of the E-type attachment until it
is securely locked with a snap.
- Make sure that the attachment is securely installed onto
the airmotor, pulling it gently with fingers before use.
Removal
- Hold the airmotor with one hand and the attachment with
the other hand as illustrated.
- Pull the attachment out from the airmotor. Then, do not
separate the overlapped hands until the lock is released.
4. Installation/Removal of Attachment onto/from Airmotor
002
Product number
Backend configuration
Nose configuration
043-2328 EX-103
043-2302 EX-203
ISO standard 4-hole
(ISO standard 2-hole is available.)
ISO E-type
043-2328 EX-103
Speed ratio
Maximum speed
Weight
4:1 speed reduction
Speed
(rpm)
5,500
6,250
3.7oz
Air pressure
(psi)
36
42
Air consumption
(NL/Min)
42
51
043-2302 EX-203
Speed ratio
Maximum speed
Weight
1:1 drive
Speed
(rpm)
22,000
25,000
3.17oz
Air pressure
(psi)
36
42
Air consumption
(NL/Min)
42
51
PATTERSON
EX-103
MADE IN JAPAN
• When abnormal vibration, noise, overheating, etc. occurs while the airmotor is in the test run or
in use, stop using the airmotor immediately.
In this case, consult the Patterson Service
Center.
• Never dismantle or alter the airmotor in any way.
• Never remove the airmotor from the tubing connector when the motor is rotating.
• Never install/remove the attachment onto/from the airmotor when the motor is rotating.
• Never apply air pressure above 42 PSI to the airmotor.
PAT_EX-103.203
140x440mm
size:505 (140x55mm)
Cleaning and Lubricating the Interior
- Attach a Tip Nozzle to the nozzle of the PANA SPRAY Plus.
- Shake the can 3 or 4 times and insert the Tip Nozzle into the
drive air port of the airmotor while holding the head of the
airmotor with a cloth etc.
- Hold the airmotor and spray for 2 or 3 seconds until oil
comes out of the exhaust air part. Repeat lubrication until
foreign material stops coming out of the tip.
7. Cleaning and Lubrication
2022-11-21 CACCXXXX XXN
: AUTOCLAVABLE
This product can be sterilized in a steam sterilizer at 135°C.
HIBCC DataMatrix for Unique Device Identifier.
Pour une version en français du manuel d'utilisation, veuillez vous rendre sur le site Web de
Patterson: https://www.pattersondental.com/fr-CA
Manufactured for:
Fabriqué pour :
Patterson Dental Supply, Inc.
1031 Mendota Heights Road
Saint Paul, MN 55120


