1.
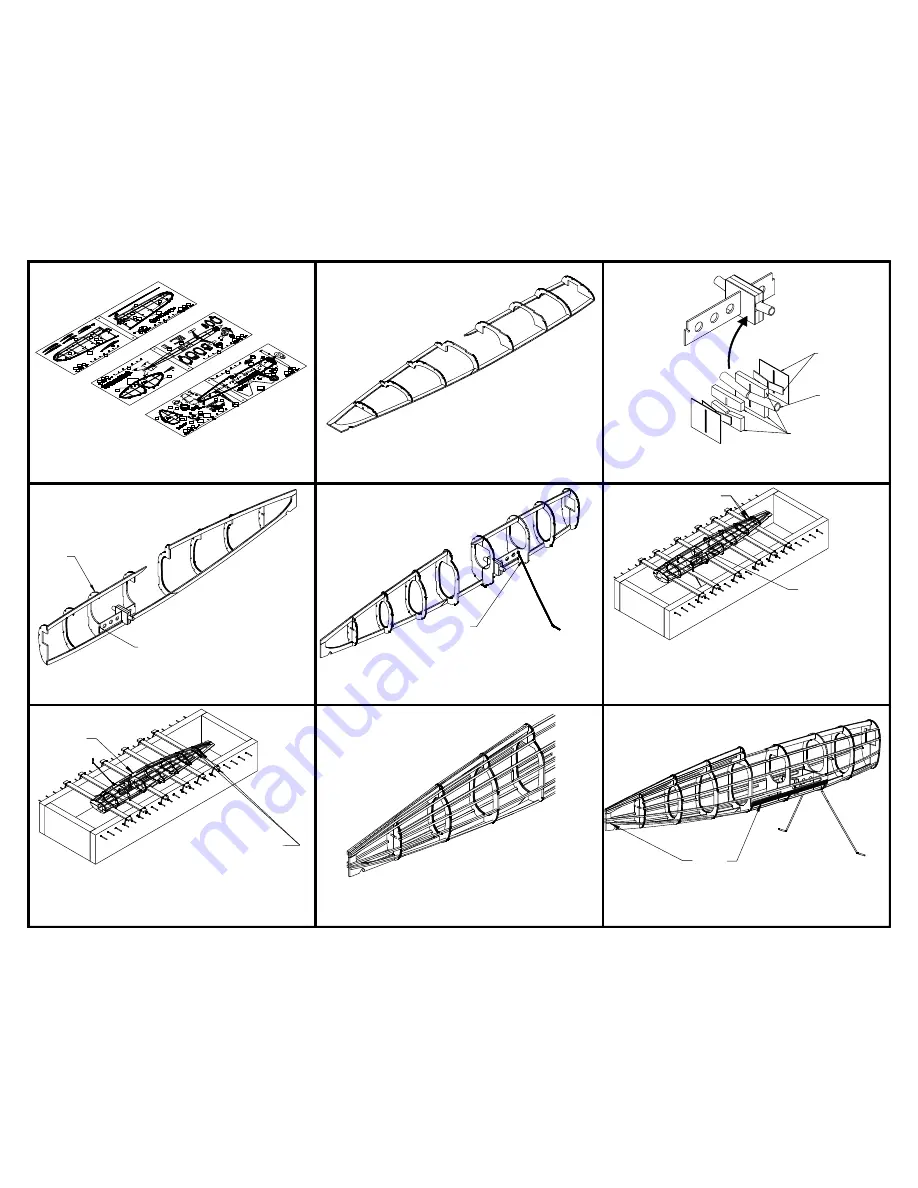
Tape the six plan pages together to form three building plan pages.
Use the "+" marks for alignment of the pages.
Pin the keel parts to the plan. Glue the keel joints as the parts
are placed on the plan. Also glue the right former halves to the
keel using the plan as a location guide.
2.
3.
4.
5.
6.
7.
8.
9.
Remove the fuselage from the assembly fixture. Glue the top two
rear stringers on each side to the assembly.
Remove the fuselage assembly from the plan. Glue the wing
mount assembly to formers 3 and 4. Make sure the end of B-5
with the 3/64" hole faces former 3.
If you don't already have a fuselage assembly fixture, build one
like the one shown in the sketch. The cross pieces are held in
place with rubber bands. Place the fuselage on the fixture and
pin the keel to the fixture cross pieces. Add the main stringers
and the wing plate. Do not add the two top rear stringers at this
time.
Remove the fuselage assembly from the fixture. Flip the
assembly and insert the fixture cross pieces. Glue the stringers
in place. Again, do not glue the two top rear stringers to the
assembly at this time.
Assemble the wing mount components. The wing joiner slides
fore and aft on the plywood keel B-5. Make sure the wing joiner
moves easily on B-5.
1/64" Ply
5/32" OD
Aluminum
3/32" Balsa
Bend the landing gear legs from 1/32" piano wire. Insert the
gear legs through the hole in B-5. Glue the left side of each
former to the corresponding right side former. Line up the
landing gear legs and glue them to former 3.
3/64" Hole
Glue
Wing plate
Wing plate
Sand the stringers to a taper at the rear of the fuselage. Also
sand the wing plates so they blend with the fuselage curve.
Sand
These stringers
end at former 8
These stringers
end at former 8
3


