background image

3 Conversion of the mixing valve 


2011/05 

993x07xx – V02


3


Conversion of the mixing valve 

3.1


from "flow on the right" to "flow on the left" 

1.


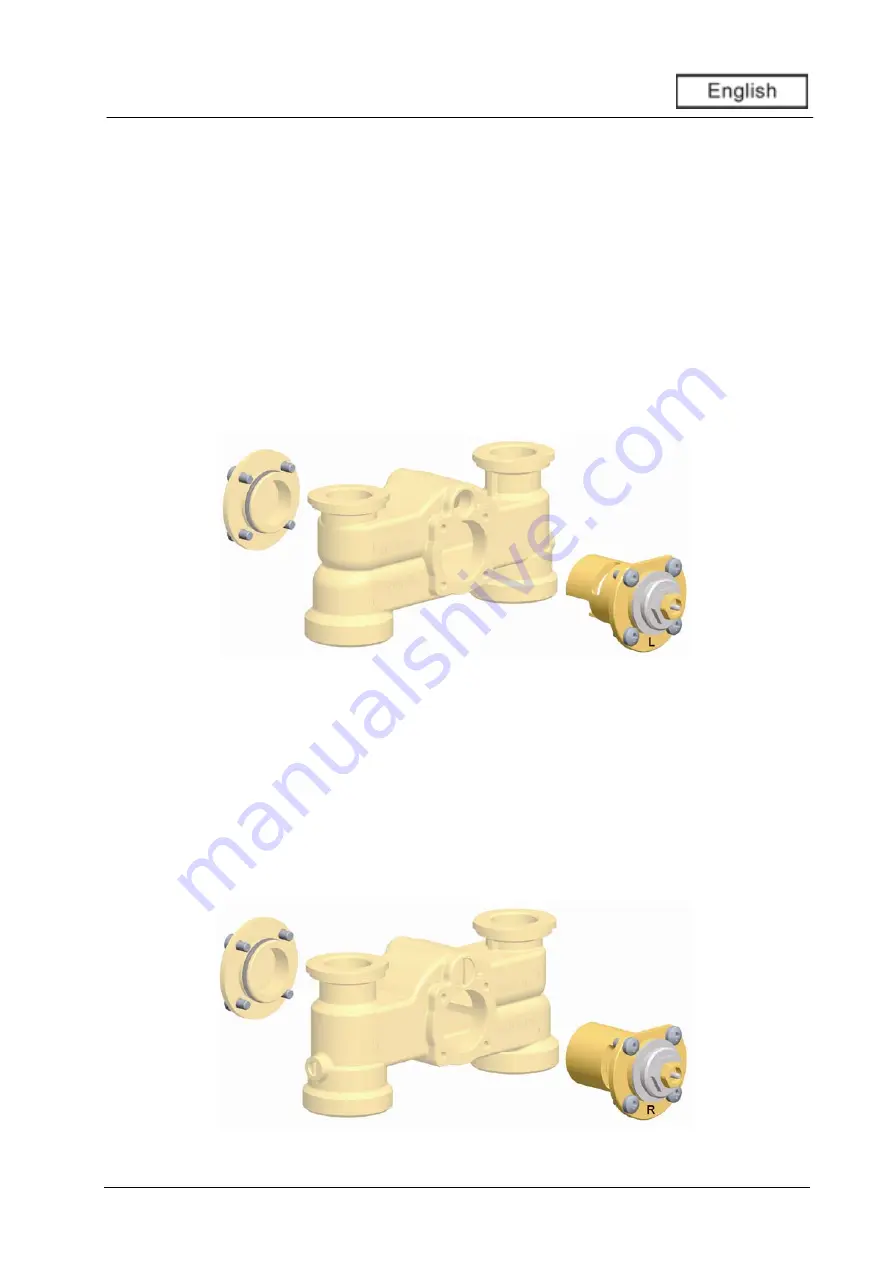
Dismount the existing mixing valve cartridge (marked "R"). 

2.


Dismount the cover on the back side. 

3.


Turn the mixing valve by 180° and mount the cover on the other side of the mixing valve 
(attention: do not jam the cover!). 

4.


Insert the new cartridge (marked "L") with the flat side to the top as shown in the figure 
below and tighten the screws. 

3.2


from "flow on the left" to "flow on the right" 

1.


Dismount the existing mixing valve cartridge (marked "L"). 

2.


Dismount the cover on the back side. 

3.


Turn the mixing valve by 180° and mount the cover on the other side of the mixing valve 
(attention: do not jam the cover!). 

4.


Insert the new cartridge (marked "R") with the flat side to the top as shown in the figure 
below and tighten the screws. 


Summary of Contents for 31071

Page 1: ...ng the flow line for constant value mixing valves DN 20 and DN 25 Instructions de montage Kit de transformation pour l échange du côté départ pour les vannes mélangeuses à régulation constante DN 20 et DN 25 Instrucción de montaje Kit de conversión para cambio de alimentación para mezcladores de valor costante DN 20 DN 25 Istruzioni di montaggio Set di conversione per inversione della mandata per ...

Page 2: ...achkenntnisse voraus die einem anerkannten Berufsabschluss als Anlagenmechaniker in für Sanitär Heizungs und Klimatechnik bzw einem Beruf mit vergleichbarem Kenntnisstand ent sprechen Fachmann Bei der Installation und Inbetriebnahme muss folgendes beachtet werden einschlägige regionale und überregionale Vorschriften Unfallverhütungsvorschriften der Berufsgenossenschaft Anweisungen und Sicherheitsh...

Page 3: ... den neuen Reglereinsatz gekennzeichnet mit L gemäß der Abbildung mit der abgeflachten Seite nach oben ein und schrauben Sie ihn fest 3 2 Von Vorlauf links auf Vorlauf rechts 1 Demontieren Sie den vorhandenen Mischereinsatz gekennzeichnet mit L 2 Demontieren Sie den Deckel auf der Rückseite 3 Drehen Sie den Mischer um und montieren Sie den Deckel auf der anderen Seite des Mischers Achtung Deckel n...

Page 4: ...l knowledge commensurate with a recognised vocational qualification as a fitter for plumbing heating and air conditioning technology or a profession requiring a comparable level of knowledge specialist The following must be observed during installation and commissioning Relevant local and national prescriptions Accident prevention regulations of the professional association Instructions and safety...

Page 5: ...ention do not jam the cover 4 Insert the new cartridge marked L with the flat side to the top as shown in the figure below and tighten the screws 3 2 from flow on the left to flow on the right 1 Dismount the existing mixing valve cartridge marked L 2 Dismount the cover on the back side 3 Turn the mixing valve by 180 and mount the cover on the other side of the mixing valve attention do not jam the...

Page 6: ...echnique sanitaire du chauffage et de la climatisation ou à une qualification comparable Expert Lors de l installation et la mise en service il faut respecter les règles nationales et régionales s appliquant au secteur les directives sur la prévention des accidents de travail les instructions et consignes de sécurité de ce document AVIS Dégâts matériels dus à des huiles minérales Les produits cont...

Page 7: ...Insérez la nouvelle garniture marquée par L dans la vanne mélangeuse avec le côté aplati en haut comme montré dans la figure ci dessous Serrez les vis 3 2 de départ à gauche en départ à droite 1 Démontez la garniture existante de la vanne mélangeuse marquée par L 2 Démontez le couvercle au côté arriére 3 Tournez la vanne mélangeuse de 180 et montez le couvercle à l autre côté de la vanne attention...

Page 8: ...e los componentes eléctricos requieren conocimientos técnicos correspondientes a la profesión de mecánico de instalaciones sanitarias de calefacción y aire acondicionado u otra profesión con similar nivel de conocimientos técnicos técnico especializado Durante la instalación y la puesta en servicio debe prestarse atención a lo siguiente normativa regional y supraregional correspondiente normativa ...

Page 9: ... ladee la cobertura Insierte el nuevo interior marcado con L según la ilustración con el lado aplanado hacia arriba y atornille el mezclador 3 2 de alimentación a la izquierda a alimentación a la derecha 1 Desmonte el interior del mezclador existente marcado con L 2 Desmonte la cobertura en el parte posterior del mezclador 3 Invierta el mezclador e instale la cobertura al otro lado del mezclador P...

Page 10: ...essionale riconosciuto come impiantista termotecnico per impianti sanitari di riscaldamento e di condizionamento ovvero a una professione con pari livello di conoscenze esperto Durante l installazione e la messa in funzione deve essere osservato quanto segue normative regionali e sovraregionali rilevanti norme antinfortunistiche dell Istituto di assicurazione contro gli infortuni sul lavoro indica...

Page 11: ...rchio 8 Montare il nuovo inserto del regolatore contrassegnato dalla lettera L con il lato appiattito verso l alto come mostrato in figura e serrare bene 6 2 da mandata a sinistra a mandata a destra 5 Smontare l inserto presente nella valvola miscelatrice contrassegnato dalla lettera L 6 Smontare il coperchio sul retro 7 Voltare la valvola miscelatrice e montare il coperchio sull altro lato della ...

Page 12: ...alten We reserve the right to make technical changes without notice Sous réserve de modifications techniques Sujeto a modificaciones técnicas Con riserva di modifiche tecniche Printed in Germany Copyright by PAW GmbH Co KG PAW GmbH Co KG Böcklerstraße 11 D 31789 Hameln Germany www paw eu Tel 49 0 5151 9856 0 Fax 49 0 5151 9856 98 ...

Reviews: