background image

3.

Slide the metal rod into the hole in the Station’s corner
support and through the support brace until the rod exits
through the hole in the other corner support.  You may
have to reach under the support brace to guide the rod
into the opposite hole.

4.

Finish tightening the screws to secure the support brace.

5.

Remove the metal rod.

6.

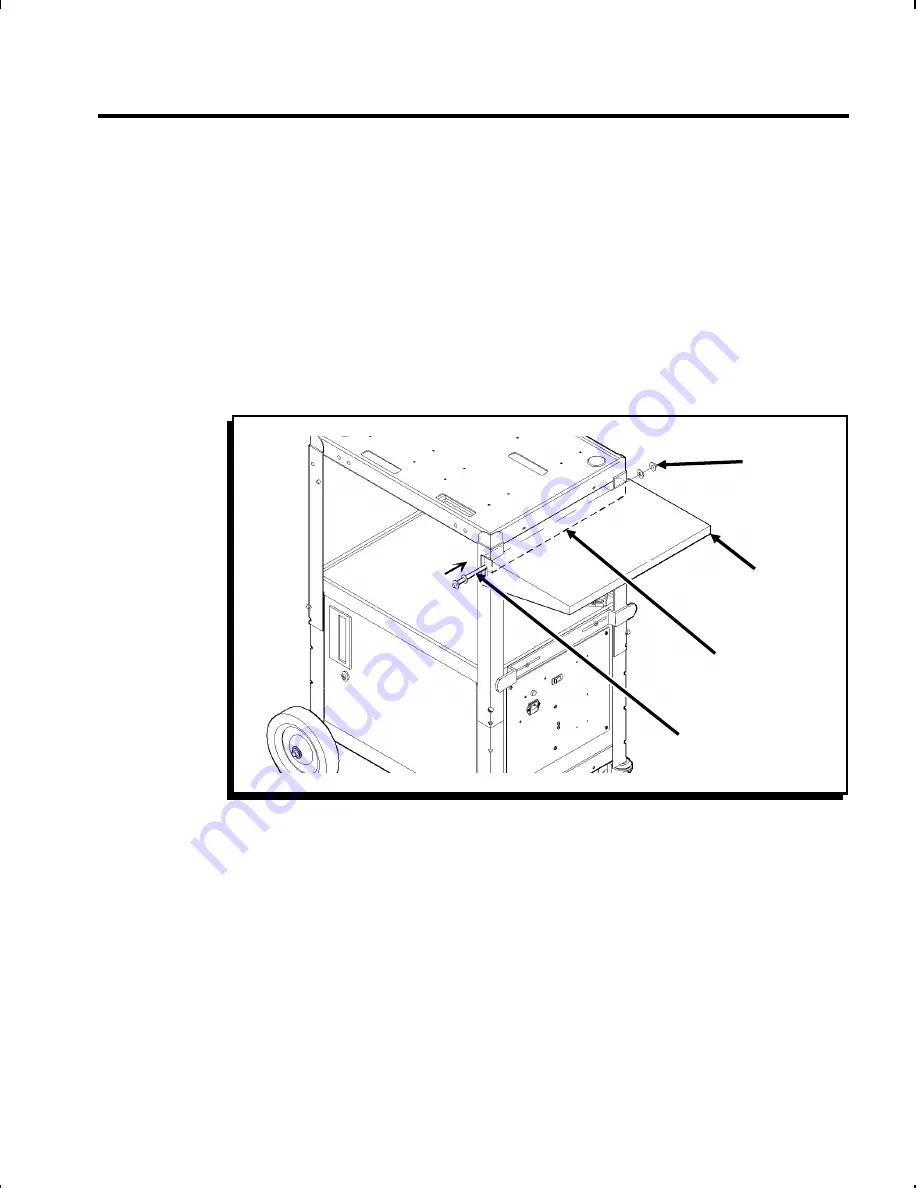
Position the rear lip of the drop shelf over the support
brace so the shelf rests in the extended position.  
(Figure 7.)

w

To avoid hitting your fingers, use needle-nose pliers to hold
the end cap as you are hammering it.

7.

On a firm surface, using a piece of cardboard for a pad,
stand the metal rod on one end.  Hammer an end cap onto
the metal rod.  The end cap should lock firmly.

8.

Slide a plastic washer onto the metal rod.

Figure 7

Metal
Rod

end cap

Drop
Shelf

Support
Brace


Chapter 1.  Assembling the Station


1-11

Summary of Contents for Mobile Printing Station Monarch 9476

Page 1: ...TC9476OI Rev AA 4 99 1995 Monarch Marking Systems Inc All rights reserved Assembly and Setup Instructions MonarchTM 9476TM Mobile Printing Station ...

Page 2: ...nst harmful interference when the equipment is operated in a commercial environment This equipment generates uses and can radiate radio frequency energy and if not installed and used in accordance with the instruction manual may cause harmful interference to radio communications Operation of this equipment in a residential area is likely to cause harmful interference in which case the user will be...

Page 3: ...n F install the printers F load fan fold supplies F charge the Station s battery Audience This manual is designed for the person assembling the Station and setting it up to print supplies wOnly qualified service personnel may install or replace the 12 volt battery for the Station Service personnel should have appropriate technical training and experience necessary to F install or replace a 12 volt...

Page 4: ...he printer MPCLII Packet Reference Manual TCMPCL2PM F define an online address for a printer Addressing a Monarch 9490 Printer TCMPCLIDAD F select a printer on the Station to receive online packets F select printer voltage F load ribbon 9490 Operator s Handbook TC9490OH F troubleshoot printers F solve printer problems 9476 Assembly and Setup Instructions ii ...

Page 5: ...lf 1 10 Attach the Data Entry Terminal Cradle 1 13 Step 5 Installing the Battery and Charger 1 14 Install the Battery 1 14 Install the Battery Charger 1 18 Step 6 Installing the Printers 1 22 Attach the Printer Brackets 1 22 Attach the Printers 1 23 Chapter 2 Loading Supplies 2 1 Loading Fan Fold Supplies 2 3 Loading Roll Supplies in Fan Fold Printers 2 9 Loading Ribbon 2 14 Reloading a Ribbon Cas...

Page 6: ...eshooting 4 1 Solving Problems 4 1 Changing Fuses 4 2 Changing the Battery Fuse 4 2 Changing the AC Fuse 4 4 Chapter 5 Specifications 5 1 Utility Cart 5 1 Battery 5 1 Charger 5 3 9476 Assembly and Setup Instructions iv ...

Page 7: ...fy screws and bolts nThis list does not include parts for optional items See Attaching Optional Items for a list of these parts General Cart Packaging Packaged separately Package 1 F 1 utility cart F 2 large washers F 1 axle F 2 axle end caps F 2 axle mounts F 1 chrome handle insert F 2 axle end caps F 4 1 4 20 wing nuts black F 1 heavy duty power cord F 2 5 8 phillips screws black F 2 4 casters w...

Page 8: ... Packaging F 4 retainer rods F 1 battery charger F 2 8 supply holder brackets with magnets F 2 universal battery hold down rubber brackets F 1 power cord packaged in charger carton Package 1 F 1 rechargeable 12 volt battery F 2 M5 x 15mm phillips hex bolts F 3 M5 lock washers Package 2 F 4 1 4 20 wing nuts F 4 1 4 20 lock washers F 2 M5 washers F 4 1 4 20 washers F 2 M5 nuts F 1 M5 x 10mm phillips...

Page 9: ... axle wTo avoid hitting your fingers use needle nose pliers to hold the end cap as you are hammering it onto the axle 2 You may need an assistant for this step Remove the collapsed Station assembly from the carton Hold the top piece of packaging against the top of the Station and turn the Station upside down on a firm surface The top packaging serves as a pad to protect the printer power packs whi...

Page 10: ... the following parts in this order onto the axle one wheel one washer and two axle mounts Figure 1 nDo Not install the second end cap without first inserting the axle mounts into the sockets The sockets prevent the axles from being positioned too close together Figure 1 Axle Mount Axle Wheel end cap Washer Washer 9476 Assembly and Setup Instructions 1 4 ...

Page 11: ...ncapped end of the axle Press the cap firmly with your thumb to temporarily hold the cap in place 7 Hold the axle firmly with one hand while tapping the end cap onto the axle with a rubber mallet Make sure the end cap fits firmly onto the axle 8 Push the two casters into the sockets in the bottom of the front legs Figure 2 9 Tap the axle mounts and casters with a rubber mallet to fully seat them F...

Page 12: ...ation s cabinet and remove the packaging from around the bottom of the cable tube and from the cables 4 You might need another person s help with this step Lift the top shelf to the second highest height adjustment Make sure the cables inside the cable tube feed freely as you lift the top shelf Insert bolts into the holes in all four legs and fasten them with wing nuts as shown Figure 3 Figure 3 C...

Page 13: ...e cable tube Use pliers to secure the cable clamp tightly Figure 3 Step 3 Attaching the Cabinet Handle and Cord Bracket Follow the steps below to install the cabinet handle and cord bracket 1 Remove the following items from their packaging F chrome handle insert F two 5 8 phillips screws black F cord bracket F two 8 32 x 1 2 slotted screws black F two 8 32 nuts lockwashers black Chapter 1 Assembli...

Page 14: ...he bracket with two 1 2 slotted screws and 8 32 nuts lockwashers Figure 4 Step 4 Attaching Optional Items This section describes how to attach the optional drop shelf push handle and data entry terminal cradle Each optional item and necessary mounting hardware is packaged individually These are optional items if you did not order them skip to step 5 Figure 4 Cord Bracket Handle Insert 9476 Assembl...

Page 15: ...g F 1 push handle F 4 1 4 20 x 3 4 hex bolts F 4 1 4 20 nuts F 4 1 4 20 washers 2 Attach the push handle to the front or rear of the Station using four 3 4 hex bolts 1 4 20 washers and 1 4 20 nuts as shown Figure 5 Figure 5 Push Handle Chapter 1 Assembling the Station 1 9 ...

Page 16: ... phillips screws F 2 plastic washers 2 Attach the support brace to the Station s corner supports on either the front or the rear of the Station using two 1 2 phillips screws The open side of the support brace must face down Figure 6 nDo not tighten the screws completely Figure 6 Corner Support Support Brace 9476 Assembly and Setup Instructions 1 10 ...

Page 17: ...the metal rod 6 Position the rear lip of the drop shelf over the support brace so the shelf rests in the extended position Figure 7 wTo avoid hitting your fingers use needle nose pliers to hold the end cap as you are hammering it 7 On a firm surface using a piece of cardboard for a pad stand the metal rod on one end Hammer an end cap onto the metal rod The end cap should lock firmly 8 Slide a plas...

Page 18: ...d Figure 7 11 You might need another person s help with this step Hold the head or side of a hammer firmly against the end of the rod with the end cap While maintaining pressure use a second hammer to hammer an end cap onto the exposed end of the rod The end cap should lock firmly Figure 7 12 To collapse the shelf lift the shelf from the sides and allow it to swing down Figure 8 To extend the shel...

Page 19: ...ata entry terminal cradle is shipped fully assembled To attach it place it as shown on any of the Station s shelves The magnets on the cradle anchor it to the Station Figure 9 Figure 9 Terminal Cradle Magnet Chapter 1 Assembling the Station 1 13 ...

Page 20: ...stall or replace the battery 1 Remove the following items from their packaging F 1 12 volt battery F 2 metal retainer rods F 2 1 4 20 wing nuts F 1 rubber bracket F 1 green wire F 1 M5 x 10mm phillips screw F 2 M5 x 15mm phillips hex bolts F 3 M5 nuts F 2 1 4 20 washers F 2 1 4 20 lockwashers F 2 M5 washers F 3 M5 lockwashers 9476 Assembly and Setup Instructions 1 14 ...

Page 21: ...d s short end end without the threads into one of the two holes as shown Tilt the long end of the retainer rod up until it slides down through the hole Repeat the process with the other retainer rod in the other hole Figure 10 Figure 10 Retainer Rod Chapter 1 Assembling the Station 1 15 ...

Page 22: ...lide the battery to the back of the cabinet 5 Use a 15mm bolt washer lockwasher and M5 nut to attach the two black wires and green ground wire to the negative battery post Figure 11 6 Position the battery between the retainer rods The writing on the battery should face out Figure 12 Figure 11 Green Ground Wire Black Wires Negative Positive White Wire 9476 Assembly and Setup Instructions 1 16 ...

Page 23: ...attery Use 1 4 20 wing nuts washers and lockwashers to attach the retainer rods to the rubber bracket Tighten both wing nuts equally to secure the battery Figure 12 Figure 12 Ground Wire Rubber Bracket Retainer Rod Chapter 1 Assembling the Station 1 17 ...

Page 24: ...om their packaging F 1 battery charger F 2 metal retainer rods F 1 rubber bracket F 2 1 4 20 wing nuts F 2 1 4 20 washers F 2 1 4 20 lockwashers F 1 power cord packaged with the battery charger F 1 power cord heavy duty 9476 Assembly and Setup Instructions 1 18 ...

Page 25: ...d s short end end without the threads into one of the two holes as shown Tilt the long end of the retainer rod up until it slides down through the hole Repeat the process with the other retainer rod in the other hole Figure 13 Figure 13 Retainer Rod Chapter 1 Assembling the Station 1 19 ...

Page 26: ...ble into the battery socket on the back of the charger Figure 14 The cable is keyed 5 Make sure the voltage selector switch on the back of the charger is set correctly 115V in U S 6 Place the charger on the cabinet floor Figure 14 Battery Cable Battery Socket Power Socket Power Cord Voltage Selector 9476 Assembly and Setup Instructions 1 20 ...

Page 27: ...rubber bracket across the top of the charger Use 1 4 20 wing nuts washers and lockwashers to attach the retainer rods to the rubber bracket as shown Tighten both wing nuts equally to secure the charger Figure 15 9 Plug the charger s power cord into the power outlet on the inside wall of the cabinet Figure 15 Retainer Rod ExternalPower Socket Rubber Bracket Chapter 1 Assembling the Station 1 21 ...

Page 28: ...ry charger The cabinet must remain locked at all times and the key must be stored with qualified service personnel Step 6 Installing the Printers Follow the steps below to attach the printer brackets and printers to the Station Attach the Printer Brackets 1 Remove the following items from their packaging F printer brackets 1 4 depending on your system F M4 x 8mm phillips sems screws and M4 nuts 4 ...

Page 29: ...s in the shelf and fasten with 8mm screws and M4 nuts Figure 16 nAll printer brackets must face the same direction Attach the Printers For each printer you install follow these steps nSee your 9490 Operator s Handbook for more information on attaching the power pack and communication cable Figure 16 Printer Bracket Fan Fold Slot Chapter 1 Assembling the Station 1 23 ...

Page 30: ...re 17 2 The power packs for the printers are attached to the Station s top shelf Insert the tabs on the power pack into the slots of the battery well in the base of the printer Push down until the latch snaps into place Figure 18 Figure 17 Shoulder Screw Figure 18 Power Pack Battery Well 9476 Assembly and Setup Instructions 1 24 ...

Page 31: ...r s shoulder screws slide into the vertical slots in the printer brackets Make sure the back of the printer rests against the upturned metal ledge on the printer bracket The printer should lean back slightly Figure 19 Figure 19 Fan fold Slot Shoulder Screw Printer Bracket Metal Ledge Chapter 1 Assembling the Station 1 25 ...

Page 32: ...ation cables for the printers are located inside the Station s cable tube Insert the communication cable into the printer port as shown Figure 20 Figure 20 Printer Port Cable 9476 Assembly and Setup Instructions 1 26 ...

Page 33: ...pes of supplies See your 9490 Operator s Handbook to load roll supplies in roll fed printers nThe Station can accommodate a maximum of two fan fold printers if the fan fold supply stack is longer than six inches Before loading supplies you must open the printer 1 Insert your fingers into the depression beneath the faceplate and pull up Figure 21 Figure 21 Supply Guide Faceplate 2 1 ...

Page 34: ...nd down as shown Figure 22 3 Tip the printhead assembly up and over the platen roller as shown Figure 23 Figure 22 Supply Guide Figure 23 Printhead Assembly Platen Roller Pinch Rollers Peel Bar 9476 Assembly and Setup Instructions 2 2 ...

Page 35: ...ely Loading Fan Fold Supplies To load fan fold supplies into your printer follow the steps below nWhen using fan fold labels load for non peel mode only Non peel mode feeds the labels through the printer without peeling them from the backing paper The printer does not print fan fold labels in peel mode 1 Open the printer Figure 24 Latches Chapter 2 Loading Supplies 2 3 ...

Page 36: ...the O rings skip to step 6 3 Lift one end of the supply deflector to remove it from the supply well You may have to gently spread the supply holders apart to release the supply deflector Figure 25 4 Roll the O rings out of their tracks and into the new positions 5 Replace the supply deflector in the supply well Figure 25 Figure 25 Supply Deflector O Ring 9476 Assembly and Setup Instructions 2 4 ...

Page 37: ...ectly beneath one of the Station s fan fold slots The supply s liner side should face up so the arrow next to the black mark points toward the printer Place the magnetic supply brackets at the opposite corners of the stack as shown Figure 26 8 Lift the supply strip up through the Station s fan fold slot Figure 26 Figure 26 Supply Strip Fan Fold Slot MagneticSupply Bracket Chapter 2 Loading Supplie...

Page 38: ... the back of the supply points toward the printer Center the supply in the printer by lining up the black mark within the centering notch Figure 27 10 Adjust the supply guides to the edges of the supply and turn the latches to lock the supply guides in place Figure 27 Figure 27 Fan Fold Slot Centering Notch Arrow Black Mark Supply Guide Latch 9476 Assembly and Setup Instructions 2 6 ...

Page 39: ...old slot until the strip exits through the back of the printer under the supply deflector The supply strip should feed around the supply deflector and over the top of the printer as shown Figure 28 Figure 28 Supply Deflector Chapter 2 Loading Supplies 2 7 ...

Page 40: ...er opening in the supply guide Figure 29 13 To close the printer push the top assembly toward the printer close the supply guide and latch the faceplate into place Figure 29 Supply Guide Upper Opening 9476 Assembly and Setup Instructions 2 8 ...

Page 41: ...old printer follow the steps below 1 Open the printer 2 Lift one end of the supply deflector to remove it from the supply well You may have to gently spread the supply holders apart to release the supply deflector Figure 30 Figure 30 Supply Deflector Chapter 2 Loading Supplies 2 9 ...

Page 42: ...e width of your supply Figure 31 nMake sure the arrow at the end of the each supply holder points to the correct width The supply holders lock at each width setting Figure 31 Arrow Widthof Supply Tabs Supply Holder 9476 Assembly and Setup Instructions 2 10 ...

Page 43: ... supply holders inside the printer and press until the supply roll snaps into place The supply roll should unwind as shown Figure 32 nMake sure the supplies turn freely in the supply well Figure 32 Supply Holder Chapter 2 Loading Supplies 2 11 ...

Page 44: ...5 For non peel mode printing feed the supply strip through the upper opening in the supply guide Figure 33 Figure 33 Supply Guide Upper Opening 9476 Assembly and Setup Instructions 2 12 ...

Page 45: ...you print labels peel automatically through the top opening in the label guide and the backing paper exits out the bottom opening 7 To close the printer push the top assembly toward the printer close the label guide and latch the faceplate into place Figure 34 Supply Guide Upper Opening Lower Opening Chapter 2 Loading Supplies 2 13 ...

Page 46: ...load the ribbon cassette into the printer 1 Open the printer and remove the ribbon cassette Figure 35 2 Slide a new ribbon cassette onto the printhead assembly until it slips into place 3 Close the printer Figure 35 Ribbon Cassette 9476 Assembly and Setup Instructions 2 14 ...

Page 47: ...e the International Symbols for opening and closing indicates the cassette is locked closed indicates the cassette is unlocked open 2 Rotate both latches until they snap into the unlocked position 3 Lift off the half of the cassette without the latches and set it aside Figure 36 Figure 36 RidgedEndof Take upReel Latch Gear Ribbon Spool Foam Washer Latch Chapter 2 Loading Supplies 2 15 ...

Page 48: ...e of the ribbon faces out F Make sure the latches are still in the unlocked position before fitting the two halves of the cassette together F If you are using a 2 inch or 3 inch wide ribbon push the core of the ribbon roll to seat the ribbon roll onto the cassette s spool Do not touch the ribbon because it may wrinkle and twist 8 Replace the other half of the cassette The two halves should fit tog...

Page 49: ... send commands to specific printers on the Station 1 Connect your data collection unit to the Station s communication cable Figure 37 This communication cable serves all printers on the Station 2 Turn on the Station s power supply and turn on the printers from which you want to print supplies Figure 38 Figure 37 Communication Cable Figure 38 Power Switch Chapter 2 Loading Supplies 2 17 ...

Page 50: ...ress each printer s trigger to calibrate the supply You are now ready to collect data and print nTo conserve the battery make sure the Station s power switch is turned off when not in use 9476 Assembly and Setup Instructions 2 18 ...

Page 51: ...hat the station is receiving power Figure 39 Charge the Station s battery F before using the Station for the first time charge it for 6 hours F when a printer s LED indicates a low battery condition see Battery Life for indications of low battery conditions F when the Station is not in use nWhen the Station is not in use always leave the battery charger plugged in and charging The battery charger ...

Page 52: ... Not let the battery remain fully or partly discharged for a long time keep it charged F If using an extension cord you must use 18 or heavier for lengths up to 50 feet or 16 or heavier for lengths up to 100 feet Use of improper extension cord could cause fire and electric shock F Pull on the plug rather than the cord when disconnecting the battery charger Locate the cords where they will not be s...

Page 53: ...n low battery battery is down to 11 5V The printers still operate until the battery is drained to 10 5V or lower F fast alternating green and amber battery is lower than 5V Printers do not operate F no LED dead battery nThe length of the battery s life is directly effected by the number of discharge cycles depth of discharge charging voltage and the surrounding temperature A cycle is the time from...

Page 54: ...9476 Assembly and Setup Instructions 3 4 ...

Page 55: ...s battery voltage selection is incorrect When connected to the Station the printer must be set to 12 volts Print a test label The printer voltage is indicated after the printer s model number Make sure the Model line says M9490 12v See Addressing a Monarch 9490 Printer to set the printer voltage None of the Station printers print There are three possible problems F The Station s battery is low F O...

Page 56: ...switch on the front of the Station must be off while changing fuses The status light near the power switch should be OFF Changing the Battery Fuse wOnly qualified service personnel may change the battery fuse 1 Turn the Station s power supply off and unplug the power cord Figure 40 Figure 40 Power Switch Status Light 9476 Assembly and Setup Instructions 4 2 ...

Page 57: ...the fuse out of the cover Figure 41 4 Insert a 15 A 32V slow blow fuse size 3AG into the fuse cover until the fuse is fully seated Figure 42 5 Push the fuse cover into the fuse holder and turn clockwise until it locks in place Figure 41 Fuse Cover Fuse Holder Fuse Figure 42 Chapter 4 Troubleshooting 4 3 ...

Page 58: ...ure 43 2 Unplug the other end of the power cord from the Station 3 Use a flathead screwdriver to carefully pry open the fuse cover located under the power socket on the front of the Station Figure 44 Figure 43 Power Switch Figure 44 Fuse Cover Fuse 9476 Assembly and Setup Instructions 4 4 ...

Page 59: ... Insert a 250VAC 6 3 amp slow blow fuse into the fuse holder until the fuse snaps into place Figure 44 6 Push the fuse holder until it snaps back into place Figure 44 7 Plug the power cord back into the power socket on the Station Chapter 4 Troubleshooting 4 5 ...

Page 60: ...9476 Assembly and Setup Instructions 4 6 ...

Page 61: ... inches 61 0 cm Capacity 250 lbs Weight 125 lbs with battery charger and four printers Operating Limits 40 F to 110 F 5 C to 43 C nIf you are using thermal transfer printers printers with ribbons the maximum operating temperature is 95 F 35 C Battery F 12 volt 38 amp hours deep cycle to 10 5V F Sealed lead acid non venting safety venting only no transportation restrictions F Shelf Life Charge Rete...

Page 62: ...y s performance Charger Input 115VAC 10 60Hz IEC connection Output F Reverse polarity and short circuit proof F Temperature compensated F Low voltage start can charge a discharged battery but the battery must be greater than 3V F Smart charging for deep cycle 12 volt lead acid or gelled type battery F 10 amp peak charging current tapering to float monitor charge 9476 Assembly and Setup Instruction...

Page 63: ......

Page 64: ...For supplies service or assistance call TOLL FREE 1 800 543 6650 In the U S A 1 800 263 4650 In Canada www monarch com Published by the Technical Communications Department Printed in the U S A ...

Reviews: