background image

iii


CONSOLE COMMANDS ................................................................................4-1


Help Commands ......................................................................................4-4


General Commands .................................................................................4-6


Setup Commands .................................................................................. 4-11


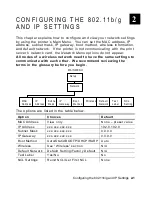
802.11b/g Wireless Commands ............................................................... 4-16


TCP/IP Commands ................................................................................ 4-19


SNMP Commands .................................................................................. 4-22


RFID Commands ................................................................................... 4-22


Using the Network Packet ...................................................................... 4-23


USING THE SMART RELAY SYSTEM .............................................................5-1


Initial Smart Relay Setup Procedures ........................................................5-2


About the Primary Printer .........................................................................5-2


About the Partner Printer .........................................................................5-3


Connecting the Printers............................................................................5-4


Configuring the Partner Printer .................................................................5-5


Using the Smart Relay Telnet Commands ..................................................5-5


About the Smart Relay Counter .................................................................5-7


TROUBLESHOOTING....................................................................................6-1


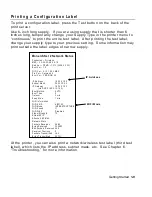
Printing a Test Label ...............................................................................6-1


General Troubleshooting Information .........................................................6-4


Troubleshooting Wireless Configuration Problems ......................................6-7


Technical Support ...................................................................................6-7


SPECIFICATIONS ........................................................................................ A-1


802.3 Specifications ............................................................................... A-1


Optional 802.11b/g Specifications ............................................................ A-1


Options ................................................................................................. A-2


GLOSSARY ................................................................................................. G-1


INDEX .......................................................................................................... I-i 

Summary of Contents for Monarch 9860

Page 1: ...u 9855 u 9860 Monarch Printers TC7411MN2OI Rev AD 5 07 2007 Paxar Americas Inc All rights reserved ...

Page 2: ...trademarks of Paxar Americas Inc Microsoft Windows and NT are trademarks of Microsoft Corporation in the United States and or other countries Firefox is a trademark of Mozilla Corporation UNIX is a trademark of The Open Group Novell and NetWare are trademarks of Novell Inc in the United States and other countries HP Jet Admin and HP Web Jet Admin are trademarks of Hewlett Packard Inc The Bluetooth...

Page 3: ...ork Protocols 1 3 Setting Up the Print Server 1 4 Checking the Print Server Hardware 1 5 Verifying Successful Installation 1 5 Verifying Successful Installation 1 6 About Print Mode Ready 1 8 Printing a Configuration Label 1 9 CONFIGURING THE 802 11B G AND IP SETTINGS 2 1 Saving Settings 2 2 MAC Address 2 2 IP Address 2 3 Subnet Mask 2 4 IP Gateway 2 5 Boot Method 2 6 ...

Page 4: ...guring the Printer 3 4 Changing the Printer Setup 3 5 Changing the System Setup 3 7 Reset Initialize Network 3 8 Configuring the Network Settings 3 9 Changing TCP IP Settings 3 10 Changing SNMP Settings 3 12 Changing Wireless Settings 3 14 Setting Alerts 3 18 Receiving An Alert 3 19 Reading the Virtual Panel 3 20 Using Custom Commands 3 21 Changing the Password 3 22 Updating Firmware 3 24 Basic Se...

Page 5: ... 2 About the Primary Printer 5 2 About the Partner Printer 5 3 Connecting the Printers 5 4 Configuring the Partner Printer 5 5 Using the Smart Relay Telnet Commands 5 5 About the Smart Relay Counter 5 7 TROUBLESHOOTING 6 1 Printing a Test Label 6 1 General Troubleshooting Information 6 4 Troubleshooting Wireless Configuration Problems 6 7 Technical Support 6 7 SPECIFICATIONS A 1 802 3 Specificatio...

Page 6: ...iv ...

Page 7: ... 11g wireless network or wired Ethernet 802 3 network 802 11b g refers to 802 11b and 802 11g in this manual You can use the print server in Ad Hoc peer to peer or infrastructure access point wireless mode The print server operates at speeds of up to 54 Mbps on any IEEE 802 11b g wireless compatible network It includes a dual mode built in wired Ethernet 802 3 connection So the print server automa...

Page 8: ...ns A Specifications Printer and radio specifications G Glossary Networking and printer terms and their definitions System Requirements To use the print server for printing from a wireless network you need an 802 11b g wireless network The wireless network consists of either of the following An 802 11b g wireless enabled computer printing straight to the printer Ad Hoc mode An 802 11b g wireless ac...

Page 9: ...er with an IP address of 192 0 0 192 will not be seen by a network looking for devices with a prefix of 10 1 xxx xxx A router default gateway address is optional Wireless security settings Supported Operating Systems The print server supports multiple network protocols for users with Microsoft Windows Novell NetWare NDS and UNIX Supported Network Protocols TCP IP LPD LPR BOOTP DHCP HP JetDirect Ra...

Page 10: ... Pause Press or until you see IEEE1284 Press Enter Pause to save the setting 3 Press Escape Clear until you see the Main Menu Note MonarchNet2 uses the printer s internal parallel port You can switch between MonarchNet2 and using the parallel port but you must set the Port to External and the Mode to Compatible Then turn off the printer and turn it back on to detect the cable MonarchNet2 is not av...

Page 11: ...Started 1 5 Checking the Print Server Hardware The Ethernet print server comes preinstalled and tested in your printer Test Button Antenna Serial Port LEDs 9855 Plastic Cover Printer Parallel Port Ethernet Port ...

Page 12: ...arily Then the LEDs indicate the following activity LED Indicators Status solid printer is on blinking error Orange off printer is off solid Ethernet link wired 10baseT blinking network activity Yellow off no Ethernet connection solid Ethernet link wired 100baseTX blinking network activity Green off no Ethernet connection solid wireless link blinking network activity Yellow Green off no wireless c...

Page 13: ...eset the print server to its factory default parameters see Default Network for more information LED Status Indicators The orange light comes on when the printer is turned on The yellow light comes on solid when an Ethernet link wired 10baseT is established The green light comes on solid when an Ethernet link wired 100baseTX is established Both the yellow and green lights come on solid when a wire...

Page 14: ...nd the MonarchNet2 protocol It may take a minute or more before a wireless connection is associated between the print server and the access point N Print Mode Ready A connection is established between the Ethernet print server and the MonarchNet2 protocol It may take a minute or more before a wired connection is associated with the Ethernet print server and the network The boxes on the display ind...

Page 15: ...Ver CZMO 7 01L 2006 05 23 Boot Ver 1 0 WiFi Ver 2 13 10 0 LMAC Prn Ver Version 5 0 Boot Ver VERSION 3 2 IP Address 192 0 0 192 Subnet Mask 255 255 0 0 IP Gateway 192 0 0 192 via DHCP 192 0 10 192 Boot Method AUTO Boot Tries 3 Timeout 0 min Keep Alive 1 min WiFi Information WiFi SSID ABC123 WiFi Mode INFRASTRUCTURE WiFi Speed 11 WiFi WEP Disabled Signal Strength 72 Actual SSID Attached AP MAC Netwo...

Page 16: ...1 10 MonarchNet2 Operating Instructions ...

Page 17: ...ork need to have the same settings to communicate with each other We recommend reviewing the terms in the glossary before you begin MAIN MENU The options are listed in the table below Option Choices Default MAC Address View only None preset value IP Address xxx xxx xxx xxx 192 0 192 0 Subnet Mask xxx xxx xxx xxx 0 0 0 0 IP Gateway xxx xxx xxx xxx 0 0 0 0 Boot Method Auto Static BOOTP DHCP RARP Aut...

Page 18: ... to inform your System Administrator if you change any settings Keep a record of each of your network printer s settings in a safe place MAC Address The Media Access Control MAC Address is a hard coded value that cannot be changed like a serial number It consists of four 3 digit numeric fields usually separated by periods The MAC address of the print server is located on the label of the printer s...

Page 19: ...After you display the option you need press Enter Pause For example to change the IP address from 192 to 000 press or to highlight the first position and press Feed Cut until you see 0 then press to select the next position and press Feed Cut until you see 0 then press to select the next position and press Feed Cut until you see 0 Press Enter Pause to save the setting or press Escape Clear to exit...

Page 20: ... from 0 9 After you display the option you need press Enter Pause For example to change the subnet mask from 192 to 000 press or to highlight the first position and press Feed Cut until you see 0 then press to select the next position and press Feed Cut until you see 0 then press to select the next position and press Feed Cut until you see 0 Press Enter Pause to save the setting or press Escape Cl...

Page 21: ...er you display the option you need press Enter Pause For example to change the Gateway Address from 192 to 000 press or to highlight the first position and press Feed Cut until you see 0 then press to select the next position and press Feed Cut until you see 0 then press to select the next position and press Feed Cut until you see 0 Press Enter Pause to save the setting or press Escape Clear to ex...

Page 22: ...IP address remains the same every time the device connects to the network BOOTP The device broadcasts its hardware address and the MAC address and the BOOTP server responds with the IP address DHCP The network automatically assigns IP addresses within a specified range to devices when they are first turned on A device could have a different IP address every time it connects to the network RARP The...

Page 23: ...on you need press Enter Pause 4 Press Escape Clear until you see the Main Menu Wireless Using the Wireless Menu you can view the signal strength set the Service Set Identifier SSID wireless mode A Point density transmit rate and channel Note All nodes of a wireless network need to have the same settings to communicate with each other We recommend reviewing the terms in the glossary before you begi...

Page 24: ...of the access point s range With a percentage below 50 printing performance could be affected If the signal strength is low increase the number of retries To improve the signal strength try moving the printer closer to the access point and away from other radio devices such as Bluetooth wireless devices microwave ovens or 2 4 gigahertz cordless phones Note If the printer is not communicating with ...

Page 25: ...xample SSID ABC1234 3 Press or to move through the positions Hold Feed Cut to scroll quickly through the characters from 0 9 A Z a z or press Feed Cut once to scroll one character at a time After you display the character you need press Enter Pause You must press Enter Pause after each character to save the change and continue To clear the SSID press and at the same time when you are at the end of...

Page 26: ...structure mode requires an access point to communicate Note If communicating in a mixed environment where both Ad Hoc and infrastructure mode are used make sure the SSIDs are unique in both modes From the Main Menu Select Setup Network Wireless Then follow these steps 1 Press or until you see WIRELESS Wireless Mode 2 Press Enter Pause The current setting is displayed for example WiFi Mode Ad Hoc 3...

Page 27: ...High If set to High density the device searches for another access point in range using 11 Mbps communications Medium uses 2 to 5 5 Mbps communications Low uses 1 to 2 Mbps communications From the Main Menu Select Setup Network Wireless Then follow these steps 1 Press or until you see WIRELESS APoint Density 2 Press Enter Pause The current setting is displayed for example APOINT DENSITY Low 3 Pres...

Page 28: ... 36 48 or 54 The transmit rate is negotiated with the access point and this setting may be ignored From the Main Menu Select Setup Network Wireless Then follow these steps 1 Press or until you see WIRELESS Transmit Rate 2 Press Enter Pause The current setting is displayed for example TRANSMIT RATE 1 3 Press or to change the setting After you display the option you need press Enter Pause 4 Press Es...

Page 29: ...annel is negotiated with the access point and this setting is ignored Note Make sure all network devices are set to the same channel From the Main Menu Select Setup Network Wireless Then follow these steps 1 Press or until you see WIRELESS Channel 2 Press Enter Pause The current setting is displayed for example Channel 1 11 5 3 Press or to change the setting After you display the option you need p...

Page 30: ...ll your specific network settings including IP address SSID etc To change the setting from the Main Menu Select Setup Network Then follow these steps 1 Press or until you see NETWORK Default Network 2 Press Enter Pause Default Network Default Setting 3 After you display the option you need press Enter Pause The print server is reset to your defaults or factory defaults 4 Press Escape Clear until y...

Page 31: ...d Name PXR_xxxxxx xxxxxx the last six digits of the MAC address IP Address Subnet Mask IP Gateway Boot Method Boot Tries 3 Timeout 0 min Keep Alive 1 min SSID none LPD banner Disabled LPD retries Disabled Port X1 TCP port 9100 WiFi Mode infrastructure Speed 54 Actual SSID discover any AP set for broadcast Encryption Disabled Authentication Type Open System AP density Low International Roaming Flex...

Page 32: ... If the label is too small some information may print outside the label edges To change the setting from the Main Menu Select Setup Network Then follow these steps 1 Press or until you see NETWORK Test Label 2 Press Enter Pause Test Label No 3 Press to display Yes and press Enter Pause The configuration label prints See Printing a Configuration Label earlier in this manual for a sample label ...

Page 33: ...rocess the NCL file saved in the printer s flash memory An NCL file exists in flash memory if the word NCL appears on the first test label s right side Use Get First NCL to process the first initial configuration file This file can be configured to mimic factory default settings For more information about NCL refer to the Network Control Language Programmer s Manual To change the setting from the ...

Page 34: ...2 18 MonarchNet2 Operating Instructions ...

Page 35: ...n in this manual may not exactly match the software The recommended screen area resolution for your computer is 1024 x 768 pixels Before you begin you need to know your printer s IP address The printer should be turned on and ready to receive data It may take a minute or more depending on network traffic for the print server to connect to an access point When the printer is connected to an access ...

Page 36: ... the N network symbol or the antenna symbol when the printer is connected and ready to receive data If the printer is experiencing a ribbon or supply problem this graphic appears with a red background for Printer Status If the printer has a wireless connection this graphic appears for Signal Quality If the printer has an AC power connection this graphic appears for Power Status ...

Page 37: ...tor Log On or the printer s name for example PXR_8A983A 4 Type access for the password and click Submit You do not need a User Name The password is case sensitive and saved in the printer s flash memory See Access Control to change the password ...

Page 38: ...name IP address installed enabled options and more Click the Tech Support tab if you need to contact us Configuring the Printer You can configure the printer using your Web browser 1 From the side Menu Bar click Printer Configuration 2 Select one of the following tabs Printer Setup or Supply Setup Tabs Side Menu Bar ...

Page 39: ...k or Continuous If you are using edge aperture supplies use the die cut setting If you are using center aperture supplies use the aperture setting 3 Set the Feed Mode Continuous or On Demand 4 Enter a value for the Cut Adjust Position The range is 300 to 300 This adjusts where the tag is cut 5 Enter a value for the Supply Position The range is 300 to 300 This adjusts the printer to print at the ve...

Page 40: ...Dispense Position range is 50 to 200 This adjusts the stopping point of the label after it is printed 10 Enter a value for the Backfeed Distance range is 10 to 200 This is the amount to move the label backwards before printing 11 Enter a value for the Contrast range is 699 to 699 This adjusts the darkness of printing on the supply 12 Enter a value for the Print Position range is 450 to 450 This ad...

Page 41: ... printer is turned off 2 Set the Speed Adjustment Default 2 5 4 0 6 0 8 0 10 0 or 12 0 ips If you select Default serial bar codes print at 2 5 ips parallel bar codes print at 6 0 ips 3 Set the Power Up Mode Online or Offline 4 Select the Prompt Set English French German Spanish ES Japanese Portuguese Italian Swedish Spanish MX Danish Dutch Finnish or Norwegian 5 Set the Monetary Sign None USA UK J...

Page 42: ...lash Ø No or Yes 9 Click Submit when finished Reset Initialize Network Click Save Re init Network on the Protocols tab to reset and initialize the network interface Any changes made on previous screens do not take effect until you click Reset Network This process takes a few minutes for the printer to respond with the new settings ...

Page 43: ... 3 9 Configuring the Network Settings You can configure the print server to operate on your network 1 From the side Menu Bar click Network Configuration 2 Select one of the following tabs Protocols SNMP Wireless or Alerts ...

Page 44: ...cols tab set the Boot Method Auto BOOTP DHCP RARP or Static 2 Set the number of Boot Tries 1 10 The default is 3 If you are having a problem receiving an IP address with BOOTP set this number to 10 3 Change the IP Address if necessary 4 Set or change the Subnet Mask 5 Set or change the Gateway 6 Select either No Subnet or No Gateway for RARP ...

Page 45: ...or or the current date and time 13 Enter the Time Zone Adjustment in hours and minutes from Greenwich Mean Time GMT This offset varies by location and time zone For example Eastern Standard time is five hours behind GMT Use 5 00 for the offset For an offset of 3 5 hours use 3 30 Note Changes for Daylight Savings Time are not made automatically If your time zone participates in Daylight Savings Tim...

Page 46: ... HP JetAdmin 22 Click Save Changes to save changes or click Save Re init Network to save the changes and re initialize the network with the new settings Any changes made on this screen or other screens do not take effect until you click Save Re init Network This process takes a few minutes Changing SNMP Settings Only configure the settings required for your network printer 1 Click the SNMP tab to ...

Page 47: ...ly appear 9 Enter the Trap IP port if it does not automatically appear 10 Enable SNMP Alerts if necessary Set which alerts you need to receive See Setting Alerts for more information 11 Click Submit when you are finished 12 Click the Protocols tab 13 Click Save Re init Network on the Protocols tab before any changes take effect Even though you submitted your changes on the previous screen they do ...

Page 48: ... not need an access point Infrastructure mode requires an access point to communicate 3 Set the SSID The SSID is a unique identifier that must match for all nodes on a subnetwork to communicate with each other 4 Select the Radio type 802 11b or 802 11b g 5 Set the Ad Hoc channel 1 to 11 All devices must be on the same channel to communicate 6 Set the Speed 1 2 5 5 11 12 18 24 36 48 or 54 megabits ...

Page 49: ...fied on a network These options vary depending on what was selected as the Encryption Mode See Basic Security Configurations for more information 12 Enable WPA Group Key to use a group key for data link encryption 13 Enter the maximum number of Authentication Attempts 14 Enter the Pre shared key which must be exactly 64 hex characters If using a pass phrase it must be 8 to 63 displayable character...

Page 50: ... each other on the network Note As you enter the values for the WEP keys you can see the characters However the next time you view this tab the values are displayed as asterisks 3 Click Submit when finished 4 Click the Protocols tab 5 Click Save Re init Network on the Protocols tab before any changes take effect Even though you submitted your changes on the previous screen they do not take effect ...

Page 51: ...s almost always 65537 default See Basic Security Configurations for more information The Certificate Root Key is used to verify the root certificate in the certificate chain provided by the authentication server Leaving this field blank sets the value to null The Certificate Root Key Exponent value must match the authentication server certificate value 3 Enter the Certificate Common Name 1 which i...

Page 52: ... changes on the previous screen they do not take effect until you click Save Re init Network This process takes a few minutes Setting Alerts Alerts and SNMP are supported with the release of version 3 0 or greater printer firmware The printer also contains the minimum set required to be compliant with printer MIB version 2 0 RFC 3805 1 Click the Alerts tab to setup the mail server and select users...

Page 53: ... Protocols tab before any changes take effect Even though you submitted your changes on the previous screen they do not take effect until you click Save Re init Network This process takes a few minutes Receiving An Alert When the printer goes offline has a ribbon error or any other error that you selected notification for a similar email appears in the specified User s inbox The text of the email ...

Page 54: ... s control panel You can use the virtual panel to clear errors feed labels and more 1 From the side Menu Bar click Virtual Panel Display 2 The current status of the printer appears on the virtual panel s display 3 If there is an error click Escape Clear to clear the error If you want to feed a label click Feed Cut ...

Page 55: ...nu allows you to enter MPCL format and batch data to print a label or enter Telnet console commands 1 From the side Menu Bar click Custom Command 2 Enter any MCPL format and batch data or enter a Telnet console command See Chapter 4 Console Commands for more information ...

Page 56: ...word for MonarchNet2 This should only be done by your System Administrator The default is access The password is case sensitive and saved in the printer s flash memory Note Make a note of the password if you change it Changing the password also restricts access to Telnet sessions 1 From the side Menu Bar click Access Control 2 Enter the Current Password 3 Enter the New Password ...

Page 57: ... Press Submit when finished If you change the password and attempt to log in using the old password this message appears It also appears for various error conditions when configuring the printer 6 Click LOGIN to login using the correct password and correct the problem ...

Page 58: ...connected and ready to receive data 3 Enter the TFTP Server IP Address 4 Enter the Firmware Path and Filename relative pathname to your TFTP server Refer to your TFTP Server s documentation for more information about setting up and using the TFTP server Note Depending on your TFTP server you may only need the filename not the entire path 5 Click Submit to load the firmware If you lose power while ...

Page 59: ... This is the 64 or 128 bit WEP Key that must match other nodes encryption keys in order to communicate The user can only define 10 hex characters 40 bits for 64 bit WEP or 26 characters 104 bits for 128 bit WEP WPA RC 4 64 128 Improves on WEP by using TKIP Temporal Key Integrity Protocol which dynamically changes the encryption key and MIC Message Integrity Code which replaces CRC WPA 2 AES 128 Im...

Page 60: ... and all host certificates are accepted Required The Print Server comes with a default Private Key Information File You can either download that file from the print server and add it to the TLS authentication server or overwrite a new one on the print server PAC EAP FAST does not use certificates to authenticate but a PAC Protected Access Credential which is managed dynamically by the server The P...

Page 61: ...a Web browser RSH or REMSH remote shell support is available with the release of version 3 0 or greater printer firmware Remote shell support is a common UNIX application that provides remote command execution capability for networked devices For more information refer to your UNIX documentation You can use Telnet if you do not have access to the MonarchNet2 software This chapter also includes inf...

Page 62: ...s Values that contain spaces multiple words must be enclosed within quotation marks For example SEt EN PW value SEt EN PW Store 876 n Numeric digits are indicated by the letter n For example SEt IP BOot n SEt IP BOot 5 SEt EN CHannel nn SEt EN CHannel 11 Accessing Telnet Console Mode 1 Start a Telnet session 2 Type telnet 192 0 0 192 your printer s IP address and press Enter 3 You see Welcome to M...

Page 63: ...nected to SSID ENG4121 on channel 11 5 To show the current IP settings type sh ip show TCP IP settings and press Enter IP is enabled IP address 192 0 0 192 Boot tries 3 Subnet mask 255 255 0 0 Boot method AUTO IP Gateway 192 1 1 192 Max window 10240 via DHCP 192 2 2 192 LPD banner disabled Timeout 0 min LPD retries are disabled Keepalive 1 min Service Port TCP port PXR1E8580_X1 X1 9100 6 To change...

Page 64: ...pecific command type HElp command Syntax Help set DEFAULT Set parameters to factory defaults EN Network Parameters LOAd Firmware update parameters PAssword password Set console password PORt name Parameter for port name PROtect password Set update password SERVEr Server and LAT parameters SERVIce name Service Parameters SNMP SNMP Variables Syslog Syslog Parameters DNS DNS Parameters STRing n BOT E...

Page 65: ... protocol MEthod type Set method of getting IP address PIng aa bb cc dd Test connection to IP host PRObe EN DI TCP connection probes RANge EN DI ALL aa bb cc dd MAx ee ff gg hh RARp flags nn 1 no subnet 2 no router 3 neither REtry EN DI LPD retry continuation ROuter aa bb cc dd Default router address SUbnet aa bb cc dd Subnet mask TCP EN DI Raw TCP 9100 protocol TELnet EN DI TELNET protocol TFTP E...

Page 66: ...ems CLear FATal Deletes fatal error log CLear PAssword Removes the console password CLear POrt portname JOB Clears current entry in the print server s internal queue for the specified portname P1 for the first parallel port CLear PROTect Sets the update password to null CLear SERVEr STRing n Removes BOT EOT string DEfine Defines configuration items DElete Removes configuration item EXIT Exits cons...

Page 67: ...s SET LOAD EN DI Enables or disables firmware reload after exit SET LOAD HOst name Sets node name of boot host NetWare firmware load SET LOAD IP aa bb cc dd Sets IP address of load host TCP IP firmware load SET LOAD SOftware filename Sets print server s firmware filename to load SET LOAD XModem Begins XModem serial download of new firmware SET PAssword Sets console password The user is prompted fo...

Page 68: ...name FIlter nn Sets service filter to nn SET SERVIce servicename FMS nn Sets filter 1 match string to nn SET SERVIce servicename FRS nn Sets filter 1 replace string to nn SET SERVIce servicename NAme newname Changes service name SET SERVIce servicename POrt portname Changes the service port portname is P1 and P2 for the first and second parallel ports and S1 and S2 for the first and second serial ...

Page 69: ...h memory SET PRN FIRMWARE Sets the printer in boot loader mode to reload the firmware SHow PRN FORmats 0 ALl format RAW Shows the specified format from flash memory If no format is specified or you choose 0 or ALl then shows all formats that are stored in flash memory If the optional raw argument is not specified formats are displayed in default format with each field on a separate line and format...

Page 70: ...s bytes SHow PRN TEStlabel Prints a test label SHow PRN UPASSwordstatus Shows the current status of the offline menu user password on or off SET PRN USPASSword status YEs NO Turns the offline menu user password on or off SHow SERVEr Shows the server parameters SHow SERVEr COunters Shows the server statistics SHow SERVEr QUeue Shows the print server internal queue SHow SERVIce Shows service paramet...

Page 71: ...arameter s current setting If no parameter is specified it shows the current settings of all parameters in the backfeedcontrol category SET PRN BATchoptions CLearfields NUmberofparts CUTOption CUTMultiple PRintmultiple QUantity PRompt YEs NO Turns on or off the specified batch entry prompt These parameters also have corresponding values such as cut last ticket for CUTOption SET PRN BATchoptions CL...

Page 72: ...cation category SET PRN CONtrolcharacters STartheader PAramseparator QUotedstrings FIeldseparator ENDheader DAtaescape IMmediatecmd ENQRequest ENQTerminator JObterminator value Sets the specified control character to the specified value Setting the immediate command character enables immediate commands setting the ENQ status request character enables ENQ status polling SHow PRN CONtrolcharacters S...

Page 73: ...gits value Sets the specified monetary parameter to the specified value SHow PRN MONetary MOnetarysign SEcondarysign DEcimaldigits Shows the specified monetary parameter s current setting If no parameter is specified it shows the current settings of all parameters in the monetary category SET PRN PRIntcontrol COntrast PRintoposition MArginposition SPeed PHeadwidth value Sets the specified printcon...

Page 74: ...nts from volatile RAM or flash memory Note that 0 is shorthand for ALl CLear PRN STOrage RAm FLash GRaphics graphic or ALl Clears the specified graphic or all graphics from volatile RAM or flash memory Note that 0 is shorthand for ALl CLear PRN STOrage RAm FLash CDigits CD scheme Clears the specified check digit scheme from volatile RAM or flash memory SET PRN SUPply TYpe RIbbon FEedmode SUpplypos...

Page 75: ...o arguments SET PRN SCRipts ENQpollbeforescript IMmcmdbeforscript value Sets the specified scripts parameter to the specified value SHow PRN SCRipts STatus INfo ENQpollbeforescript IMmcmdbeforescript Shows the specified scripts parameter s current setting If no parameter is specified it shows the currents settings of all parameters in the scripts category SET PRN VERifier STate SCanbeam CAbledetec...

Page 76: ...ore information SET EN CERTCN name Sets the EAP common name If no value is set null all host certificates are accepted SET EN CERTCN2 name Sets the second EAP common name If no value is set null all host certificates are accepted SET EN CERTEXP value Sets the EAP certificate exponent value SET EN CERTKEY keyvalue Sets the EAP root key value SET EN CHannel nn Sets 802 11b g wireless channel SET EN ...

Page 77: ...esent otherwise the radio defaults are used Strict uses access point regulatory frequency information SET EN PW password Sets the password for 802 11b g EAP authentication SET EN KEY 1 2 3 4 Sets which WEP key number to use default is 1 SET EN KEYVAL WEPkey Sets WEP key value Must be hexadecimal SET EN MODE IN AD Sets 802 11b g wireless mode to infrastructure or Ad Hoc mode SET EN RAdio 802 11b 80...

Page 78: ... OUTDOOR ATI AUSTRIA INDOOR LU LUXEMBOURG BE BELGIUM LUI LUXEMBOURG INDOOR BEI BELGIUM INDOOR NL NETHERLANDS CA CANADA NLI NETHERLANDS INDOOR DK DENMARK NZ NEW ZEALAND DKI DENMARK INDOOR NO NORWAY FI FINLAND NOI NORWAY INDOOR FII FINLAND INDOOR CN PRC FR FRANCE PT PORTUGAL FRI FRANCE INDOOR PTI PORTUGAL INDOOR DE GERMANY PL POLAND DEI GERMANY INDOOR SG SINGAPORE GR GREECE ES SPAIN HU HUNGARY ESI S...

Page 79: ...llows a connection to either WPA or non WPA access points SET EN WPAGROUP ENABLE DISABLE Selects whether to use the WPA group key mode When enabled group keys are used for data link encryption SET EN WPAPSK WPAkey Sets the WPA pre shared key or pass phrase Use 64 hex characters for the PSK or 8 63 characters for the pass phrase This is only valid when authentication mode is WPA PSK TCP IP Commands...

Page 80: ...IP HTTP EN DI Selects whether to use the HTTP protocol SET IP KEepalive n Sets keep alive interval n in minutes SET IP LPD EN DI Selects whether to use the LPD protocol SET IP MEthod AUTO BOOTP RARP DHCP STATIC Sets method of getting IP address SET IP PING aa bb cc dd Sends IP ping packets to test the host connection SET IP PRObe EN DI Enables or disables the TCP connection probe SET IP RArp nn 0 ...

Page 81: ...ult subnet mask SET SERVIce servicename IP EN DI Enables or disables TCP IP jobs on specified service SET SERVIce servicename TCP nn Sets TCP port number 1023 on service SET IP TCP EN DI Selects whether to use the raw TCP port 9100 protocol SET IP TELNET EN DI Selects whether to use the Telnet protocol SET IP TFTP EN DI Selects whether to use the TFTP protocol SET IP TImeout n Sets timeout n in mi...

Page 82: ...OCation string Sets SNMP SysLocation SET SNMP JETADmin EN DIS Selects whether to use the JetAdmin protocol RFID Commands SET PRN RFId WRiteattempts PRotocol SIgnal RPower WPower value Sets the specified RFID parameter to the specified value SHow PRN RFId MOduletype VErsion WRiteattempts PRotocol SIgnal RPower WPower REgion FRequency SUmmary COnfiglabel Shows the specified RFID parameter s current ...

Page 83: ...le packet N3 action Enter A to add to packet to the printer N4 device Enter T to pass the packet through the printer and stores the packet in the network card N5 name Packet name 0 8 characters enclose within quotation marks C1 C Command field C2 con_comds Console commands Must be enclosed within quotation marks Each command must be on a separate line The maximum number of characters per command i...

Page 84: ...4 24 MonarchNet2 Operating Instructions ...

Page 85: ...mary printer forwards the batches according to the Smart Relay configuration Use this addendum to configure the Smart Relay commands using Telnet Additionally you can number all the labels in a batch with a collation number that prints on every label The primary printer controls the collation number according to the Smart Relay configuration Note If you need to turn off either printer turn off the...

Page 86: ...ter Wait until you see Smart Relay Ready then turn on the partner printer 9 Send your data About the Primary Printer The primary printer must be a 9855 printer using MonarchNet2 software can have only one partner connects to the partner printer using a serial cable You cannot use the optional external keyboard with the primary printer Note There is no bi directional communication between the prima...

Page 87: ...ee Smart Relay Ready If you print a Network Test label Smart Relay information appears on the bottom of the label indicating this printer is a primary printer About the Partner Printer The partner printer can be a 9855 or 9860 printer The partner printer is unaware that it is a partner printer It can accept data from other sources besides the primary printer Since the partner printer can accept da...

Page 88: ...e next number in sequence for collation The r c numbers indicate the row and column location for the collation number See Chapter 6 Troubleshooting for more information about the test label Connecting the Printers Connect the serial cable 126089 from the 9 pin auxiliary serial port on the primary printer to the 25 pin serial port on the partner printer Partner Printer Primary Printer Use this seri...

Page 89: ...croll until you see 115200 Press Enter Pause 3 Press or to select Word Length Scroll until you see 8 Press Enter Pause 4 Press or to select Stop Bits Scroll until you see 1 Press Enter Pause 5 Press or to select Parity Scroll until you see None Press Enter Pause 6 Press or to select Flow Control Scroll until you see XON XOFF Press Enter Pause Using the Smart Relay Telnet Commands See the following...

Page 90: ...Our Professional Services group can develop custom RFID scripts applications or other types of data manipulation scripts Call Customer Service for more information SET PRN RELay COUNTer NONE 0 9999 Sets the Smart Relay Counter Number to None no counter is used or 0 to 9999 beginning value for counter The default is None SET PRN RELay POS 0 2400 0 2400 Sets the Smart Relay Field position collation ...

Page 91: ...Make sure your format is designed with the Smart Relay Counter Field s height and width in mind so data is not overwritten About the Smart Relay Counter The Smart Relay counter keeps your batches in order Use the collation number to put printed labels back into the order they were sent to the primary printer To use the Smart Relay counter enable the counter and then set the row and column position...

Page 92: ... other sources besides the primary printer are not incremented and have no Smart Relay collation field Note If using the Smart Relay counter do not use the Repeat Batch Cancel All or Cancel Batch menu items These items cause the counter number to be incorrect To set the counter to the correct number use the console command SET PRN REL COUNT xxxx where xxxx is the correct number After you specify t...

Page 93: ...ds A sample configuration label should print See Chapter 1 Getting Started for more information 3 Press and hold and at the same time one second and release A series of test labels print The third test label contains wireless and network settings If the test labels do not print call Service The third test label displays the settings for the IP address subnet address IP gateway boot tries boot meth...

Page 94: ...ending on network traffic The printer does not communicate with your network The network settings must match the print server s settings for IP address gateway and subnet mask SSID Ad Hoc or infrastructure mode Security Cannot see print server on network The devices must be on the same logical network and the subnet masks should be the same Configuration test label shows searching or set manually ...

Page 95: ...request message on your computer Web browser The print server is not communicating on the network Verify network and print server settings including IP address etc MonarchNet2 does not appear to be working Turn off the printer and turn it back on Print a configuration label press the test button on the back of the print server to confirm the IP address etc Enter the correct IP address in your Web ...

Page 96: ...on the print server runs through a set of power up diagnostics for a few seconds All three LEDs blink momentarily Then the LEDs indicate the following activity LED Indicators Status solid printer is on blinking error Orange off printer is off solid Ethernet link wired 10baseT blinking network activity Yellow off no Ethernet connection solid Ethernet link wired 100baseTX blinking network activity G...

Page 97: ...RELESS for RF Check the WiFi SSID and the signal strength Is the SSID correct Is the signal strength greater than zero If the signal strength is 0 there is no connection with the access point 30 or less indicates you may be experiencing interference or close to being out of the access point s range and below 50 printing performance could be affected If the signal strength is low increase the numbe...

Page 98: ...printer using Port 9100 i e telnet aa bb cc dd 9100 Press Ctrl E on your keyboard This sends an ENQ request The printer responds with three characters Depending upon the Telnet being used you may not see the first character as it is a hex 05 value The other two characters are ASCII characters You will see A which means the printer is online and waiting Alternatively you can type J 2 Note The J mus...

Page 99: ...without an access point 4 To use encryption or password protect your wireless network and your wireless adapter or access point normally uses a password or pass phrase instead of WEP it should allow you to enter 0x followed by a ten digit for 40 bit or 64 bit WEP or twenty six digit for 128 bit WEP key in hexadecimal format 0 9 or A F 5 Change the RF channel Ad Hoc mode only to correct intermitten...

Page 100: ...6 8 MonarchNet2 Operating Instructions ...

Page 101: ...TP SNMP NetWare HP Jet Admin 802 3 Specifications Communication Rate 10 Mbps or 100 Mbps Optional 802 11b g Specifications Frequency 2 4 GHz range direct sequence Communication Rate 1 2 5 5 11 12 18 24 36 48 or 54 megabits per second Channels 1 to 11 Mode Ad Hoc or infrastructure Encryption WEP 64 or WEP 128 WPA or WPA2 Authentication EAP FAST LEAP PEAP TLS TTLS PSK A ...

Page 102: ...MonarchNet2 Operating Instructions Options Wireless 802 11b g communications are available However check with International Sales for an approved list of countries or regions where these devices can be used ...

Page 103: ...me and password There are two types open and shared Authentication protocols include LEAP PEAP TLS TTLS EAP FAST and PSK Auto Method One of the available boot methods Auto tries DHCP BOOTP and RARP then sets to the last IP address used if the IP address is not automatically set using any of the previous methods BOOTP or Bootstrap Protocol One of the available boot methods It is a protocol used by ...

Page 104: ... PAC Protected Access Credential which is managed dynamically by the server The PAC is distributed one at a time to the client manually or automatically Gateway Allows connections communications between different subnets on a network Infrastructure Mode Requires an access point to communicate with other devices on the network In infrastructure mode wireless devices can communicate with each other ...

Page 105: ... to authenticate and then attempt to communicate with the access point Any wireless device can authenticate with the access point but if WEP is used the device can communicate only if its WEP keys match the access point s There is no challenge that occurs you either have the correct key or not when you communicate with the access point By eliminating the challenge process it actually makes this mo...

Page 106: ...sends it back to the access point If the challenge text is encrypted correctly the access point allows the requesting device to authenticate Both the unencrypted challenge and the encrypted challenge can be monitored however this leaves the access point open to attack Because of this weakness shared key authentication can be less secure than open authentication Signal Strength A percentage 1 to 10...

Page 107: ... networks that runs on your computer and connects your computer to a server on the network You enter commands through the Telnet program and they run as if you were entering them directly on the server console TCP IP A way that two devices can transmit data between each other TCP IP Transmission Control Protocol Internet Protocol is generally the standard for transmitting data over a network TKIP ...

Page 108: ...abled they all must have it enabled with the same key or they cannot communicate 128 Bit 64 Bit WEP Key This is the 64 or 128 bit WEP key that must match other Nodes encryption keys in order to communicate 10 hex characters for 64 bit 40 user specified characters or 26 hex characters for 128 bit 104 user specified characters You must use the same key values for devices to communicate with each oth...

Page 109: ...up 3 17 channel wireless 2 15 command console 4 1 general 4 6 help 4 4 Smart Relay 5 6 SNMP 4 15 TCPIP 4 13 Telnet 4 1 wireless 4 9 configuration label 1 10 2 18 console commands 4 1 D DHCP 2 8 E EAP FAST authentication 3 26 encryption mode 3 15 3 25 WPA 3 15 3 25 WPA2 3 15 3 25 F firmware update 3 24 front panel printer 3 20 G general commands 4 6 H help commands 4 4 L label configuration 1 10 2 ...

Page 110: ... 3 20 master 5 3 partner 5 3 primary 5 3 settings 3 5 3 6 3 7 slave 5 3 protocols 1 4 PSK authentication 3 26 R RARP 2 8 requirements system 1 3 reset network 3 8 S setting password 3 22 3 23 settings printer 3 5 3 6 3 7 SNMP 3 12 3 13 SSID 2 11 TCPIP 3 10 3 11 WEP 3 16 3 25 wireless2 9 2 10 2 13 2 14 2 15 3 14 setup certificates 3 17 network3 10 3 11 3 12 3 13 printer 3 5 3 6 3 7 WEP 3 16 wireles...

Page 111: ...mit rate 2 14 TTLS authentication 3 26 type authentication 3 15 3 26 U update firmware 3 24 V virtual display 3 20 W WEP 128 Bit 3 16 64 Bit 3 16 settings 3 16 3 25 wireless AP density 2 13 channel 2 15 mode 2 12 settings 2 9 3 14 signal strength 2 10 SSID 2 11 transmit rate 2 14 wireless commands 4 9 WPA encryption mode 3 15 3 25 WPA2 encryption mode 3 15 3 25 ...

Page 112: ...iv MonarchNet2 Operating Instructions ...

Page 113: ......

Page 114: ......

Reviews: