background image

PAGE 4

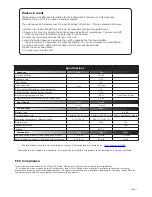
The current specification for compatible PC hardware, network and operating systems is available on our 

website at the following link: 

http://paxton.info/720

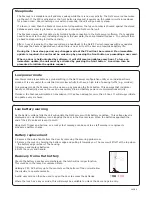
Net2 has NO PaxLock detection function. 

It is recognised that there could be security issues if the 

wireless units were detectable from outside the site. During installation, a PaxLock unit binds to a Net2Air 

bridge which will then only talk to registered units.

Devices cannot be added to the system if commissioning mode is disabled.

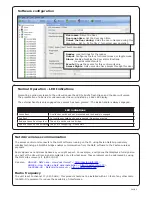
An entry is then made on the Doors screen and a special icon is used to denote the wireless connection.

A PaxLock must bind to a Net2Air bridge before it will enrol itself onto the Net2 system. The term 'bind' is 

used to denote the fixed relationship between a wireless unit and its bridge.

1. Create a user record in the database and assign a Net2 token to the user. (This record can be deleted after

    the installation is complete.)

2. You must now wake up the PaxLock by using the front push button.

3. Present the user token to the PaxLock.

4. The Red and Green LED's will flash alternately while the unit configures.

The PaxLock transmits the number and waits for a response from Net2. If more than one bridge replies, the 

unit checks the signal strength and selects the strongest bridge to communicate with.  The Net2 software 

confirms that the token number is in the database and registers the PaxLock/bridge binding.  The LED's will 

go out when the process has finished.

The software must be in commissioning mode which is the default setting. If this has been turned off it must 

be enabled in the Server Configuration Utility.

Enrolling a PaxLock

The Net2 software should be loaded on the controlling PC with at least one Net2Air bridge installed.

Full documentation is supplied with the Net2Air bridge unit and also from the website as follows:

X

AN1051 - Installing Net2 software <


http://paxton.info/1520

 >

X

Ins-40084-US  Net2Air USB  bridge <


http://paxton.info/1453

 >

X

Ins-40085-US  Net2Air Ethernet bridge <


http://paxton.info/1192

 >

Software installation

Download the latest version of Net2 software at: 

http://paxton.info/1438

 before commissioning this product. 

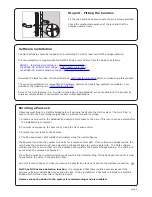
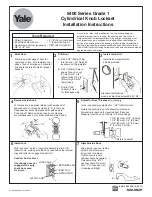
Step 10 - Fitting the handles

Fit the two handles and secure with the grub screws provided.

Check the mechanical operation of the lock and that the 

handles operate freely.

Some of the Net2 features (e.g. Fire alarm integration, Anti-passback) are not available on this product as 

wireless communication is not suitable for data critical applications.

Summary of Contents for Net2 PaxLock

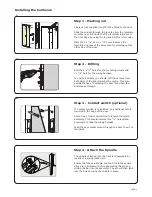
Page 1: ... com Net2Air Site Surveyor 690 200 US This access control unit uses wireless communication It is recommended that a Net2Air site surveyor is used to determine the best position for the bridge and control units This wireless unit requires a Net2Air bridge to communicate with the server PC Paxton 1 2 3 4 5 6 7 8 9 AA AA 1 Front Lock Assembly 2 Rear Lock Assembly 3 Door Handle x 2 4 Mounting screw 1 ...

Page 2: ...of damaging the door face when the drill breaks through Step 3 Contact switch optional If a contact switch is to be fitted an additional hole is required in the edge of the door Drill a hole of the required size to receive the switch assembly This should intersect the 5 8 hole drilled previously to take the wiring harness Feed the door contact wires through the door to exit on the inside Ø 16 37 1...

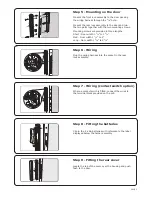
Page 3: ... into the socket in the rear lock assembly Locate the top of the cover over the housing and push flush to the door Clip in the 4 x AA batteries with reference to the label displayed below the holder assembly Step 8 Fitting the batteries Where a contact swich is fitted connect the wires to the terminal block provided on the pcb Step 7 Wiring contact switch option Mounting screws are provided in thr...

Page 4: ...r and waits for a response from Net2 If more than one bridge replies the unit checks the signal strength and selects the strongest bridge to communicate with The Net2 software confirms that the token number is in the database and registers the PaxLock bridge binding The LED s will go out when the process has finished The software must be in commissioning mode which is the default setting If this h...

Page 5: ... handle is engaged An invalid user card has been presented No access granted LED indications Green flash The unit is configuring Please wait The access control unit connects to the Net2 software running on the PC using Paxton Net2Air proprietary wireless technology A Net2Air bridge enables communication from the Net2 software to the Paxton wireless products Radio signals do not always behave as yo...

Page 6: ... to the Net2 PC which responds with any updates This keeps the PaxLock updated even when there is no activity at the door and maximises battery life Sleep mode As the battery voltage falls the unit will update the Net2 server with its battery condition This voltage level is displayed as a colored battery icon alongside the door in the Doors screen When the batteries approach the end of their life ...

Page 7: ...Dimensions Features External use Min Width Height Max Depth Min Max Access Levels Time Zones Door open time ACU s per Net2Air bridge Recommended Events stored in ACU with no server connection Number of Cards Specifications Yes Net2Air bridge data lines per system Net2Air wireless range to ACU The declaration of conformity is available on request Contact details are provided at http paxton info 596...

Reviews: