background image


7


9. Open external manual gas valve. (See Fig. 15.)

10. Set the room thermostat to a temperature slightly above room temperature. (See Fig. 16.) This will automatically signal the

furnace to start. 


14

15

16


11. When the furnace receives the start signal, the hot surface igniter at the main burners is automatically heated for 15 to 20 sec. When

the microprocessor control veri

fi

es that there is suf

fi

cient heat to ignite, the gas valve permits gas to 

fl

ow to the main burners. After

ignition and a time delay of approximately 60 sec, the furnace blower starts.


NOTE:


 If the burners fail to ignite after 4 attempts, the furnace control system will lock out. If  lockout occurs, the main burners fail

to light, or blower does not come on, shut down the furnace and call your dealer for service.

 12. Set your thermostat to the temperature that satis

fi

es your comfort requirements.

SUGGESTION: Setting the thermostat back a few degrees and compensating for the difference with warmer clothing can
make a big difference in your fuel consumption. The few degrees at the top of your thermostat “comfort level” are the most
costly degrees to obtain.

When room temperature drops below the temperature selected on the thermostat, the furnace will be switched on automatically.
When  room temperature reaches the temperature selected on the thermostat, the furnace will be switched off automatically.

Some thermostats have a FAN mode with 2 selections, AUTO and ON. When thermostat is set to AUTO, the furnace blower
cycles on and off. In ON mode, the furnace blower runs continuously. Continuous fan keeps the temperature level in your
home more evenly balanced. It also permits the indoor air to be continuously 

fi

ltered.


SHUTTING DOWN YOUR FURNACE


Should you need to shut down your furnace for service or maintenance, you will need to turn the furnace off.


17

18

19


The following procedures must be followed:
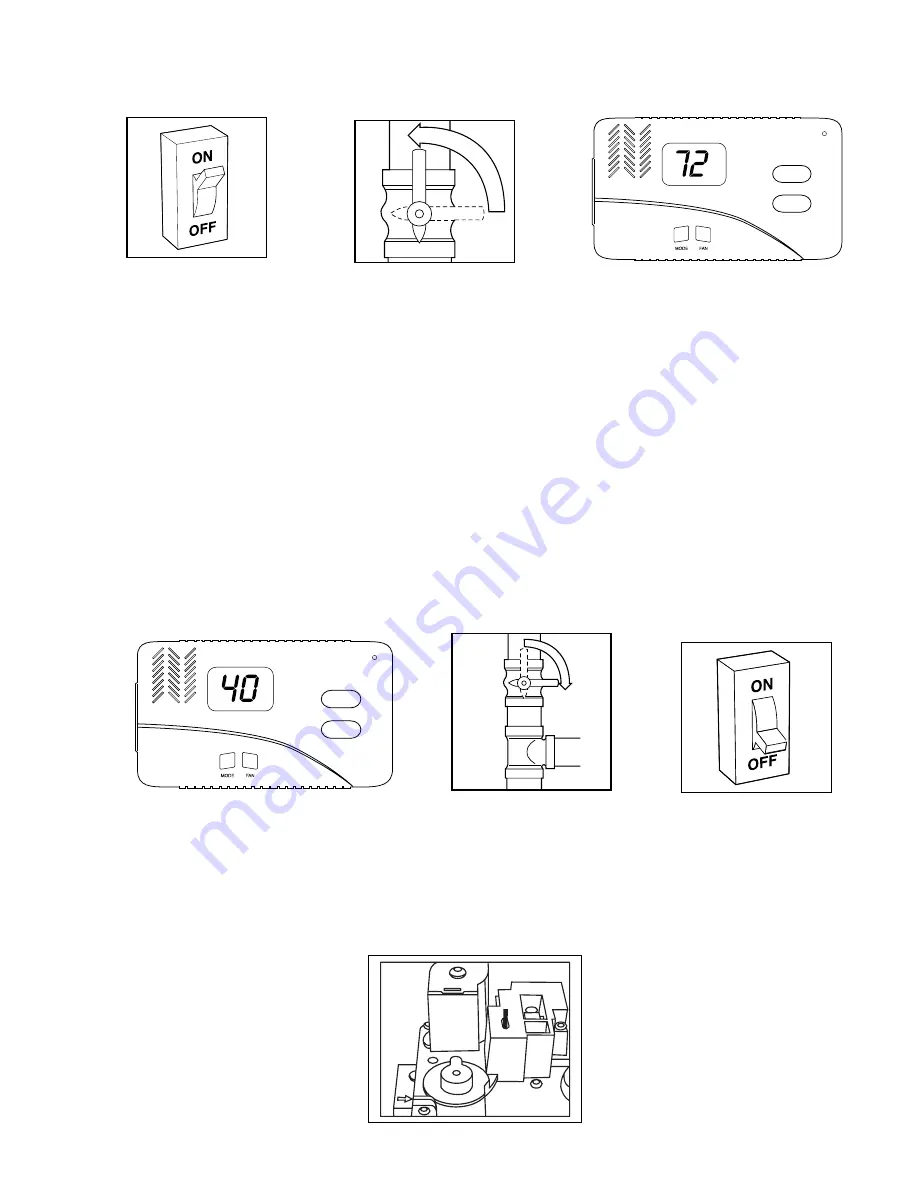
1. Set your room thermostat to the lowest temperature setting. (See Fig. 17.)
2. Close the external manual gas valve. (See Fig. 18.)
3. Turn off electrical supply to the furnace. (See Fig. 19.)
4.


Remove main furnace door. (See Fig. 10.)


5. Turn control switch on the gas control to OFF position. (See Fig. 20.)


20

OP

E

N

<

<

<

<

CL

O

S

E

ON

O

F

F

M

P


C


1

3

2

Summary of Contents for OG-PG9M-07

Page 1: ...NOXIDE POISONING HAZARD Carbon Monoxide is invisible odorless and toxic Payne Heating Cooling Systems rec ommends a carbon monoxide alarm in your home even if you do not own a gas appliance Locate the carbon monoxide alarm in the liv ing area of your home and away from gas ap pliances and doorways to attached garages Follow the alarm manufacturer s instruction included with the alarm WARNING FIRE ...

Page 2: ...n of this furnace With only minimal care your new furnace will deliver many years of money saving home comfort and enjoyment Spend just a few minutes with this manual to learn the operation of your new furnace and the small amount of maintenance it takes to help keep it operating at peak efficiency year after year The output capacity and any representations of efficiency for this furnace are based...

Page 3: ...irements Furnace control board Blower access panel safety interlock switch Transformer 24v behind furnace control board provides low voltage power to furnace control board and thermostat 15 16 17 18 19 12 11 6 8 10 9 7 6 4 5 1 2 13 14 18 3 15 16 17 19 SAFETY CONSIDERATIONS Installing and servicing of heating equipment can be hazardous due to gas and electrical components Only trained and qualified...

Page 4: ...fresh air to the unit In addition to the safety rules above make sure that the following combustion air requirements are met for non direct vent applica tions Combustion air must be clean and uncontaminated with chlorine or fluorine These compounds are present in many products around the home such as water softener salts laundry bleaches detergents adhesives paints varnishes paint strippers waxes ...

Page 5: ...ace Follow these important safeguards 6 Never attempt to light the burners manually with a match or other source of flame Read and follow the operating instructions on the inside of main furnace door especially the item that reads as follows Wait 5 minutes to clear out any gas Then smell for gas including near the floor If you smell gas STOP Follow B in the safety information above on this furnace...

Page 6: ...rol to the OFF position and wait 5 minutes See Fig 11 Then smell for gas including near the floor If you smell gas STOP Follow operating instructions on main furnace door 10 11 6 After waiting 5 minutes turn control switch on the gas control to the ON position See Fig 12 7 Replace main furnace door See Fig 13 12 13 8 Turn ON electrical supply to the furnace and wait 1 minute See Fig 14 WARNING FIR...

Page 7: ...in your fuel consumption The few degrees at the top of your thermostat comfort level are the most costly degrees to obtain When room temperature drops below the temperature selected on the thermostat the furnace will be switched on automatically When room temperature reaches the temperature selected on the thermostat the furnace will be switched off automatically Some thermostats have a FAN mode w...

Page 8: ...h factory specified disposable media filter check or replace filter before each heating and cooling season Replace disposable media filter at least once a year The air filter is normally located in the blower compartment See Fig 1 If the air filter has been installed in another location contact your dealer for instructions To inspect clean and or replace the air filter s follow these steps 1 Turn ...

Page 9: ... filter If torn replace it NOTE If washable filter that was shipped with the furnace has been replaced with an electronic air cleaner EAC refer to the EAC Owner s Manual for maintenance information 6 If washable filter wash filter if dirty in a sink bathtub or outside with a garden hose Always use cold tap water A mild liquid detergent may be used if necessary Spray water through filter in the opp...

Page 10: ...lows 1 Turn off gas and electrical supplies to the furnace and remove the main furnace door See Fig 8 and 9 2 Remove burner enclosure front See Fig 31 or 32 Inspect the gas burners igniter area and remainder of furnace for dirt soot rust or scale FURNACE CASING WIDTH IN FILTER SIZE IN FILTER TYPE 17 1 2 1 16 x 25 x 1 Cleanable 21 1 20 x 25 x 1 Cleanable 24 1 2 1 24 x 25 x 1 Cleanable WARNING PERSO...

Page 11: ...ower unless winterized Follow these procedures to winterize your furnace 1 Obtain propylene glycol RV swimming pool antifreeze or equivalent 2 Turn off electrical supply to your furnace See Fig 21 3 Remove main furnace door See Fig 22 4 Remove upper inducer housing drain connection cap See Fig 34 5 Connect field supplied 1 2 in ID tube to upper inducer housing drain connection 6 Insert field suppl...

Page 12: ...nnection s at the furnace to ensure it is physically sound sealed to the furnace casing and terminates outside the space containing the furnace Inspect electrical wiring connections and components for loose connections Perform an operational checkout to determine whether your furnace is working properly and if it requires adjustments Inspect all condensate drain tubes and condensate trap assembly ...

Page 13: ...g the button on the switch If it trips again shut down the furnace and call for service See Shutting Down Your Furnace section in this manual Check for obstructions around the vent termination If your furnace still fails to operate call your service representative For your convenience record the furnace product and serial numbers on back page Should you ever require service you will have ready acc...

Page 14: ...14 ...

Page 15: ...15 ...

Page 16: ...16 Cancels OG PG9M 07 2005 Payne Heating Cooling P O Box 70 Indianapolis IN 46206 Printed in U S A Catalog No OG PG9MAB 01 8 05 ...

Reviews: